![]()
This is going to be an awesome project covering several really important Swift and SwiftUI techniques – the kind of things you’ll use in almost every app you build going forward, and certainly the kind of thing many companies look for when evaluating portfolios of potential job candidates.
In this project you’re going to build Fast Track: an app that searches Apple’s iTunes API, displays album covers, and lets users listen to previews of each track. Along the way you’re going to learn how to make network requests, how to handle loading data from JSON, how to create grids of content, how to break up complex SwiftUI views, and more – it’s really packed!
All set? Create a new App project called FastTrack – let’s go!
We’ve used SwiftUI’s List view several times so far, and I hope you’ll agree that it’s excellent at showing simple tables of data. On iPhones lists get used a lot because horizontal space is limited, but on macOS we generally prefer lists to be used only in the sidebar – in the main window space there is a lot more room available, so they are less common.
In this project we’re going to display lots of song artwork so the user can select one to listen to a preview, and the best way of doing this is using a grid – rows and columns of views, rather than just the simple rows that lists provide.
In SwiftUI grids are provided through one of two views: LazyVGrid and LazyHGrid, depending on whether you want your views to be laid out vertically or horizontally. Yes, I know that grids are both horizontal and vertical, but in practice you don’t want to specify them like that – you want to say something like “I want my columns to be 100 points wide”, and have your items take up as many rows as it takes based on available space in the window.
Let’s try it now. SwiftUI has a GridItem struct that describes how one column in a grid should be sized, so we’re going to start by adding a new property to ContentView that asks for our grid to have three columns each exactly 100 points wide. Add this now:
let gridItems: [GridItem] = [
    GridItem(.fixed(100)),
    GridItem(.fixed(100)),
    GridItem(.fixed(100))
]
Now we can place that inside our view’s body property like this:
LazyVGrid(columns: gridItems) {
    ForEach(1..<100) { i in
        Color.red
    }
}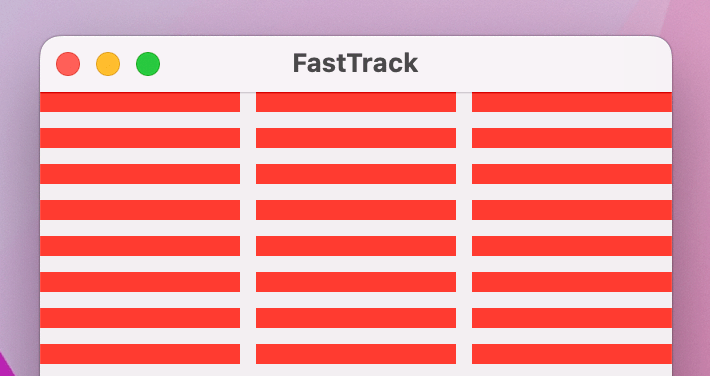
So, that’s a vertical grid using our three-column structure, and inside that are 99 rows containing the color red – nothing more. When you run that project you’ll notice a few things:
So, SwiftUI attempts to make our fairly vague layout work, and I think it does a good job. To make it better, we need to provide a little flexibility – do we want all 99 items to be visible at all times, or are we happy for them to scroll?
Given the wide variety of screen sizes available on macOS, using scrolling is usually a good idea. So, we can ask SwiftUI to make our grid scroll by placing a ScrollView around it, like this:
ScrollView {
    LazyVGrid(columns: gridItems) {
        ForEach(1..<100) { i in
            Color.red
        }
    }
}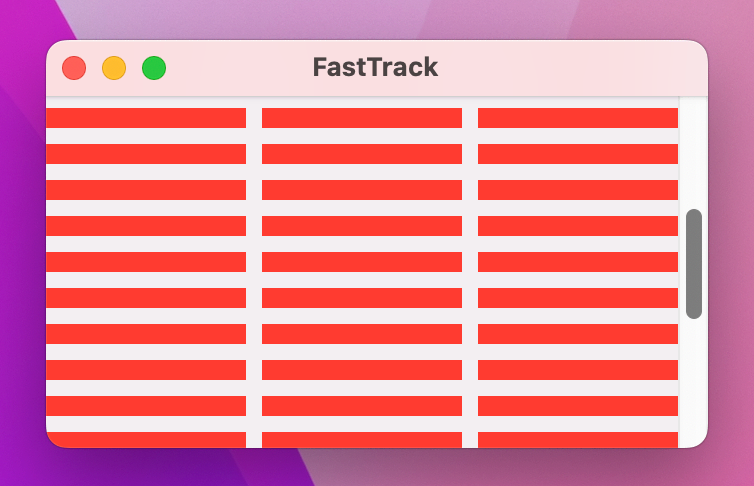
That will immediately improve our layout, because you’ll find you can now make the window smaller than the vertical space for the grid, and when you do you’ll be able to scroll around its contents. ScrollView does have two extra options you’ll want to use from time to time: the ability to control its direction, and whether to show or hide scroll indicators.
For example, we could make a horizontal scroll view with a horizontal grid inside, like this:
ScrollView(.horizontal, showsIndicators: false) {
    LazyHGrid(rows: gridItems) {
        ForEach(1..<100) { i in
            Color.red
        }
    }
}
Anyway, although fixed grid layouts are sometimes what you want, SwiftUI provides two alternatives that are generally far more useful: flexible grid items that have minimum and maximum sizes, and adaptive grid items that fill their space with more columns automatically. So, with flexible grid items you still get to specify how many rows or columns you want, but with adaptive grid items SwiftUI will fill them in automatically based on the available space.
To demonstrate this, I want to build a bit more of our user interface: a search box plus button to trigger searching, with an adaptive grid of results below. This means adding a new property to track the current search text, but we’re also going to use an adaptive grid layout so our grid can have any number of columns based on the available screen space.
Change your existing property to these:
let gridItems: [GridItem] = [
    GridItem(.adaptive(minimum: 150, maximum: 200)),
]

@AppStorage("searchText") var searchText = ""
Tip: We’re using @AppStorage again so that our search text is remembered between app runs.
Now in our view body we’re going to place the search area above our scroll view, similarly to how we placed the search area and map view in project 5:
VStack {
    HStack {
        TextField("Search for a song", text: $searchText)
        Button("Search") {
            // action code here
        }
    }

    ScrollView {
        LazyVGrid(columns: gridItems) {
            ForEach(1..<100) { i in
                Color.red
            }
        }
    }
}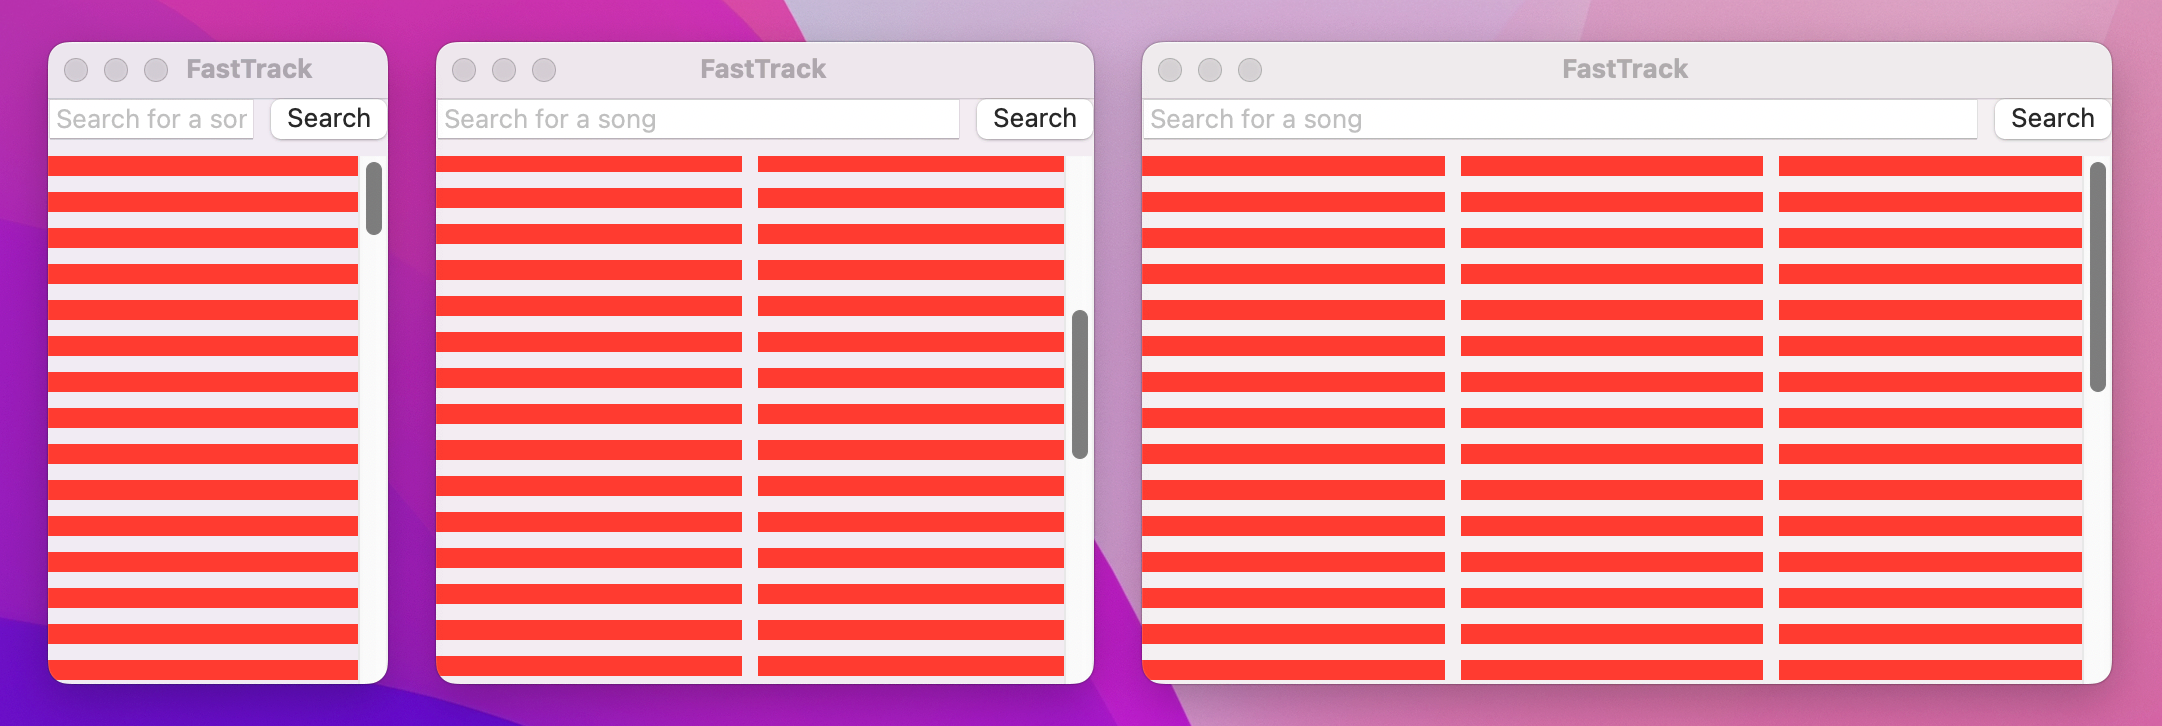
When you run the app now you’ll see why adaptive grid items are so useful: as you resize the window you’ll find the red rectangles gently expand until they reach their maximum size of 200, at which point SwiftUI shrinks them all so it can squeeze another column in.
None of this automatic sizing behavior stops us from providing fixed frames to the cells inside our grid – SwiftUI will just redistribute the available screen space as padding between items. So, for example we could say our red boxes should be exactly 150x150 in size, like this:
Color.red
    .frame(width: 150, height: 150)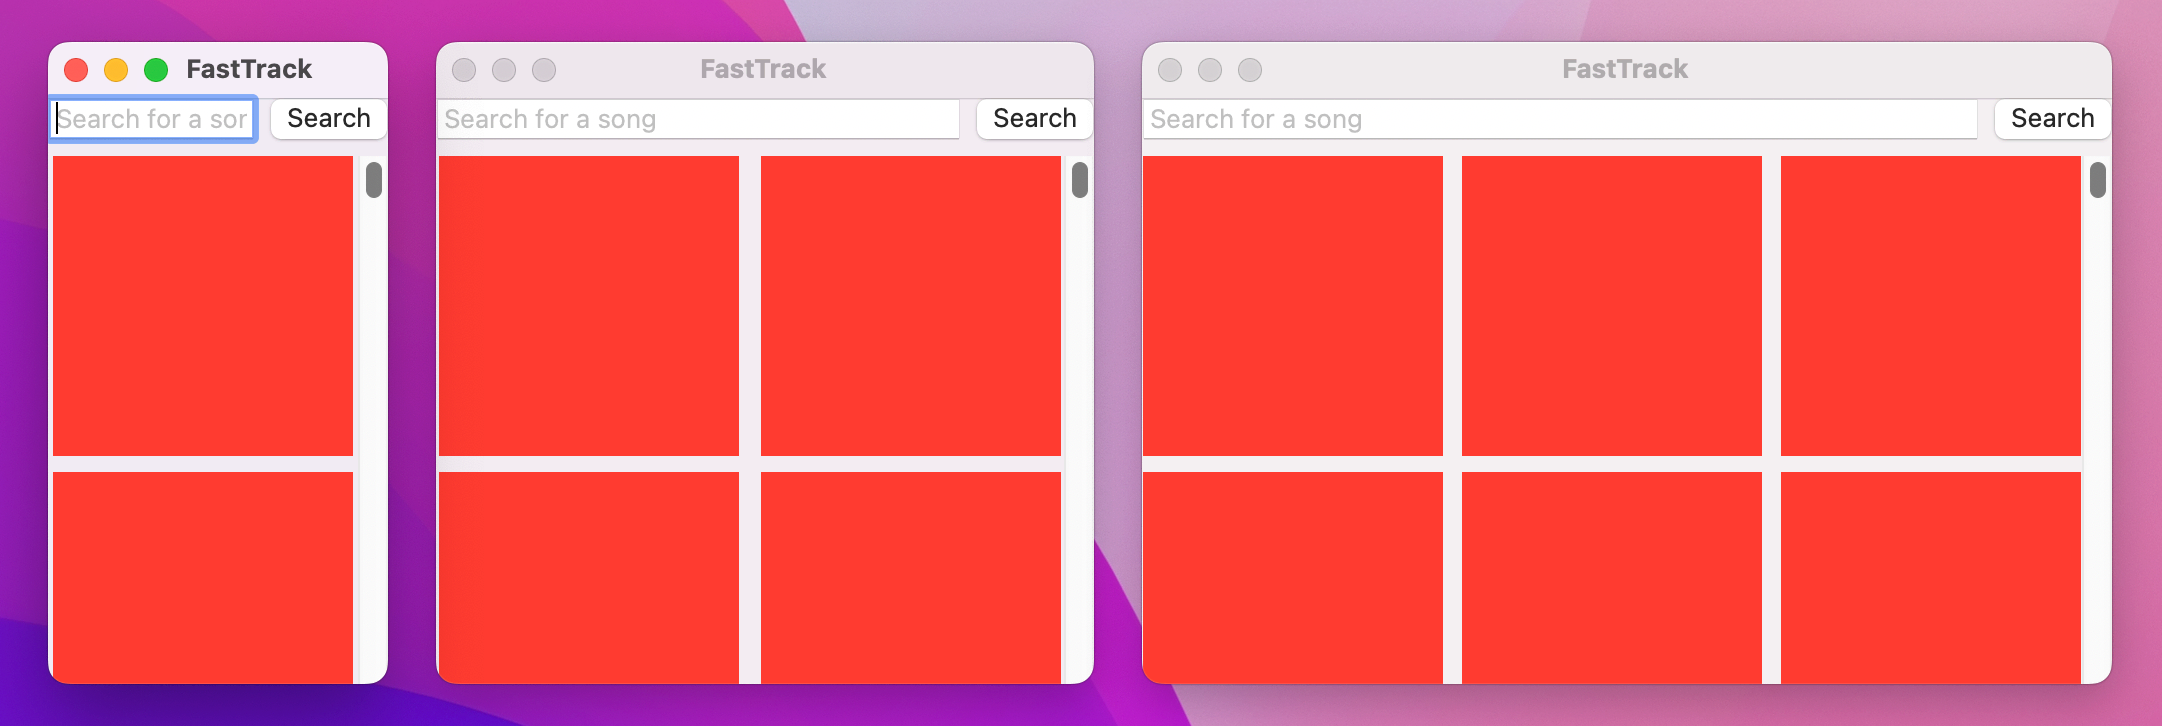
Now you’ll see the spacing adjustments kick in – SwiftUI just takes care of most of the work for us.
This final layout of adaptive columns and fixed-size cells is exactly what we need for this project, so we’re done with grids for now.
One of the most important skills for any developer is the ability to fetch data from the internet and use it in their code. In fact, this happens to be the most common of all job interview tests in our market: “build an app that fetches this data from our server, and displays it somehow.”
As you’ll see, Swift makes this task remarkably easy in terms of the code we’ll end up writing, which is lucky given that the whole app is about finding and listening to songs using Apple’s iTunes API! However, even though the code is straightforward there is still a lot of new knowledge you’ll need, so buckle up!
The process starts with defining the data we want to work with – what do we expect to receive from our server? To find that out, we need to make a request to the iTunes API ourselves, so enter this URL into Safari: https://itunes.apple.com/search?term=nirvana&limit=100&entity=song
That should download a file called something like 1.txt, but this file contains JSON – JavaScript Object Notation. Despite its name, JSON is not restricted just to JavaScript, but is instead the most common way of sending data between internet services.
JSON has a very particular format, but if you open the file that got downloaded you’ll see it’s rather hard to read because Apple’s API compresses it all to make the download smaller. To see what’s actually happening, I recommend you select all the text and paste it into a JSON formatter such as this one: https://jsonformatter.curiousconcept.com – that will reformat the JSON into multiple lines, so it’s easier to read.
You’ll see a lot of text, looking a bit like this:
{
   "resultCount":100,
   "results":[
     {
         "kind":"song",
         "artistId":112018,
         "collectionId":1413920644,
         "trackId":1413921155,
         "artistName":"Nirvana",
         "trackName":"Smells Like Teen Spirit",
         "artistViewUrl":"https://music.apple.com/us/artist/nirvana/112018?uo=4",
         "previewUrl":"https://audio-ssl.itunes.apple.com/itunes-assets/AudioPreview125/v4/44/8d/b2/448db2c4-5185-9eb5-66c2-d1e7182687ad/mzaf_14615718485326206820.plus.aac.p.m4a",
         "artworkUrl100":"https://is3-ssl.mzstatic.com/image/thumb/Music125/v4/8d/58/a9/8d58a928-0663-71f7-4e5c-d2bd54a124fb/source/100x100bb.jpg",
         "trackPrice":1.29,
         "releaseDate":"1991-09-10T12:00:00Z"
      },
I’ve edited that to focus on a few important parts:
{ and ended using }. Inside there, key are strings written in quotes, followed by a colon, followed the value.There’s a lot more in there, and perhaps later on you could expand the app to add more of these details in there.
Anyway, for now we’re going to cherrypick a few things to power our app, and place them into a new struct: the track’s ID number, the artist and track name, the URL to the preview audio, and the URL to the artwork. Mostly this is straightforward, but there are two special things I want to point out:
URL. I know that URLs are really just strings, but the URL type adds extra features like being able to read just the host name or differentiate between local file URLs and remote internet URLs.URL type for the audio preview, but not for the artwork URL. Apple provides the artwork at several sizes, but even the largest is just 100x100. So, we’re going to store it as a string then do a little hackery to fetch a larger version.Start by making a new Swift file called Track.swift, and give it this code:
struct Track {
    let trackId: Int
    let artistName: String
    let trackName: String
    let previewUrl: URL
    let artworkUrl100: String
}
It’s critically important that you get that code correct: each of those property names must be typed exactly as their names appear in the JSON, and each of their types – Int, String, and URL – must also match the data in the JSON.
Important: If you make even a small letter case mistake, you’ll hit problems. So, check that you’ve written artworkUrl100 and not artworkURL100 for example.
We’re not done with the struct just yet, and in fact I want to make three changes.
First, I want to make it conform to Identifiable, so SwiftUI knows how to identify each one of these uniquely. Change its definition to this:
struct Track: Identifiable {That will throw up an error, because conforming to Identifiable means having a property called id that is unique. We don’t actually have one here, and while we could add a random UUID like we did previously there’s a better solution: we could use the trackId property we already have.
We can’t rename trackId because that would mean our struct has properties with different names from the struct, but we can create a computed property called id that simply returns trackId. So, add this now:
var id: Int { trackId }The second change I want to make is the “hackery” I mentioned earlier – Apple’s largest artwork size is 100x100, but if we do a little string replacement we can request a 300x300 instead, which is perfect for our needs. If you recall, our grid cells are capped at 150x150 in size, so once you count in Apple’s retina displays that equates to 300x300 pixels.
So, add this computed property to Track:
var artworkURL: URL? {
    let replacedString = artworkUrl100.replacingOccurrences(of: "100x100", with: "300x300")
    return URL(string: replacedString)
}
As you can see, that replaces the string “100x100” with “300x300”, before converting that into a new URL. Creating a URL from a string returns an optional URL because not all strings are valid URLs.
The last change I want to make is to add a new protocol to our struct, called Decodable. This protocol is responsible for decoding JSON into Swift data – the process of matching up all the JSON dictionaries and arrays into equivalent Swift structures. So, change your struct to this:
struct Track: Identifiable, Decodable {Remarkably, that’s all it takes to tell Swift we want to load this data from JSON. This is possible because all the types we’re using in our struct – Int, String, and URL – already conform to Decodable, so Swift is able to make the whole thing conform to Decodable.
We won’t be using it here, but alongside Decodable is another protocol called Encodable that does the opposite: it converts Swift structs into JSON and other formats. If you ever want both – a struct that can be converted both from and to JSON – you can combine them both with the Codable typealias.
Anyway, by adding that Decodable conformance, Swift will automatically create for us all the code required to create instances of Track from JSON, but here we need something more. You see, Apple’s JSON doesn’t just send back an array of tracks, but if you remember it sends back a top-level object containing that array alongside how many results it contains. It’s this bit:
{
   "resultCount":100,
   "results":[
     {
         "kind":"song",
         "artistId":112018,
We just created a Track struct with properties for the song information we care about, but we also need to create a struct for that outer object too. We don’t care how many results come back, but we do need to tell Swift to expect a “results” array containing all our tracks.
So, add this second struct to Track.swift:
struct SearchResult: Decodable {
    let results: [Track]
}
As you can see, that has another Decodable conformance so we can load it from JSON, and because it’s only property also conforms to Decodable then we don’t need to do any more work – Swift will automatically generate the required code for us.
Now, we’ve designed our data models, and Swift will generate all the decoding functionality for us. What we haven’t done yet is actually download any data and convert it into a SearchResult instance. Doing this takes only a small amount of code, but a lot of knowledge, so I want to work through it step by step.
First, we’re going to create a new ContentView method that performs our search. This will fetch the iTunes API URL with the user’s search text, download the data, convert it into a SearchResult object, then store its results array somewhere.
The method will be called performSearch(), and we’re going to mark it with the throws keyword because fetching data from the internet will fail if either the user or server are offline. However, this method is going to look a little different from the other methods we’ve written so far – add this stub to ContentView now:
func performSearch() async throws {
}
Did you spot the difference? That async keyword is just five letters long, but it carries a huge amount of weight.
To understand what this does, I want to introduce you to one important concept called the main actor. To avoid causing graphical corruption or destroying user data by accident, all our user interface work is through a single piece of code called the main actor – all the UI creation, all the image loading, all the button actions, and so on all take place on that main actor, and because it can only do one thing at a time it means we can’t accidentally have two pieces of code fighting over the same piece of data.
A lot of the time this is exactly the behavior you want, because it’s guaranteed to be safe. However, if you’re the lucky owner of a 20-core Mac Studio you’ll be less than happy that only 1 of those CPU cores is being used while the other 19 sit idle. That alone sounds bad, because you’re ignoring a huge amount of performance, but much more serious is what happens when you want to do any long-running work: if you want to perform some intensive calculation that takes a few seconds to complete, and you do so using the main actor, your user interface will completely freeze up during that time – it will simply ignore all user input until your work finishes.
Obviously this is a terrible user experience, but Swift has a beautiful solution: we can mark some functions with the async keyword to make them asynchronous – to tell Swift it can run them at the same time as other functions. Behind the scenes Swift grants the function the ability to pause itself while some other work completes, which means long-running pieces of work won’t waste so much CPU time.
So, the async keyword is our way of telling Swift “give this function the ability to sleep while some other work completes.” That doesn’t mean it has to go to sleep, only that it might. And here’s why it matters: although fetching data from the internet might take just a second or two to complete, that adds up to maybe 40 or 50 billion things your Mac could be doing instead. And so, networking calls are also asynchronous: Swift is able to start the request, then put the function to sleep until the response comes back.
We’re going to be looking more at the main actor in project 13, but for now let’s get back to the code so you can see all this in action. The first part of this method will create an iTunes API URL from the user’s search text, exiting immediately if somehow the user typed something invalid.
Add this to the method now:
guard let url = URL(string: "https://itunes.apple.com/search?term=\(searchText)&limit=100&entity=song") else { return }The second part of this method is going to fetch the data from that URL. This uses a new class called URLSession, which is responsible for managing all networking for us. macOS actually creates a shared instance of this class that comes preconfigured with sensible default settings, so we can just pass it the URL to fetch and wait for the reply.
Like I said, networking is also asynchronous in Swift, but now rather than creating an async function we want to call one. This means our code might go to sleep – if the data was fetched previously it will be cached and returned immediately, but otherwise the request will be started and the function will take a nap until the data comes back.
This has a very important side effect: because this function might sleep for a while and let other code run at the same time, it’s very possible the state of your program when it wakes up will be different from the state of your program when it went to sleep. It’s a bit like taking a nap while your kids are playing in their bedroom – you might wake up an hour later and find nothing has changed, or find that they’ve decided to give the family dog a makeover.
In practice these changes shouldn’t be a surprise to you because ultimately the only other code that will be running in your program will belong to you, but Swift always wants to make sure you remember the possibility that the sleep might occur. So, when you call an asynchronous function you must mark it with the await keyword, to show that you’re explicitly acknowledging the sleep.
Add this line of code next:
let (data, _) = try await URLSession.shared.data(from: url)That’s just one line of Swift code, but it does so much it might hurt your brain at first.
data(from:) method on the shared URLSession.await.try as well.(data, _) to discard the response and store the contents in data.We aren’t explicitly catching any errors here, but that’s okay – if something goes wrong Swift will exit this method immediately, and let the error propagate upwards to whoever called performSearch() in the first place.
Once that line of code runs, we’ll either have the contents of the URL in our data constant, or the method will have exited because an error occurred.
If we’re still in the method it means we received something back and we can try converting it into our SearchResult object, which in turn will contain array of Track instances. This is done using another new type called JSONDecoder: if we create one and call its decode() method, we can tell Swift what type of data we expect to receive, and where it can find the source data. In our case we expect to receive SearchResult.self – we’re not creating an instance of SearchResult and passing it in, we’re referring to the struct itself.
Converting some data into a SearchResult object might fail – maybe it’s missing one of the properties we said would be there, maybe it’s the wrong kind of objects entirely, or perhaps the JSON is bad for some reason. So, we need to use try again here to mark that this code might throw errors.
Add this to the method after the previous lines:
let searchResult = try JSONDecoder().decode(SearchResult.self, from: data)Remember, if that throws any errors then Swift will exit the method immediately, and whoever called it will need to handle those errors. But if we’re still in the method it means:
SearchResult object.All that remains is copy the results property from that downloaded data into somewhere the rest of our app can use. If you remember, that results property is an array of Track instances, which means to stash it away somewhere we need to make a new property in ContentView of the same type.
So, add this new property to ContentView now:
@State private var tracks = [Track]()We can now add one last line of code to the performSearch() method to set tracks to a new value once the fetch and decode have finished:
tracks = searchResult.resultsThat completes all the code we need to download data from the iTunes API, convert it to a SearchResults object, then assign it to our tracks property. However, despite having written all that code, it doesn’t actually do anything yet. This is partly because we aren’t using the tracks property anywhere in our SwiftUI view hierarchy just yet, but also because we don’t actually call the performSearch() method anywhere – all that code to download and decode stuff never gets run!
Now, we have a text field and a button, so you might think we can use onSubmit() and the button’s action parameter to call performSearch(), like this:
TextField("Search for a song", text: $searchText)
    .onSubmit(performSearch)
Button("Search", action: performSearch)
However, that won’t work. You see, both those two parts of SwiftUI don’t understand how to work with asynchronous functions, which means they can’t call them directly. Instead we need to ask Swift to fire up a background task that will call the function and wait for it to finish. That task can handle any errors that crop up if it wants, but here we don’t really care because the request will just silently fail.
So, we’re going to create a second method that has just one job: to act as a bridge between SwiftUI and our asynchronous performSearch() method:
func startSearch() {
    Task {
        try await performSearch()
    }
}
That’s it – that’s all the code it takes to start a new background task, call performSearch(), wait for it to finish, then silently consume any errors that might occur.
This new method is not asynchronous, which means we can use it in our SwiftUI code like this:
TextField("Search for a song", text: $searchText)
    .onSubmit(startSearch)
Button("Search", action: startSearch)
At least now the search code will be started correctly, but we still haven’t placed it inside our SwiftUI view hierarchy anywhere. This is something we’ll come back to in more detail soon, but for now let’s just show each track’s name in a text view by changing our existing ForEach with this new one:
ForEach(tracks) { track in
    Text(track.trackName)
        .frame(width: 150, height: 150)
}
Now, surely, this ought to work, right?
Well, give it a try – run the app, type “Taylor, then press the Search button. If everything has gone to plan, nothing at all will happen. Yes, despite all that code and all that new Swift knowledge, we still have nothing to show.
To understand what’s wrong now, look in your Xcode debug console, where you should see the message “A server with the specified hostname could not be found.” Does that mean our app can’t find https://itunes.apple.com? Well, yes, and also no. Yes, it can’t find the server, but the real problem here is a subtle one: by default macOS apps aren’t allowed to make network requests!
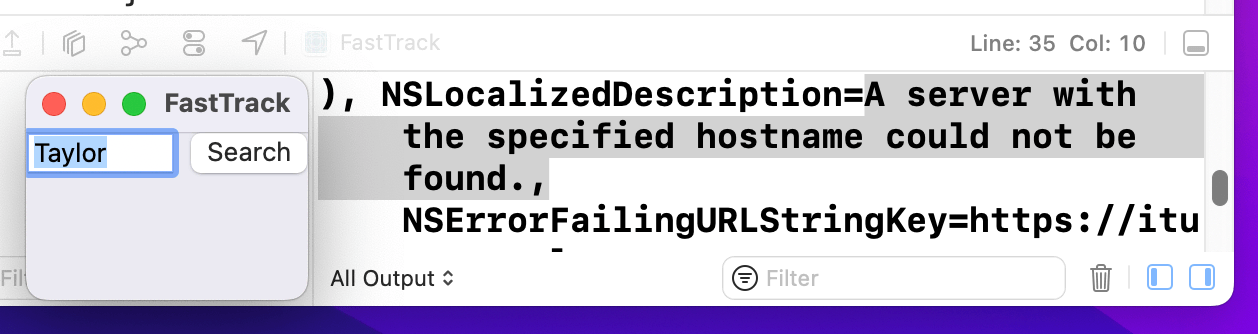
This is very different from iOS apps, where network requests just work out of the box. Fortunately, we can add outgoing network support to our app without writing any further code:
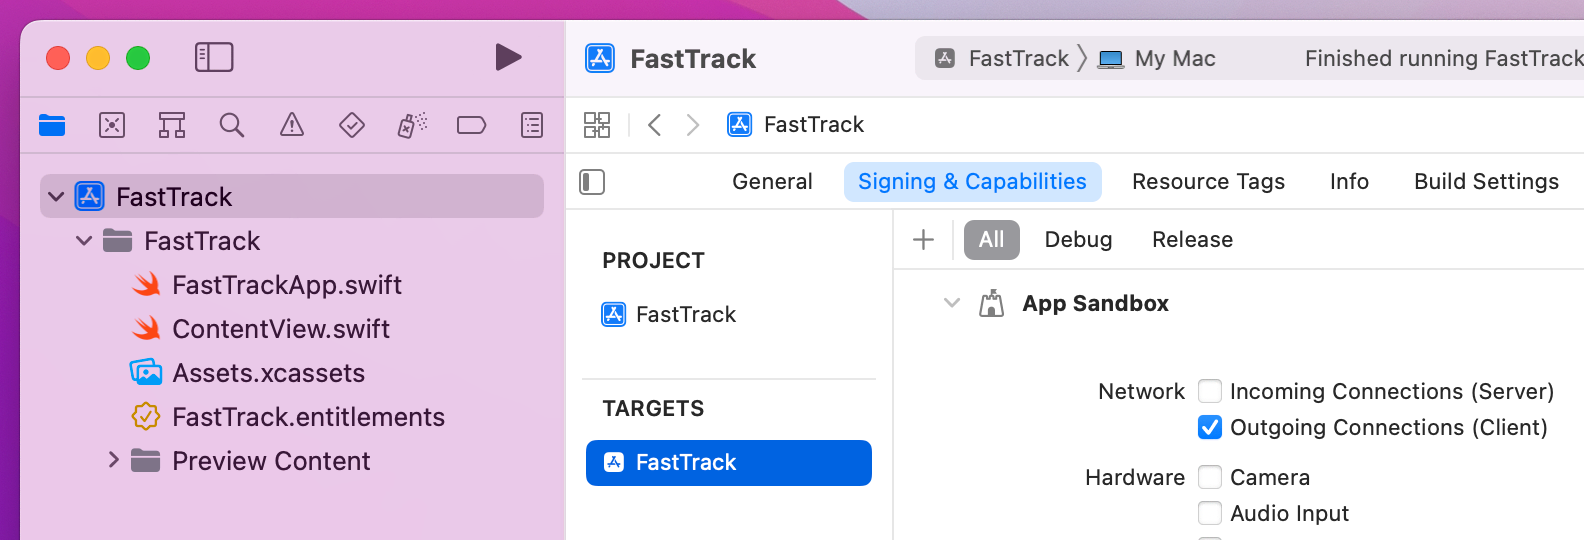
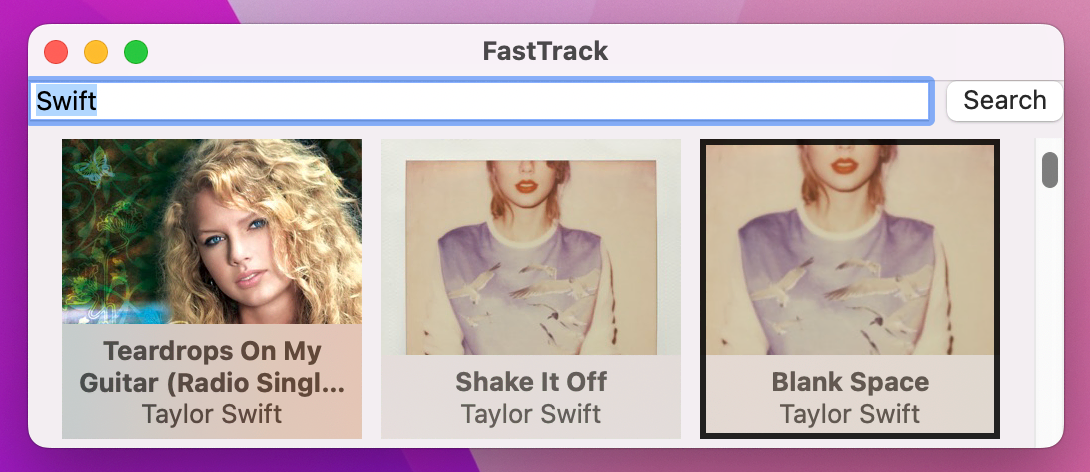
That’s it! Go ahead and run the app again, and try searching for “Taylor” to see a list of song names appear in our grid. It took a lot of explanation, but we have progress at last!
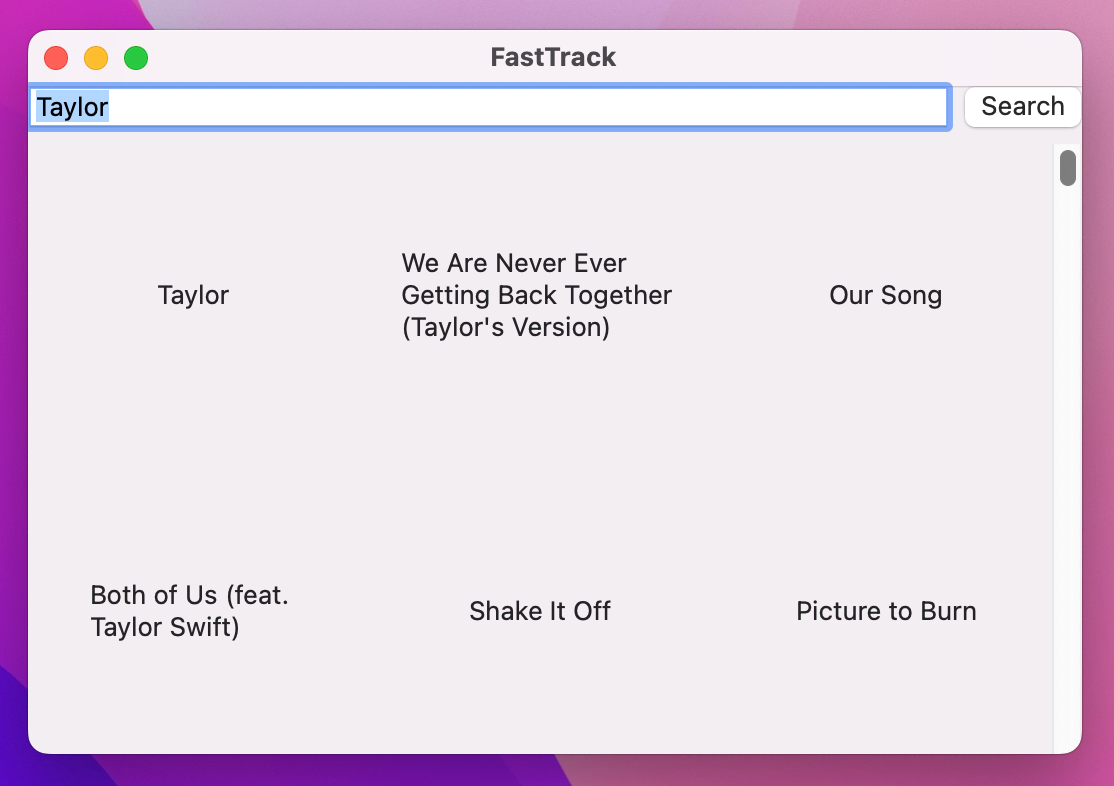
Tip: Clearly our current layout is far from done, but we’ll correct that next. More important is the fact that our current code doesn’t support spaces in the search, so stick to single-word searches for now. We’ll come back to this later!
To really bring this app to life we need to fill in our LazyVGrid with something far better than floating text views. We’ll build this up step by step, but the initial pass is going to be straightforward: we’ll load each song’s artwork into an image inside the grid.
Previously we’ve used SwiftUI’s Image view for drawing images, but we can’t use that here because it doesn’t understand how to load remote images. Instead, we need a specialized kind of view called AsyncImage that can not only load an image from a URL, but can also give us control over what happens while the image is loading or if loading fails.
Let’s start with the simplest option and work our way up: if we give AsyncImage a URL to an image we want to load, it will load it for us. This immediately gives us an improvement to our grid:
ForEach(tracks) { track in
    AsyncImage(url: track.artworkURL)
}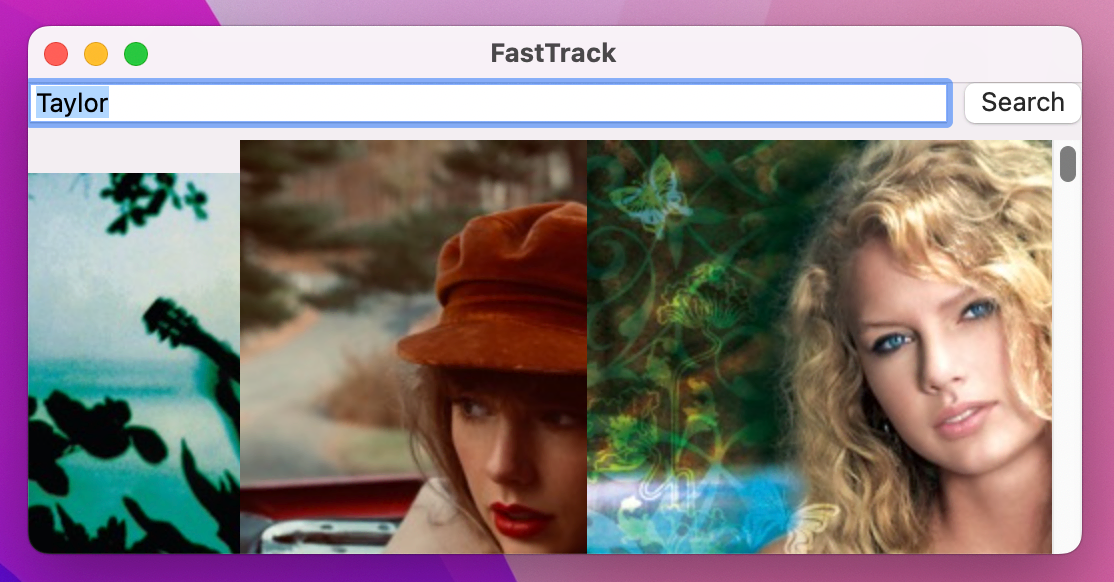
You’ll notice it’s a bit messy, mostly because the images overlap in all sorts of places, but it’s a start.
If you want a little more control, we can pass two more parameters to AsyncImage: one that will be given the finished, loaded image ready to render, and one that will be used to create a placeholder for while the image is loaded. The placeholder can be any kind of SwiftUI views you want, but here we’re going to use a simple one called ProgressView – used by itself this will show a little activity spinner.
Try this:
AsyncImage(url: track.artworkURL) { image in
    image.resizable()
} placeholder: {
    ProgressView()
}
.frame(width: 150, height: 150)
Sit and let that code sink in for a moment, because it’s a bit strange at first:
AsyncImage view that loads a URL.image coming in. This is actually a SwiftUI Image view, and it’s available here because this closure is only run when the image data has been downloaded.resizable() modifier attached.AsyncImage that is used as a placeholder, and by using ProgressView() we’ll get an activity spinner for every image until it loads.frame() modifier to the entire AsyncImage. This means the same 150x150 space is used for the progress view placeholder and the finished Image view, keeping our grid nice and square at all time.
When you run the code now you’ll see it’s really starting to come together – loading spinners appear briefly, before the final artwork snaps in when ready.
If you want even more power, there’s a more advanced form of AsyncImage that actually seems easier than this one at first because it takes only two parameters: the URL to load, and the loading phase – the current state of the image request. Your job is to read that phase and return an appropriate SwiftUI view, and this has the helpful advantage that it can handle sending back unique views when requests fail.
Replace your current AsyncImage code with this:
AsyncImage(url: track.artworkURL) { phase in
    switch phase {
    case .success(let image):
        image.resizable()
    case .failure(_):
        Image(systemName: "questionmark")
            .symbolVariant(.circle)
            .font(.largeTitle)
    default:
        ProgressView()
    }
}
.frame(width: 150, height: 150)
Let’s break that down, because there are some really important concepts in that code:
AsyncImage loading a URL.case .success(let image) we mean “if the image loading was successful, read the image,” then inside that case block we can use the image as before.failure case things are similar but different: we get handed the error that occurred, but we don’t actually need that so I’ve ignored it with _.symbolVariant() modifier lets us adjust the way it looks. Here we’re asking for the circle variant, which draws a circle around the question mark.default case we just send back an activity spinner.Now that we have an image that works well, we’re going to add something more on top of the track image: its name, and the name of the singer who created it. Overlapping views like this means using a ZStack again, and in this case I want to add a .bottom alignment to the stack so that the text aligns to the bottom edge of the track image.
So, let’s start by wrapping our current AsyncImage view in a bottom-aligned ZStack, like this:
ZStack(alignment: .bottom) {
    AsyncImage(url: track.artworkURL) { phase in
        switch phase {
        case .success(let image):
            image.resizable()
        case .failure(_):
            Image(systemName: "questionmark")
                .symbolVariant(.circle)
                .font(.largeTitle)
        default:
            ProgressView()
        }
    }
    .frame(width: 150, height: 150)

    // More code to come
}
In order to overlay the track and artist name over the track image, we need to add content after the track image – exactly where that // More code to come comment is. Remember, this new text needs to be able to stand out on any kind of background image, so we’re going to deploy a new SwiftUI modifier called foregroundStyle() in combination with a new background() variant.
Add this code in place of the // More code to come comment:
VStack {
    Text(track.trackName)
        .font(.headline)

    Text(track.artistName)
        .foregroundStyle(.secondary)
}
.padding(5)
.frame(width: 150)
.background(.regularMaterial)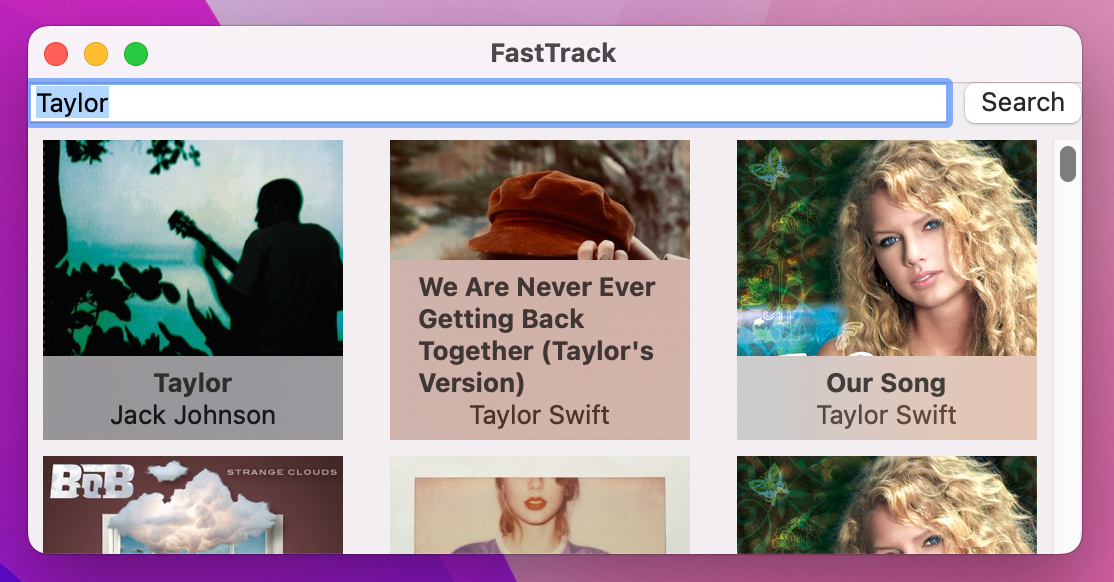
So, that creates a vertical stack of the track and artist name, adds a little padding, then gives it a fixed width so that it matches the image behind – that much is straight forward. More interesting are the last two modifiers:
.regularMaterial. This provides a frosted glass effect that lets a little of the image behind come through, albeit blurred so that it doesn’t attract too much attention. There are several of these to choose from, ranging from ultra thin to ultra thick.That finishes the basic design for our grid cells, but in the final version of the app we want to make sure that clicking one of the cells causes the related song to start playing. We could solve this with onTapGesture(), but it’s not ideal because users who rely on assistive tools such as VoiceOver won’t be told that our cells are actually buttons.
A much better idea is to make each cell a button, and rather than using a plain string as the button’s label we can in fact provide our whole ZStack as the button label.
Here’s how that looks in code:
Button {
    print("Play \(track.trackName)")
} label: {
    // all the existing ZStack code
}
In that code, the button’s action comes first, followed a second trailing closure to provide the label. That label can be any SwiftUI view you want, which in our case will be the ZStack with lots of things inside.
Before we write any more code, try running the app now and see what you think – chances are things now look completely broken! This is because macOS has a default design for buttons that provides a 3D shape used everywhere in the system, and SwiftUI tries to squeeze our whole cell view into that space.
We don’t want that default button style here, so we can ask for a different one instead – a borderless one, which will allow our cells to go back to their natural shape.
Add this modifier to the button, by which I mean after the final closing brace of the label:
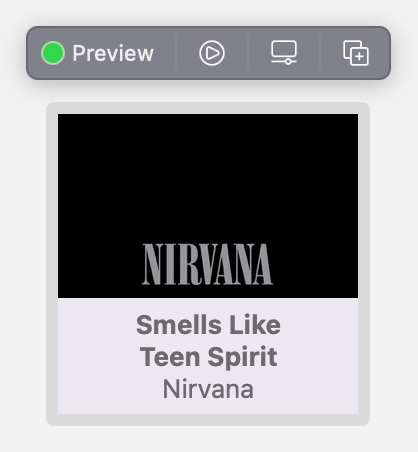
.buttonStyle(.borderless)![A grid of album covers, with a frosted glass rectangle along the bottom of each containing info text. Clicking a cover imperceptibly changes the text color, and prints “Play [album]” to the console.](../Assets/remote-images-and-custom-subviews-5.png)
And now you should not only see that our original design is back, but that clicking the cells makes the text change color subtly. Most important of all, clicking any cell will print its name in Xcode’s debug console.
Before we’re done, I want to tackle a problem in our code: almost all our SwiftUI body is taken up by handling individual cell layouts, which makes it hard to read. Rather than try to put everything inside one body property, it’s a much better idea to split up our SwiftUI views into smaller parts then reassemble them as needed to create the final result.
To do that, start by pressing Cmd+N to make a new SwiftUI view named TrackView. This will represent one cell in our grid, and the first question you need to ask is this: what does one cell in our grid need to know in order to work? Well, right now the answer to that is only one thing: which track it’s trying to show.
So, the first step in this new view is to add a property to store whichever track it’s being asked to show – add this to the TrackView struct:
let track: TrackThat will immediately cause a compiler error, because the preview provider struct for this view doesn’t pass in a track for its TrackView instance. We’ve left this alone until now because it never needed any special configuration, but now it matters: if you want the SwiftUI canvas to work for this view, we need to adjust the TrackView_Previews struct so that it creates a TrackView correctly.
If we were working with local data – a JSON file stored in our project – then we could load for a preview. We could perhaps download some example server JSON and put that into the project just for previewing purposes, but honestly here the easiest thing to do is just hard code some sample data that would work well in a preview. That means the track ID and preview URL don’t matter, but the artist name, track name, and artwork URL do matter because they will all be visible on the canvas.
So, adjust your preview code to this:
#Preview {
    TrackView(track: Track(trackId: 1, artistName: "Nirvana", trackName: "Smells Like Teen Spirit", previewUrl: URL(string: "abc")!, artworkUrl100: "https://bit.ly/teen-spirit"))
}
That artwork URL is obviously different from the regular ones, to make typing or copy/pasting easier, but I’ve adjusted it by hand from 100x100 to 300x300.
With the preview provider fixed our code is back to working again, although all you’ll see is the default “Hello, World!” code given to our view. This is where the magic comes in: we can go back to ContentView and cut all the code inside our ForEach to the clipboard – that’s the entire Button, including its buttonStyle() modifier. Now go back to TrackView and paste it in place of the default text view.
This code will all compile perfectly, because that code we moved needed only one thing in order to work: knowledge of the track it was working with. However, compiling isn’t enough, because now our ForEach loop does nothing.
To get things back to how they were, we need to update our ForEach so that creates a new TrackView for each track it’s given. Because TrackView is a struct, Swift will automatically create an initializer that accepts its track property, which means our ForEach is just this:
ForEach(tracks) { track in
    TrackView(track: track)
}
If you run the app again you’ll see the user interface is exactly as it was before – our code is much neater, and now we have the ability to reuse TrackView in other places if needed, but the actual end result from the user’s perspective is identical.
Before we move on, there’s one last thing I want to mention. In our code, SwiftUI’s ForEach view is given an array of items to loop over, followed by a function to run that should convert one item in the array into a view. Well, if you think about it, the TrackView initializer generated by Swift just happens to be a function that accepts a single track and returns the new TrackView – it’s exactly what ForEach needs to work.
So, we can actually pass that initializer straight into the ForEach to mean “call this for each one of your tracks, and use the resulting view.” Here’s how that looks in code:
ForEach(tracks, content: TrackView.init)That’s it! It’s so wonderfully concise, and yet gives us exactly the same result – I love this shorthand!
Tip: Sending the initializer straight into the ForEach content only works when the struct’s initializer accepts just one parameter. This works okay here, and it’s a great skill to have in your toolbox, but as you’ll see its use is going to be short-lived!
To really make this app useful, we’re going to let the user tap on any grid cell to have its preview audio play, and this will involve what I consider a bit of a wrong turn – we’ll look at correcting that wrong turn, and you might even disagree that it’s a wrong turn at all!
Anyway, playing audio on macOS is done using the AVKit framework, so start by adding this new import line to TrackView.swift:
import AVKitWith that done, playing audio takes three steps:
@State property that holds an optional AVPlayer. This is a class from AVKit that is responsible for loading and playing items.AVPlayer instance, then calling play() on it.We’ll tackle those in order, starting with the new property – add this to the TrackView now:
@State private var audioPlayer: AVPlayer?That’s optional because it won’t exist when the view is first loaded, but by marking it with @State we can modify it when the user asks to play the track.
The second step is to create and play the AVPlayer, which takes just three lines of code: pausing the current player if there is one, creating an AVPlayer from our preview URL, then calling play() on the result.
We’re going to place this into a new method that accepts the track to play as its only parameter, which might seem redundant but it will make sense shortly! Add this method to TrackView now:
func play(_ track: Track) {
    audioPlayer?.pause()
    audioPlayer = AVPlayer(url: track.previewUrl)
    audioPlayer?.play()
}
The final step is to call that play() method when the button is clicked, like this:
Button {
    play(track)
} label: {
Now go ahead and run the project and see what you think – you should be able to search for a singer or band, then select a grid cell to play one of their songs.
Great, right? Well, try clicking on a second grid cell – or a third, or a fourth, and so on. Because each one of our grid cells has its own audio player, each can play independently when really that’s just going to sound horrible.
This is the wrong turn I mentioned: I think it’s definitely the wrong thing for this app, but you might like this code because it would work better in other apps where the things being played overlap better.
Here, though, what we really want is for one single player to exist, so that clicking between grid cells pauses the previous music and starts the new one. This takes a little more work, because we need a way for all our audio code to go through a single location so that we can correctly stop and start music.
First, we need one centralized audio player so that we never get into the situation where two pieces of music play at the same time. Given that we only have two views, the sensible choice for this is ContentView, so I want you to move the import AVKit, the audioPlayer property, and the play() method from TrackView.swift into ContentView.swift.
Next, we need to give TrackView a way to tell ContentView when its play() method should be called. There are various ways of accomplishing this, but the simplest is using a closure – we can tell ContentView that whenever it creates a grid cell, it must provide a function to run when the cell’s button is clicked.
Ultimately this will be the play() method we just moved into ContentView, which means it needs to accept the Track object to play and return nothing. So, add this new property to TrackView after the existing track property:
let onSelected: (Track) -> VoidThat creates an onSelected property that will store a function, and the function must be able to accept a single Track as its only parameter.
Now we can call that from the button code in TrackView:
Button {
    onSelected(track)
} label: {
There are still errors, but that’s because when we create our TrackView instances we don’t pass in a function for the onSelected property. Sadly this means our neat little ForEach shortcut won’t work any more, because we need to connect the onSelected property to our play() method.
So, change your ForEach code to this:
ForEach(tracks) { track in
    TrackView(track: track, onSelected: play)
}
You’ll also need to change the preview code for TrackView, but that doesn’t actually need to do anything meaningful – just accepting a value coming in and nothing else will suffice. Something like this ought to do the trick:
TrackView(track: Track(trackId: 1, artistName: "Nirvana", trackName: "Smells Like Teen Spirit", previewUrl: URL(string: "abc")!, artworkUrl100: "https://bit.ly/teen-spirit")) { track in

}
And now this stage of the project is complete: you can pick any song from the list and listen to it, but picking a different song will automatically replace the previous one rather than causing their audio to overlap.
Before this project is done, we’re going to fix a few issues and add a few extra features too, all of which will make it look and work much better.
First, the easiest part: having our HStack run edge to edge on the screen doesn’t look nice at all, so we’re going to add some selective padding. This will be the same as the search box we added in project 5, which is padding above and on the left and right edges – add this modifier to it:
.padding([.top, .horizontal])As for the grid below, we’re going to use the parameter-less version of padding() there, but in a very precise place: on the LazyVGrid, not on the ScrollView. Like this:
ScrollView {
    LazyVGrid(columns: gridItems) {
        ForEach(tracks) { track in
            TrackView(track: track, onSelected: play)
        }
    }
    .padding()
}
This placement is intentional, and reflects best practice with scroll views: if we attached padding to the scroll view itself then there would always be a gap between the bottom of the scroll view and the bottom of its visible items, but in this situation it’s best to let the items crop naturally at the edge of the window so it’s clearer to users that there is more down there.
The second change we’re going to make is to stop very long track and artist names from completely obscuring the image behind them. SwiftUI automatically allows text to run over as many lines as it needs in order to display fully, but we can use the lineLimit() modifier to set a maximum line count.
If you want, you’re welcome to experiment with various line limits to see what you like, but I think a maximum of 2 is fine:
Text(track.trackName)
    .lineLimit(2)
    .font(.headline)

Text(track.artistName)
    .lineLimit(2)
    .foregroundStyle(.secondary)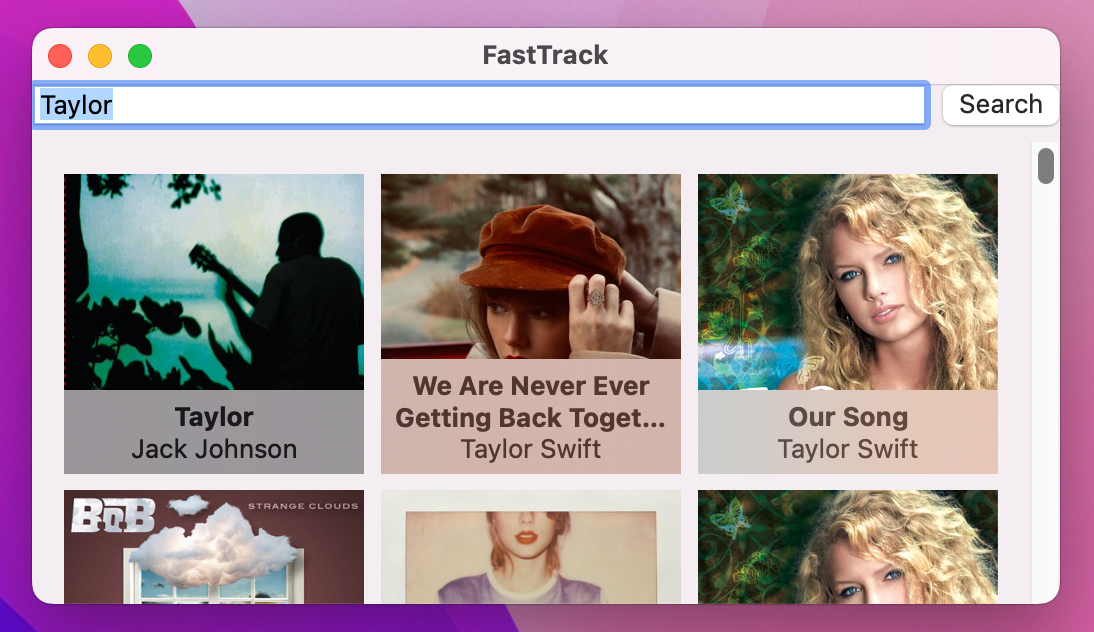
The third change will be to fix our search so that it allows text with spaces, like “Taylor Swift”. Technically there’s a whole range of characters the user can type that aren’t supposed to be inside URLs, like ampersands and slashes, so rather than just doing a simple string replacement I want to introduce you to a helpful string method: addingPercentEncoding() can replace all the invalid characters with safe equivalents. This might fail and so it returns an optional string, but we can use guard to unwrap that optional or exit early if it failed for some reason.
Add this as the first line in the performSearch() method:
guard let searchText = searchText.addingPercentEncoding(withAllowedCharacters: .urlQueryAllowed) else { return }Tip: That replaces the searchText property with a constant of the same name, but only inside this function.
The fourth change I want to make is to handle errors more gracefully, because right now they just disappear and the user is probably going to get confused. This takes a few steps, but it’s worth it – handling errors well is the hallmark of a great app!
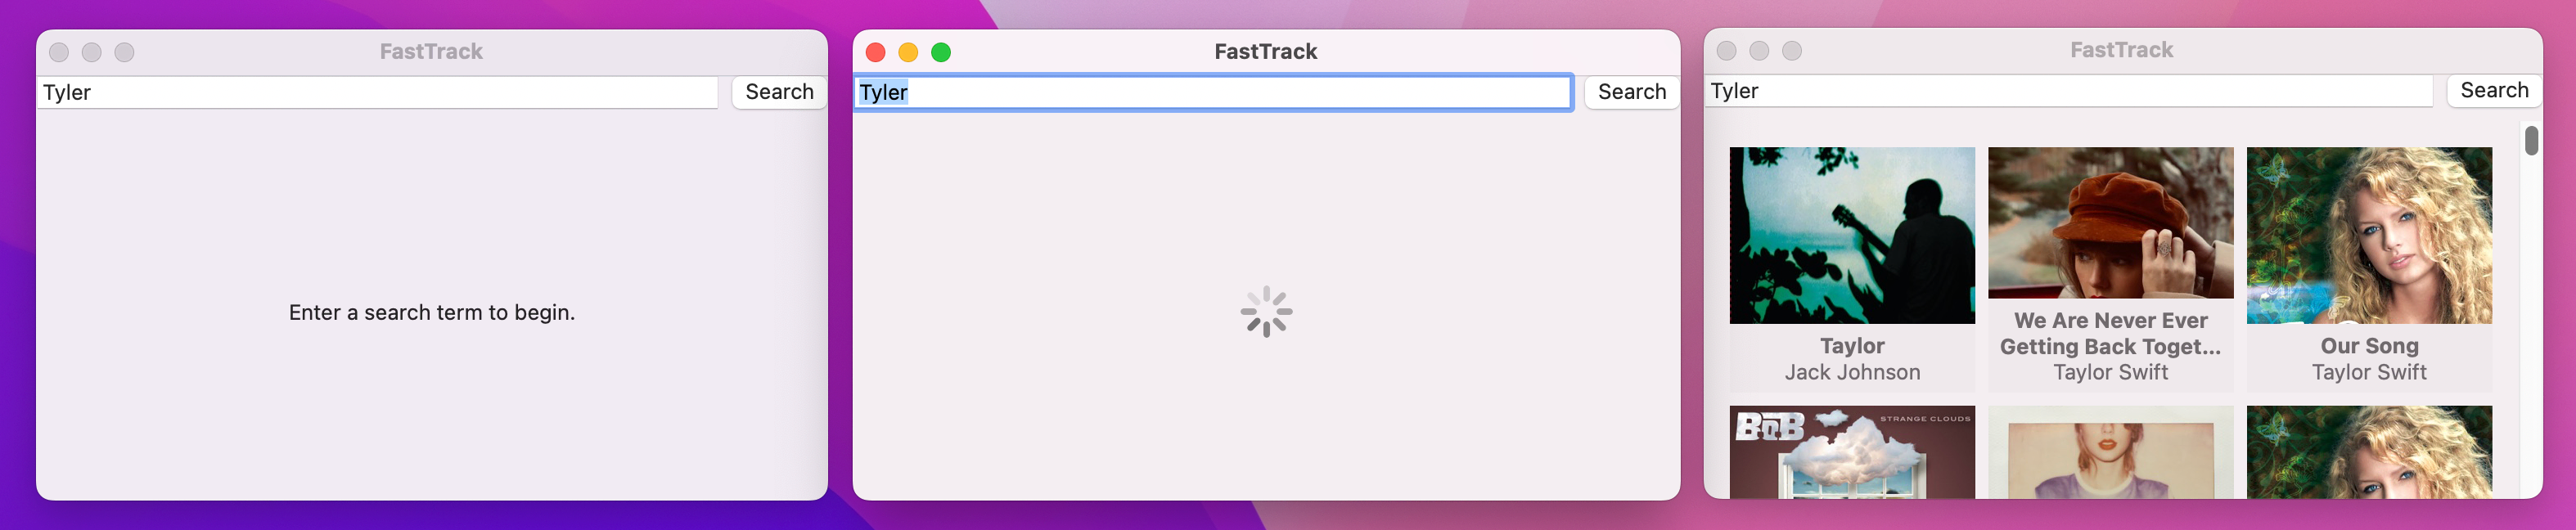
We could just show some sort of alert if the network request failed, but if we’re going to do this properly then really our app can be in one of four states:
We can represent these four states using an enum, and because this enum is only used for ContentView I would actually place it inside the ContentView struct so its usage is clear:
enum SearchState {
    case none, searching, success, error
}
By default, ContentView should be in the .none state, because the search hasn’t happened yet. So, add this property to ContentView to store that data:
@State private var searchState = SearchState.noneAs the user’s search runs, searchState will move between three of those four states: first it will be set to .searching, then either to .success or .error depending on whether our task hit an error or not.
So, update startSearch() to this:
func startSearch() {
    searchState = .searching

    Task {
        do {
            try await performSearch()
            searchState = .success
        } catch {
            searchState = .error
        }
    }
}
And now for the most important part: rather than always showing our scrolling view of results, we need to switch on the value of searchState and display one of four things.
To avoid our user interface jumping around, it’s important to make sure each of these user interface elements are resizable. Because the TextField already has a flexible width, all we need to do is give the other views a flexible height in order to keep things looking right.
Replace your current ScrollView code with this:
switch searchState {
case .none:
Text("Enter a search term to begin.")
.frame(maxHeight: .infinity)
case .searching:
ProgressView()
.frame(maxHeight: .infinity)
case .success:
ScrollView {
LazyVGrid(columns: gridItems) {
ForEach(tracks) { track in
TrackView(track: track, onSelected: play)
}
}
.padding()
}
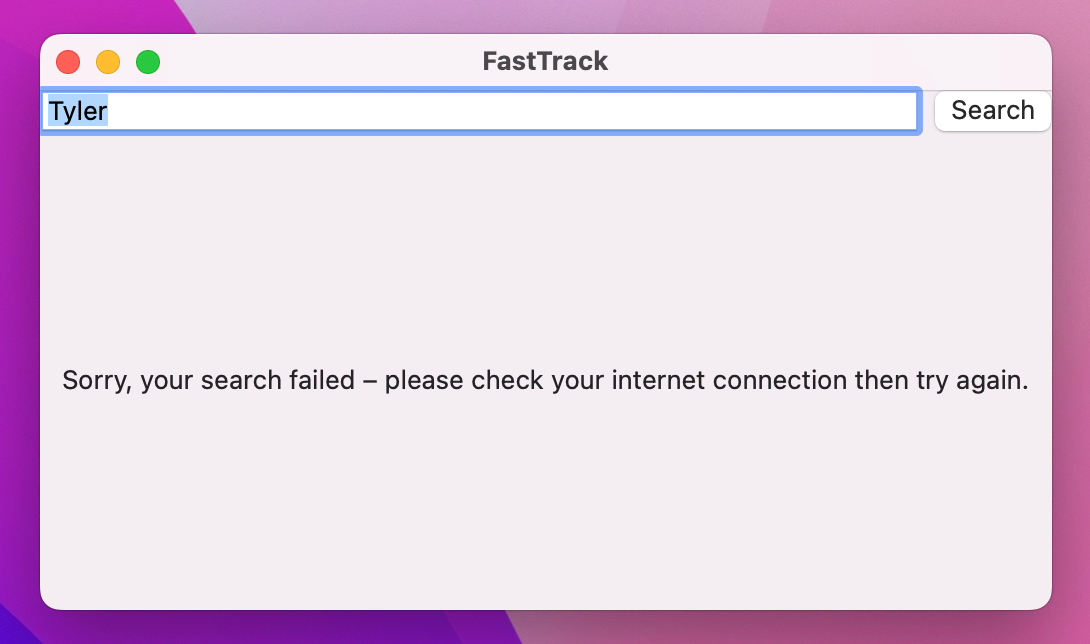
case .error:
Text("Sorry, your search failed – please check your internet connection then try again.")
.frame(maxHeight: .infinity)
}That’s all code we’ve seen before, albeit now in a switch/case format: two pieces of text, an activity indicator, then our existing ScrollView code. Notice the infinite maximum height for the three new views, which is what allows them to have a flexible height.
With that change, not only do we get error handling but we also get an activity indicator while the search is taking place. If you’d like to see the error case in action, try modifying the “itunes.apple.com” URL to “zzzitunes.apple.com” or something else that isn’t valid.
With these four changes in place the whole app is looking and working a lot better, but there’s one last change I want to sneak in: I want to give a little enticement to users to encourage them to click one of the grid cells. We can do this with a combination of modifiers, some new:
onHover() to track whether the user’s mouse is currently over the current cell.border() to draw a square border around our cell.scaleEffect() to make the track image scale up a little when the user moves over the cell, adding clipped() to make sure the image doesn't go beyond its bounds.The combination of these makes for a really striking effect, as you’ll see!
To get all that to work, we need to start by adding a new property to TrackView to monitor whether the user is currently hovering over the cell or not:
@State private var isHovering = falseWe’re going to move that between its true and false states by using the onHover() modifier, which you can attach to any view. This modifier needs to be given a function to run when the hover state changes, and it will be passed the new hover state – true or false, depending on whether the mouse is currently over this view. We can then copy that value into isHovering, but if we add a call to withAnimation() SwiftUI will move between the two states fluidly.
Add this modifier to TrackView, below buttonStyle():
.onHover { hovering in
    withAnimation {
        isHovering = hovering
    }
}
So, now we have a Boolean to track whether we’re hovering over this view or not, and it’s hooked up correctly. But what do we actually want to do with it?
The answer is “two things”: we’ll scale up the track’s artwork, then draw a border around the whole cell, both using a ternary conditional operator to move between values based on isHovering.
First, we’re going to scale up the AsyncImage view then clip it to its original frame by attaching this after its frame() modifier:
.scaleEffect(isHovering ? 1.2 : 1.0)
.clipped()
Using scaleEffect() affects the way this image is rendered, but it won’t adjust the way the view is laid out – the ZStack won’t take up 1.2 times as much space because the image is bigger. This creates a pleasing zoom effect where all the cells stay stationery but the hovered image scales up neatly. Adding clipped() is important here, because without it the image will go beyond its border, which looks a bit strange.
Second, we’re going to add a square border around the whole cell based on the hover state. You’re welcome to tinker with the color and thickness, but I’m going to use a 3-point border in the primary color when hovering. Add this modifier to the button in TrackView, after buttonStyle():
.border(.primary, width: isHovering ? 3 : 0)Tip: The .primary color is white in dark mode and black in light mode – it adapts automatically.
Now run the app again and see what you think! If you look carefully you can actually see the border color growing from 0 to 3 points when you hover over a cell, which is really nice.
That’s the end of our polish, and the end of another project – great job!
I told you this project was going to cover a whole bunch of important techniques, and looking back I hope you agree! We covered:
ScrollViewDecodable protocol and JSONDecoderURLSessionAsyncImage viewProgressView…and more! And all while building a real project so you can see them in action, and perhaps even continue to extend if you want to.
Like I said in the introduction, the practice of fetching and decoding JSON into some kind of user interface is really fundamental in app development, so the skills you’ve learned here will come back to be useful time and time again.
If you’d like to try taking this project further, here are three suggestions:
searchable() modifier, placing it wherever you think looks best.Copyright © 2023 Paul Hudson, hackingwithswift.com.
You should follow me on Twitter.