![]()
It is a truth universally acknowledged that any book on app development must include a match three game at some point. OK, I made that up, but it is true that we’ll be making a matching game here.
In this game, the player must click colored balls to remove them, along with any other balls of the same color that it touches. If they remove only one ball with a move we’ll take 1000 points away; if they remove two balls we’ll do nothing; but if they remove three or more balls we’ll award increasing numbers of points.
Along the way you’ll learn about NumberFormatter to make numbers look good on screen, SKShapeNode for drawing custom shapes, custom SKActions that run your own code rather than one of the built-in options, SpriteKit particles effects using SKEmitterNode, “fair” random number generation using GKShuffledDistribution, and more.
In short: you’ll learn lots, so there’s no time to waste. Create a new Game project in Xcode called MatchThree, choosing SpriteKit for the technology but leaving its checkboxes unchecked.
Before we begin, please follow the instructions from project 11, “Cleaning up the Xcode template”, so that we have a clean base to build on.
The first step in building this game is to create and display a grid of balls with different colors. When we progress a little, the user will be able to click on a ball to have it and similar balls removed, while new ones drop in from the top. For now, though, let’s just focus on getting the balls to draw neatly.
I’ve provided a selection of ball sprites in the project17-files folder you should have received with this book. But I don’t want you to just drag the ball images into the asset catalog. Instead, I want to use this chance to show you an important SpriteKit optimization called sprite atlases.
A sprite atlas is the combination of many small pictures into one combined picture. At runtime, SpriteKit uploads that one single texture to the GPU, draws individual sprite images just by drawing different parts of the same texture. Not only are texture atlases faster, but they also take almost no work from us. Our code is the same – all that’s changed is the way we add textures to the project.
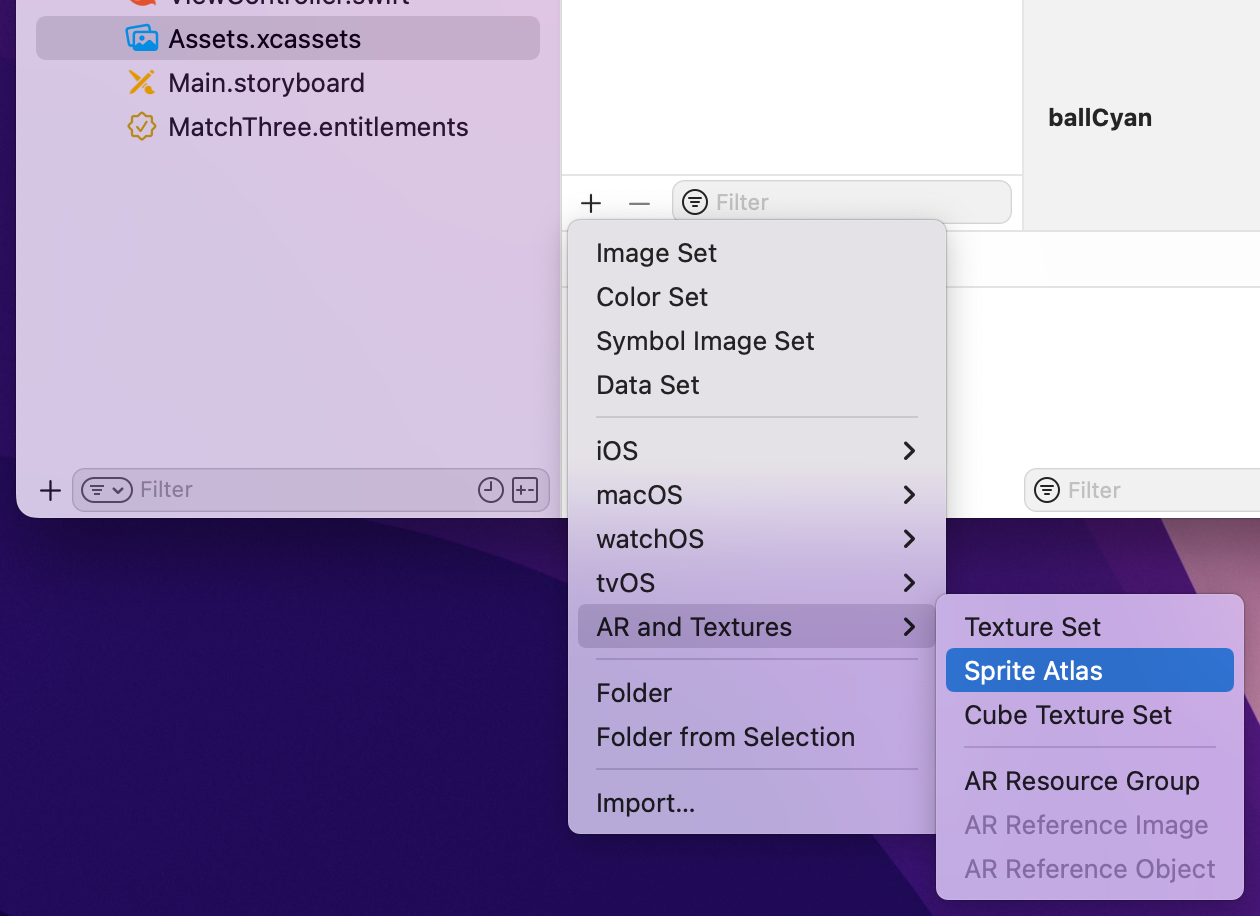
To create one here, open your asset catalog, click the + button at the bottom, then choose AR and Textures > Sprite Atlas. You can now go ahead and drag all the ball images from Finder over the new “Sprites” group to add them all to the atlas.
Okay, detour over: we have some ball images, so let’s start using them.
To make it easier to figure out what ball was clicked, and also where it should be placed in the scene, we’re going to create a subclass of SKSpriteNode that allows us to store a ball’s row and column number. So, let’s start by creating that class: go to the File menu and choose New > File. Choose Cocoa Class, name it “Ball”, then make it a subclass of “SKSpriteNode”.
Open Ball.swift for editing, but we’re only going to do two things. First, add this import to stop Xcode complaining:
import SpriteKitNow add these two properties, so each ball knows where it is inside the grid:
var row = -1
var col = -1
That’s all we’re going to add to the class – it’s really just there as a convenience.
We need to create a grid of Ball objects, but we need to do it in such a way that we can add new balls from the top as needed. The easiest way to do this is using a two-dimensional array of sprite nodes, stored in columns first then rows. This means if three balls are removed from a column, we can find it and add three balls straight to it. In comparison, if we stored rows first then columns, we’d need to add one ball to three different arrays.
I’ve provided you with seven different ball images to use, but I’m going to being using four here. This is partly for aesthetics, but partly also for difficulty – having too many colors makes the game rather hard! Choose whichever four you like the most, but I’m going with blue, green, purple, and red.
To make things more interesting, we’re going to use so-called “fair” random number generation using GameplayKit’s GKShuffledDistribution class. This guarantees to create an equal number of each ball color over time, meaning that if we make 100 balls we will get approximately 25 of each. The order they appear will be random, but it ensures you get an equal number of each over time.
To represent this, we’re going to create five new properties:
nextBall property will store an instance of GKShuffledDistribution configured to return numbers from 0 to 3 every time we call its nextInt() method.cols property will store our multi-dimensional array. Each item is itself an array of Ball objects.ballSize property will store how much space we want to allocate to each ball. This will be used for positioning, but also finding neighbors.ballsPerColumn and ballsPerRow properties let us store centrally how big the grid should be.Open GameScene.swift and add these five properties to the GameScene class:
var nextBall = GKShuffledDistribution(lowestValue: 0, highestValue: 3)
var cols = [[Ball]]()

let ballSize = 50.0
let ballsPerColumn = 10
let ballsPerRow = 14
Because every ball knows its row and column, and there’s a fixed ballSize constant, we can write a method that calculates where a ball should be placed in the game scene.
To make the grid align neatly with the center of the scene, we need to add a small amount to each ball’s X and Y coordinates, but otherwise we just multiple the ball’s row and column by ballSize.
Add this method to GameScene:
func position(for ball: Ball) -> CGPoint {
    let x = 72 + ballSize * Double(ball.col)
    let y = 50 + ballSize * Double(ball.row)
    return CGPoint(x: x, y: y)
}
We can now write a createBall() method that creates a new ball at a specific row and column, then positions it using the position(for:) method we just wrote.
This createBall() method will be responsible for creating and positioning the balls in our initial grid, but also creating and positioning new balls when they need to fall in from the top. As a result, we’re going to make it accept a startOffScreen parameter: if it’s true we’ll create the ball off screen then animate it falling in, otherwise we’ll just create the ball in its final position. We’ll write the off-screen creation code later; I’ll just put a comment in for now.
Add this method to the GameScene class:
func createBall(row: Int, col: Int, startOffScreen: Bool = false) -> Ball {
    // pick a random ball image
    let ballImages = ["ballBlue", "ballGreen", "ballPurple", "ballRed"]
    let ballImage = ballImages[nextBall.nextInt()]

    // create a new ball, and set its row and column
    let ball = Ball(imageNamed: ballImage)
    ball.row = row
    ball.col = col

    if startOffScreen {
        // animate the ball in – we'll write this later
    } else {
        // place the ball in its final position
        ball.position = position(for: ball)
    }

    // name the ball with its image name
    ball.name = ballImage
    addChild(ball)

    // send the ball back to our caller
    return ball
}
That method creates one ball and adds it to the current scene, so all that’s left is calling it many times to create a grid of balls. We already have constants for ballsPerRow and ballsPerColumn, so we need to loop through creating lots of ball arrays, adding each one to our cols property as we go.
This is best done in didMove(to:), so modify it to this:
override func didMove(to view: SKView) {
    // loop over as many columns as we need
    for x in 0 ..< ballsPerRow {
        // create a new column to store these balls
        var col = [Ball]()

        for y in 0 ..< ballsPerColumn {
            // add to this column as many balls as we need
            let ball = createBall(row: y, col: x)
            col.append(ball)
        }

        // add this column to the array of columns
        cols.append(col)
    }
}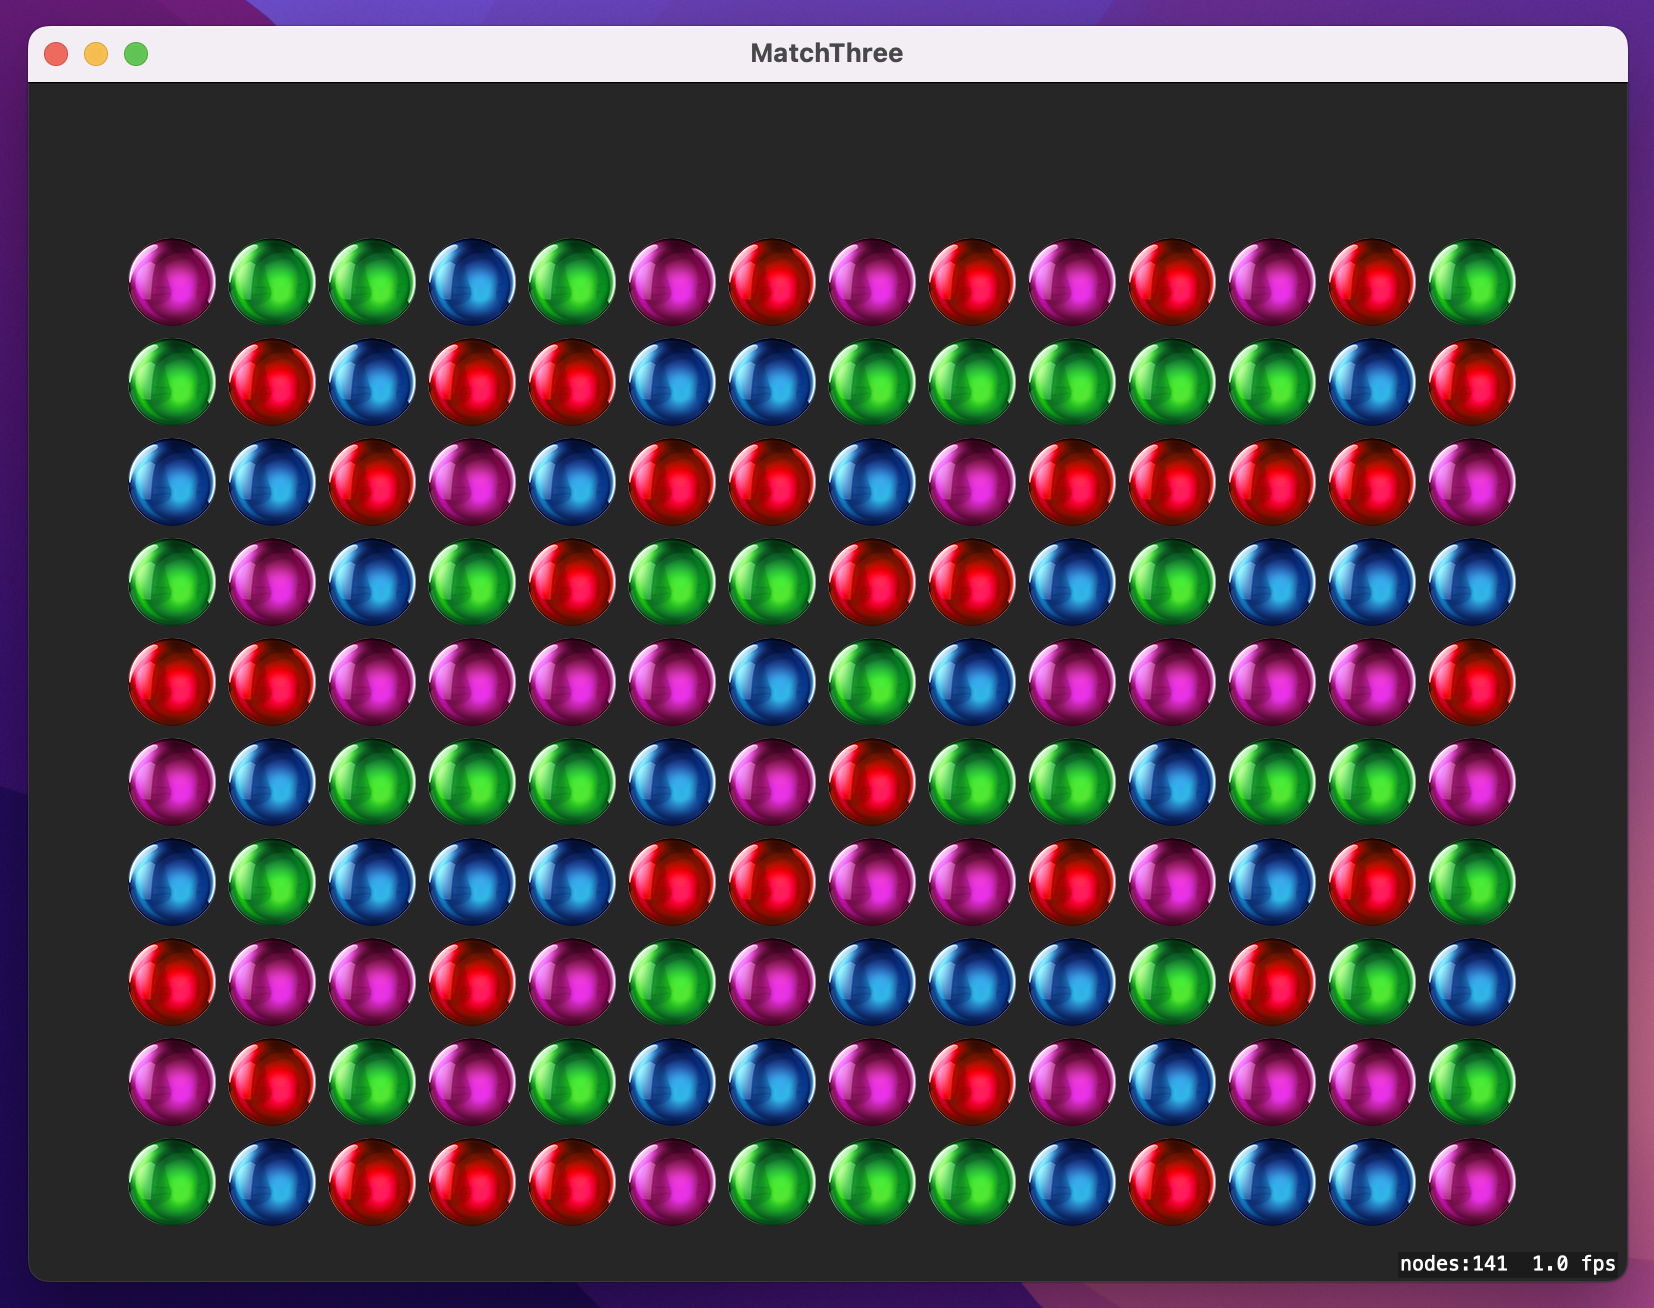
Run the game now and you should see a screen full of randomly colored balls – a promising start!
All our balls have names that start with the word “ball”, so it’s trivial to write a method that accepts a location as its parameter and returns the ball at that location if there is one. Add this method now:
func ball(at point: CGPoint) -> Ball? {
    let balls = nodes(at: point).filter { $0.name?.hasPrefix("ball") ?? false }
    return balls.first as? Ball
}
That works by finding all nodes at the requested point, filtering that array by nodes that have a name starting with “ball”, then tries to typecast the first element of that array as a Ball. If no nodes were clicked, if no Ball nodes were clicked, or if for some reason the clicked node doesn’t convert to a Ball correctly, the method returns nil.
If you’re interested in functional programming, Swift has a more concise way of writing this method using compactMap(). This applies a conversion to an array, then removes any items that come back as nil. Using compactMap() effectively lets us attempt to typecast every element as a Ball, remove any that fail the test, then return the first item.
So, this method does the same as the previous one, just with less code:
func ball(at point: CGPoint) -> Ball? {
    let balls = nodes(at: point).compactMap { $0 as? Ball }
    return balls.first
}
Regardless of which approach you choose we are only part-way there. The ball(at:) method lets us identify only the precise ball at a single location, whereas what we want to do is find the ball that was clicked, then any balls next to it of the same color, then any balls next to those balls that are the same color, and so on – one click could potentially match 10 or more balls.
Making this work requires a recursive method, which is a method that calls itself. We’ll call it first with the ball that was clicked, but inside the method it will create an array of balls above, below, to the left, and to the right of the one that was clicked. It will then loop over each ball it found, check whether it’s the same color as the original ball, and then call itself once for each matching ball. That ball will then create its own array of nearby balls, check they match, then call the method again, and again, and again, until there are no more matching balls.
If that were the full extent of the matching method, it would easily be an infinite loop. Consider this: we start with a red ball, and find another red ball to its left, so we check it. That ball finds a red ball to its right (the original one!), so we check it. That ball finds a red ball to its left (the one we already checked), so we check it… and so on, and so on.
To avoid this infinite loop, we’re going to keep track of all the balls we already checked. We could do this in an array, but repeatedly calling the contains() method on an array is expensive. So, instead we’re going to use a different data type called Set. Sets are like arrays in that you can add and remove items, but sets don’t have an order and can’t contain duplicates. The combination of these two properties means that calling contains() on a set is almost instant, no matter how big the set is.
Swift’s built-in Set type is perfect for this, so we’re going to declare a set property that will store all the balls we’ve checked. When the mouse is clicked, we’ll clear the set then start calling our recursive matching method, which adds more and more items to the set. Eventually we’ll have matched all possible balls, at which point we can loop over the items in the set to start removing them from the game.
So, let’s start by adding a property that will store the balls we’ve checked. Add this to GameScene:
var currentMatches = Set<Ball>()When the mouse is clicked, we’re going to clear that set then call match() on the ball that was clicked. This is the recursive method that looks up, down, left, and right to figure out what other balls need to be matched. To do that, it leans heavily on the ball(at:) method: it creates an array of type [Ball?], then calls ball(at:) once for each direction.
When there’s a ball in that direction it will get added to the array; when there isn’t – i.e., we’re at the edge of the grid – it adds nil. Once we’ve evaluated all directions, it will loop over the array, check that each ball hasn’t been matched already, then check that each ball is of the same color as the original ball, and call match() again if both of those conditions pass.
By the time the function has checked every ball, currentMatches will be filled with all the balls that need to be removed, and we can proceed to the next step.
Before I show you the code, I need to show you an interesting piece of syntax I’ll be using. Like I said, the match() method will create an array of type [Ball?] to add the balls around the one it’s checking – that’s an array of optional balls. When it comes to loop over that, we want to loop over all the non-nil items, and Swift has special syntax to do just that:
for case let someValue? in someArray {When that runs, only non-nil values from someArray will be placed into someValue, which means you can skip the check and unwrap step inside the loop.
OK, that’s everything you need know, so here’s the match() method with extra comments from me:
func match(ball originalBall: Ball) {
    var checkBalls = [Ball?]()

    // mark that we've matched the current ball
    currentMatches.insert(originalBall)

    // a temporary variable to make this code easier to read
    let pos = originalBall.position

    // attempt to find the balls above, below, to the left, and to the right of our starting ball
    checkBalls.append(ball(at: CGPoint(x: pos.x, y: pos.y - ballSize)))
    checkBalls.append(ball(at: CGPoint(x: pos.x, y: pos.y + ballSize)))
    checkBalls.append(ball(at: CGPoint(x: pos.x - ballSize, y: pos.y)))
    checkBalls.append(ball(at: CGPoint(x: pos.x + ballSize, y: pos.y)))

    // loop over all the non-nil balls
    for case let check? in checkBalls {
        // if we checked this ball already, ignore it
        if currentMatches.contains(check) { continue }

        // if this ball is named the same as our original…
        if check.name == originalBall.name {
            // …match other balls from there
            match(ball: check)
        }
    }
}
Again, that’s a recursive function: it could call itself up to four times per ball based on the surroundings.
Once match() has run fully, we’ll have the complete list of matched balls in the currentMatches set. The next job is to destroy them, because they’ve been matched now – they need to be removed and replaced with new balls.
This will be done with a dedicated destroy() method. It will do more later on, but for now has just two jobs: remove the ball from the correct column, then remove it from the game scene. Remember, our cols property is a two-dimensional array: it stores columns first, then rows inside the column. This means we can find and remove a ball like this:
cols[ball.col].remove(at: ball.row)However, removing things from the middle of an array can be difficult because when you remove an item, everything after it moves down one space. A simple way to avoid this problem is moving things in reverse order so that it doesn’t matter when elements move down. So, by the time we call this destroy() method it’s safe to remove things, because it will always get called in reverse order.
Add this method now:
func destroy(_ ball: Ball) {
    cols[ball.col].remove(at: ball.row)
    ball.removeFromParent()
}
At this point we’ve written ball(at:) to find the Ball object at a specific location, match() to determine which balls need to be removed when the player clicks, and destroy() to destroy a single ball. All that’s left is to write mouseDown() to tie it all together. This method will:
ball(at:) method to find the ball they clicked.currentMatches set and call match() to figure out which balls to remove.currentMatches set so that items with the highest row number come first.destroy() on each one.Now, if you’re observant you might have noticed what seems like a contradiction: I said sets don’t have an order, and yet here we are planning to sort one. It turns out this isn’t a problem, because Swift is smart enough to automatically return an array when you sort a set, and of course arrays can be sorted.
That leads to another problem: how exactly do you sort an array of sprites? The answer is that you can’t, or at least not automatically. Instead, you need to call sorted() with a closure to handle comparison. This closure will be called repeatedly with two values, $0 and $1, and it’s your job to return true if $0 should be ranked before $1.
We want to sort our set so that items with the highest row numbers come first, so we’re going to use this code:
let sortedMatches = currentMatches.sorted {
    $0.row > $1.row
}
OK, that’s everything – please add this new mouseDown() method now:
override func mouseDown(with event: NSEvent) {
// figure out where we were clicked
let location = event.location(in: self)
// if there isn't a ball there bail out
guard let clickedBall = ball(at: location) else { return }
// clear the `currentMatches` set so we can re-fill it
currentMatches.removeAll()
// match the clicked ball, then recursively match all others around it
match(ball: clickedBall)
// make sure we remove higher-up balls first
let sortedMatches = currentMatches.sorted {
$0.row > $1.row
}
// remove all matched balls
for match in sortedMatches {
destroy(match)
}
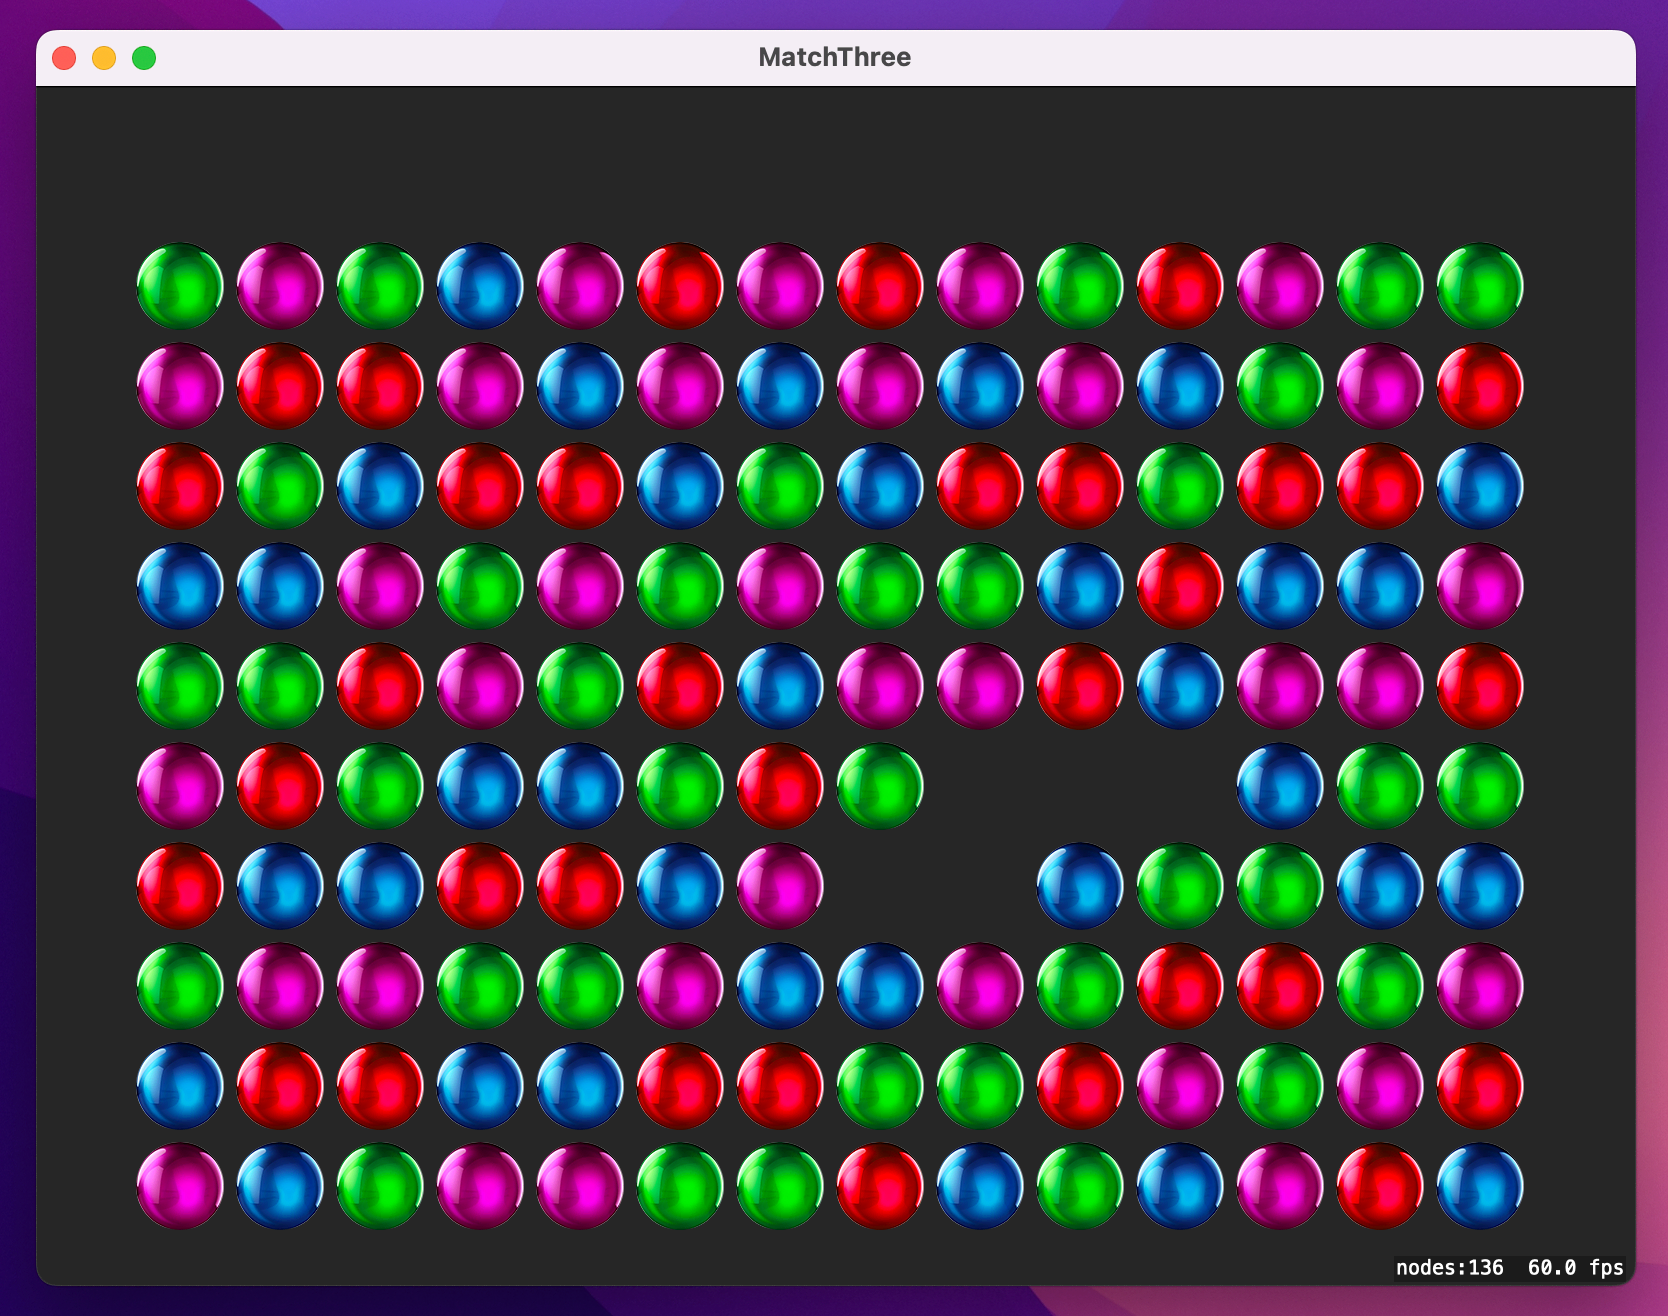
}That’s a good first attempt, and if you run the game now it will work enough that you can punch holes in the grid if you click very carefully. You should also see the match() method being called recursively, so you can match whole groups of balls that have the same color
However, sooner or later you’ll get a crash, because we’re removing balls from the cols arrays without updating their row and col values.
To make the game really start to come together – and, more importantly, to stop it from crashing – we need to move all the columns down when balls below them are matched, then create new balls to fill the gaps left behind.
We’ll tackle this in three steps: move balls down as needed, create new balls, then animate the new balls down into place.
First, moving balls down is actually quite easy. We’re going to add some code after the calls to destroy(), which means the cols arrays have all had their items removed as needed but the individual balls haven’t had their row value changed. To fix that, we’re going to loop over every row in every column and update that ball’s row value. Once that’s done, we can call position(for:) again to figure out where the ball ought to be now, then make that into an SKAction to animate the ball into place.
We used the enumerated() method way back in project 2, and it’s perfect here as well. As a reminder, it lets you loop over an array by providing both the item and the array index as it goes. This is needed here because the array index is the value we need to use for each ball’s row property.
Add this code after the for match in sortedMatches loop:
// move down any balls that need it
for (columnIndex, col) in cols.enumerated() {
    for (rowIndex, ball) in col.enumerated() {
        // update this ball's row
        ball.row = rowIndex

        // recalculate its position then move it
        let action = SKAction.move(to: position(for: ball), duration: 0.1)
        ball.run(action)
    }

    // add new balls
}
That’s the first problem solved, and you’ll see I’ve left a comment at the end marking where we’ll solve the second problem: creating new balls. This is even easier than the first problem, but it has an interesting catch.
First, the code. Add this in place of the // add new balls comment:
// loop until this column is full
while cols[columnIndex].count < ballsPerColumn {
    // create a new ball off screen
    let ball = createBall(row: cols[columnIndex].count, col: columnIndex, startOffScreen: true)

    // append it to this column
    cols[columnIndex].append(ball)
}
That code is already inside the following loop:
for (columnIndex, col) in cols.enumerated() {It’s quite small, but there’s a subtle but important behavior that I want to explain before moving on.
Swift uses value types for arrays, which means if two variables point to the same array and one changes, the other won’t change. Classes are reference types, which means if two variables point to the same object and one changes, the other changes too – both variables refer to the same object.
When our loop uses cols.enumerated() it gets back columnIndex and col, where col is an array of balls. It then modifies each ball (an object – reference type!) so that it has a new row index. But when it comes time to insert new balls into the array, our code doesn’t use col, even though it’s available. Look at it again:
while cols[columnIndex].count < ballsPerColumn {That’s modifying the cols array directly. This is because of value types: if we modified the col value we received from enumerated(), it would be a copy of the array, and would have no effect on the cols property of our game scene.
Anyway, that’s the second problem solved: that code now creates new balls to fill the gap left by the ones we removed. The last problem is to make the new balls animate into place, which means filling in the startOffScreen section of createBall().
Happily, this code is also straightforward: we can figure out where any ball ought to be by using position(for:), so we’ll place the ball at its destination, then add 600 points to its Y coordinate so that it sits off screen above the grid. Finally, we’ll use a move() action to animate it back to the original destination (without the Y offset) so that it drops into place.
Find this comment in the createBall() method:
// animate the ball inNow replace it with this:
        let finalPosition = position(for: ball)
        ball.position = finalPosition
        ball.position.y += 600

        let action = SKAction.move(to: finalPosition, duration: 0.4)
        ball.run(action)
Try running the game now, then click on some balls. All being well, they should all be removed, the balls above them should drop down, then new balls should come in from the top.

However, there’s a bug in the current code, and you can find it by clicking really quickly. If you click slowly the code works great, but if you click quickly then the game gets its positions confused and balls get animated to the wrong place.
Fixing this problem is as easy as stopping the user from clicking any new balls until our animations have completed. First, add this line in mouseDown(), just before the call to currentMatches.removeAll():
isUserInteractionEnabled = falseThat will stop any further mouse events being received until we set that property back to true. All new balls drop at the same speed regardless of their creation position, so when any ball has finished its drop we know it’s safe to re-enable user interaction.
We’ve been using the run() method to run an SKAction on a node, but you can actually give it a closure to run when the action has finished. It doesn’t matter what the action is – or even if it’s a compound action such as a sequence – SpriteKit will automatically wait until it completes fully before calling any code you provide as a trailing closure.
So, go to the createBall() method and replace this code:
ball.run(action)With this:
ball.run(action) { [weak self] in
    self?.isUserInteractionEnabled = true
}
Boom! You can go ahead and click as fast as you like now, because the game rate limits you and in doing so always ensures the grid stays intact.
Note: Our code re-enables user interaction as soon as the first ball’s actions finish, but we have multiple balls – in theory it’s possible this will enable user interface while other balls are still in motion. However, in practice it won’t: all the balls move at the same speed, and so all will finish their actions at precisely the same time.
Any player can get a huge score given a sufficient long play time, but it takes skill to get a high score when you’re on the clock. To finish this game off, we’re going to add a score counter so the player can see how they are doing, as well as a clock that ticks down as they play.
The score is mostly the same as project 14 (Shooting Gallery), but this time we’re going to add a twist. When you played project 14, you had to work hard to get a score over 100. In this game, scores of 100,000 or more are going to be likely, so we’re going to need to format the score when it’s being shown onscreen. Cocoa has a dedicated way of formatting numbers called – wait for it – NumberFormatter. However, it has a slight annoyance in that it likes to be fed numbers as NSNumber rather than Swift integers. This is a small thing, but it will cause you a mental speed bump the first time you see it.
To implement the timer we’re going to use a new SKNode subclass called SKShapeNode, which lets you draw nodes using shapes such as rectangles and circles. If we draw a big rectangle on the screen, we can manipulate its xScale property to make it shrink as the time runs out. If you implement it, SpriteKit calls an update() method on your game scene 60 times a second, and that’s the perfect place to make the timer shrink as needed.
Like usual, we’re going to start by adding some properties: one for the score label, one for the score integer, one for the timer shape node, and one to track when the game started so we can track time passing. We’re going to give the score integer a property observer that creates a NumberFormatter, configures it to display decimal numbers, then converts our current score into a string for display. This means numbers like 135618 will come back as “135,618”.
Add these four properties now:
var scoreLabel: SKLabelNode!

var score = 0 {
    didSet {
        let formatter = NumberFormatter()
        formatter.numberStyle = .decimal

        if let formattedScore = formatter.string(from: score as NSNumber) {
            scoreLabel.text = "Score: \(formattedScore)"
        }
    }
}

var timer: SKShapeNode!
var gameStartTime: TimeInterval = 0
Did you notice the NSNumber in there? Again, that’s because you can’t feed NumberFormatter a variable that contains a Swift integer – you need to convert it to NSNumber by hand.
Those properties create names for scoreLabel and timer, but don’t actually create the nodes. To do that we need to add some code to the end of didMove(to:): create and position the label, then create and position the timer. The label stuff is old – you’ve seen that several times before. So let’s take a closer look at creating an SKShapeNode – here’s some code:
timer = SKShapeNode(rect: CGRect(x: 0, y: 0, width: 200, height: 40))
timer.fillColor = NSColor.green
timer.strokeColor = NSColor.clear
You can create shape nodes from circles, ellipses, rectangles, or even arbitrary paths – the end result is a rendered shape being drawn on the screen. In the code above we’re creating a 200x40 rectangle, then filling it green. We’re also specifying a clear stroke color, which means it won’t have a border. Once you’ve created the shape node, you can position it as usual, run actions, and so on – it’s just a regular node.
Add this code to the end didMove(to:), so both the score label and timer get created when the scene first loads:
scoreLabel = SKLabelNode(fontNamed: "HelveticaNeue")
scoreLabel.text = "Score: 0"
scoreLabel.horizontalAlignmentMode = .left
scoreLabel.position = CGPoint(x: 55, y: frame.maxY - 55)
addChild(scoreLabel)

timer = SKShapeNode(rect: CGRect(x: 0, y: 0, width: 200, height: 40))
timer.fillColor = .green
timer.strokeColor = .clear
timer.position = CGPoint(x: 545, y: 539)
addChild(timer)![]()
You can run the game now if you want, but it’s not terribly interesting just yet – the timer and score label aren’t being changed just yet.
We can make the timer tick down by implementing the update() method. SpriteKit calls this with the current time as a parameter, so when it’s first called we’re going to set our gameStartTime property to give us a frame of reference. Every time after that we can calculate how much time has elapsed in this game by subtracting the current time from gameStartTime. Once we know how much time has elapsed we can figure out how much time remains by subtracting the elapsed time from 100, which is the amount of time I’m allotting for one game. Finally, once we know how much time remains we can figure out the xScale of the timer using this:
timer.xScale = max(0, CGFloat(remaining) / 100)So, we take the time remaining, which will be a number between 0 (no time) and 100 (the game just started), then divide it by 100 to get a number between 0 and 1. We then take the maximum of 0 and that number, and assign that to xScale. This means the xScale property will start at 1 then shrink slowly down to 0, making the timer shrink.
If you were curious, the reason the max() call is needed is because I’m not going to be giving you the code to halt the game after the time is up – that will be your homework. Without that half in place, xScale will continue past 0 and into negative numbers, causing the timer bar to draw in reverse!
Add this update() method now:
override func update(_ currentTime: TimeInterval) {
    if gameStartTime == 0 {
        gameStartTime = currentTime
    }

    let elapsed = (currentTime - gameStartTime)
    let remaining = 100 - elapsed
    timer.xScale = max(0, Double(remaining) / 100)
}
Now that the timer works, let’s make the score adjust depending on how many balls the player matched. We could write code to adjust their score simply by adding the number of balls they matched, but that’s a bit dull. Instead, the calculation is this:
So, if they match three balls they will get 8 points (2 *2 * 2), four balls will get 16 points, five balls 32 points, and so on. This rewards tactical thinking, because players can get much higher scores if they match lots of balls.
To avoid utterly outrageous scores, we’re going to place a cap so that the maximum the player can score in a single move is 2 to the power of 16, i.e. 65,536 points. With such large numbers, I hope you can see why we added support for NumberFormatter!
Let’s add score adjustment now. Add this code to the end of the mouseDown() method:
let newScore = currentMatches.count

if newScore == 1 {
    // bad move – take away points!
    score -= 1000
} else if newScore == 2 {
    // meh move; do nothing
} else {
    // good move – add points depending how many balls they matched
    let scoreToAdd = pow(2, Double(min(newScore, 16)))
    score += Int(scoreToAdd)
}
At this point the game has mechanics, a timer, and a score, so go and play!
![]()
I’m going to add one last thing to the game, but it’s really easy to do so please stick with me. That thing is a particle emitter, which lets us simulate special effects like rain, snow, sparks, and even fog.
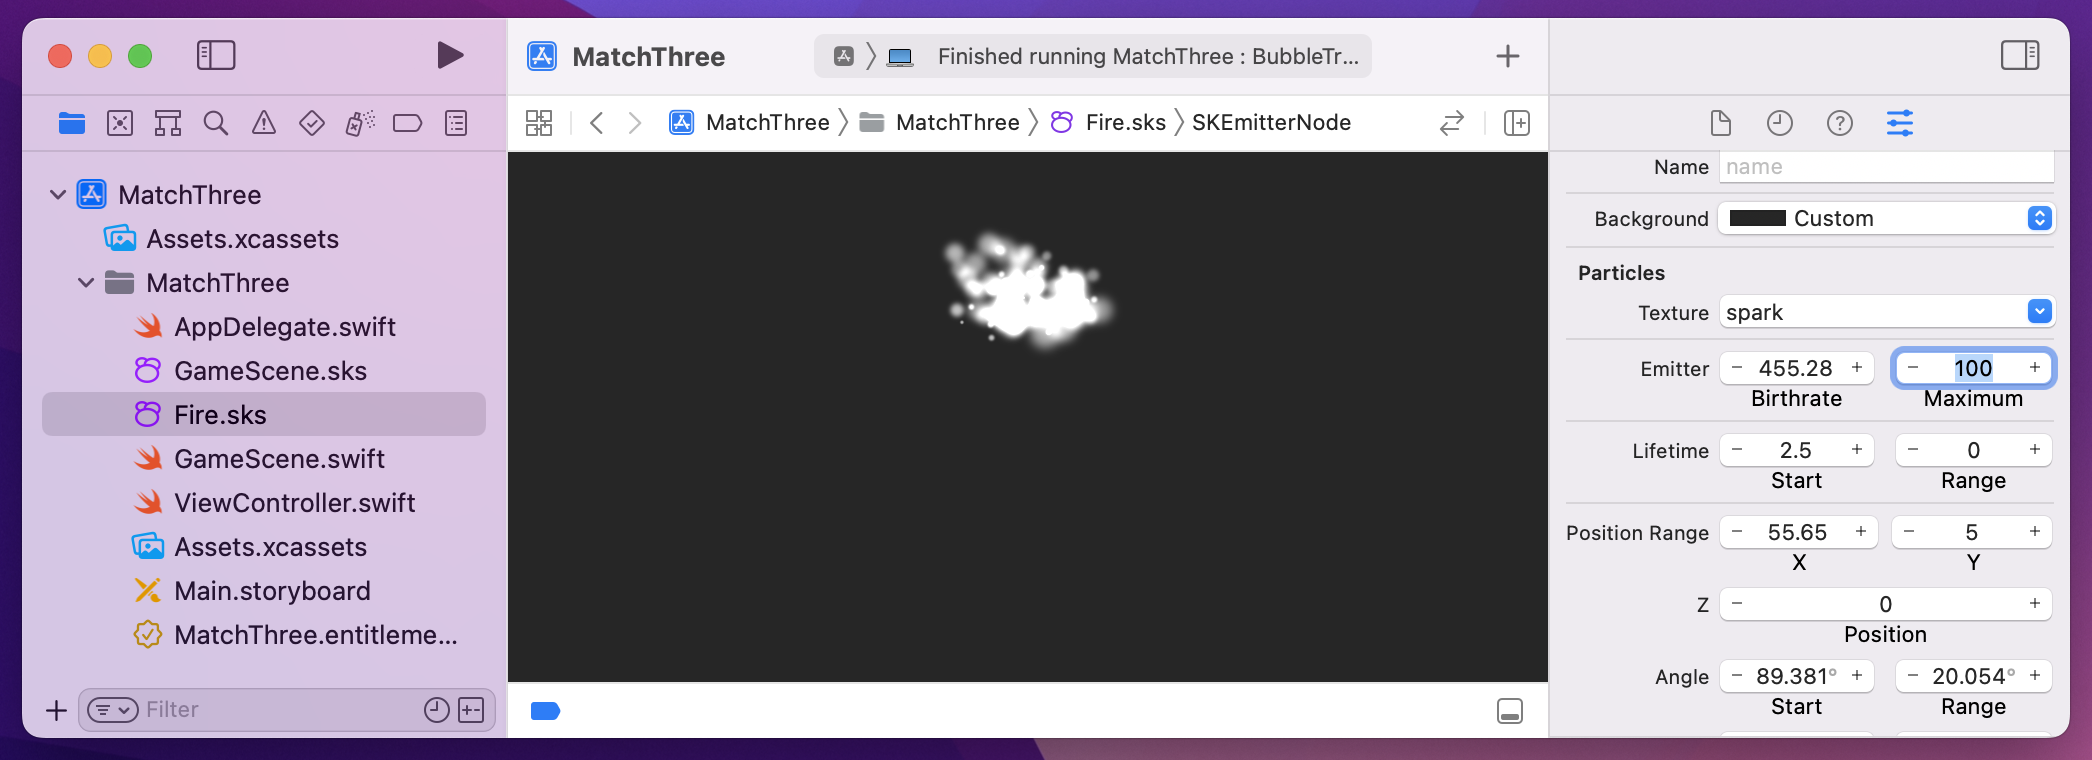
To get started, go to the File menu and choose New > File. Now scroll way down to the list of macOS options, and select SpriteKit Particle File, then click Next.
You’ll be asked to select a particle template to get you started, and the options include things like fire, magic, rain, smoke, and more. Each of those are pre-configured particle effects that you can use directly or customize to your needs. We’ll use the “Fire” template here, so please select it then click Next and Create, naming it “Fire”.
When you create a new particle file, you’ll immediately be taken to Xcode’s graphical particle editor tool. This lets you adjust all the particle settings using the attributes inspector and see exactly what difference it makes.
You’re welcome to toy with these settings in your own time, but we’re just going to make two small changes here. First, change “Maximum” from 0 to 100. When that value is 0 it means the particle system will never end; using 100 means it will create precisely 100 particles then stop, creating a fire puff. Second, scroll to the bottom of the list of properties and click on the loupe next to “Color Ramp”. This sets the color of the particles, and you can enter multiple colors if you want. For now, though, I’d just like you to change that default color to white.
That’s it for the graphical particle editor. Like I said, you’re welcome to return to this in your own time toy around as much as you please, but right now a bigger priority is using what we just made.
Using a particle emitter takes three steps. First, create it using the fileNamed: initializer. Second, position it in the scene wherever you want it. Third, create an SKAction that waits until the last particle has died before destroying the emitter. If you don’t do that last step the emitters never get destroyed and slowly chew up memory in your game.
We’re going to create our little smoke puff over every ball that gets destroyed, so all we need to do is add this code at the start of the destroy() method:
if let particles = SKEmitterNode(fileNamed: "Fire") {
    particles.position = ball.position
    addChild(particles)

    let wait = SKAction.wait(forDuration: TimeInterval(particles.particleLifetime))
    let sequence = SKAction.sequence([wait, SKAction.removeFromParent()])
    particles.run(sequence)
}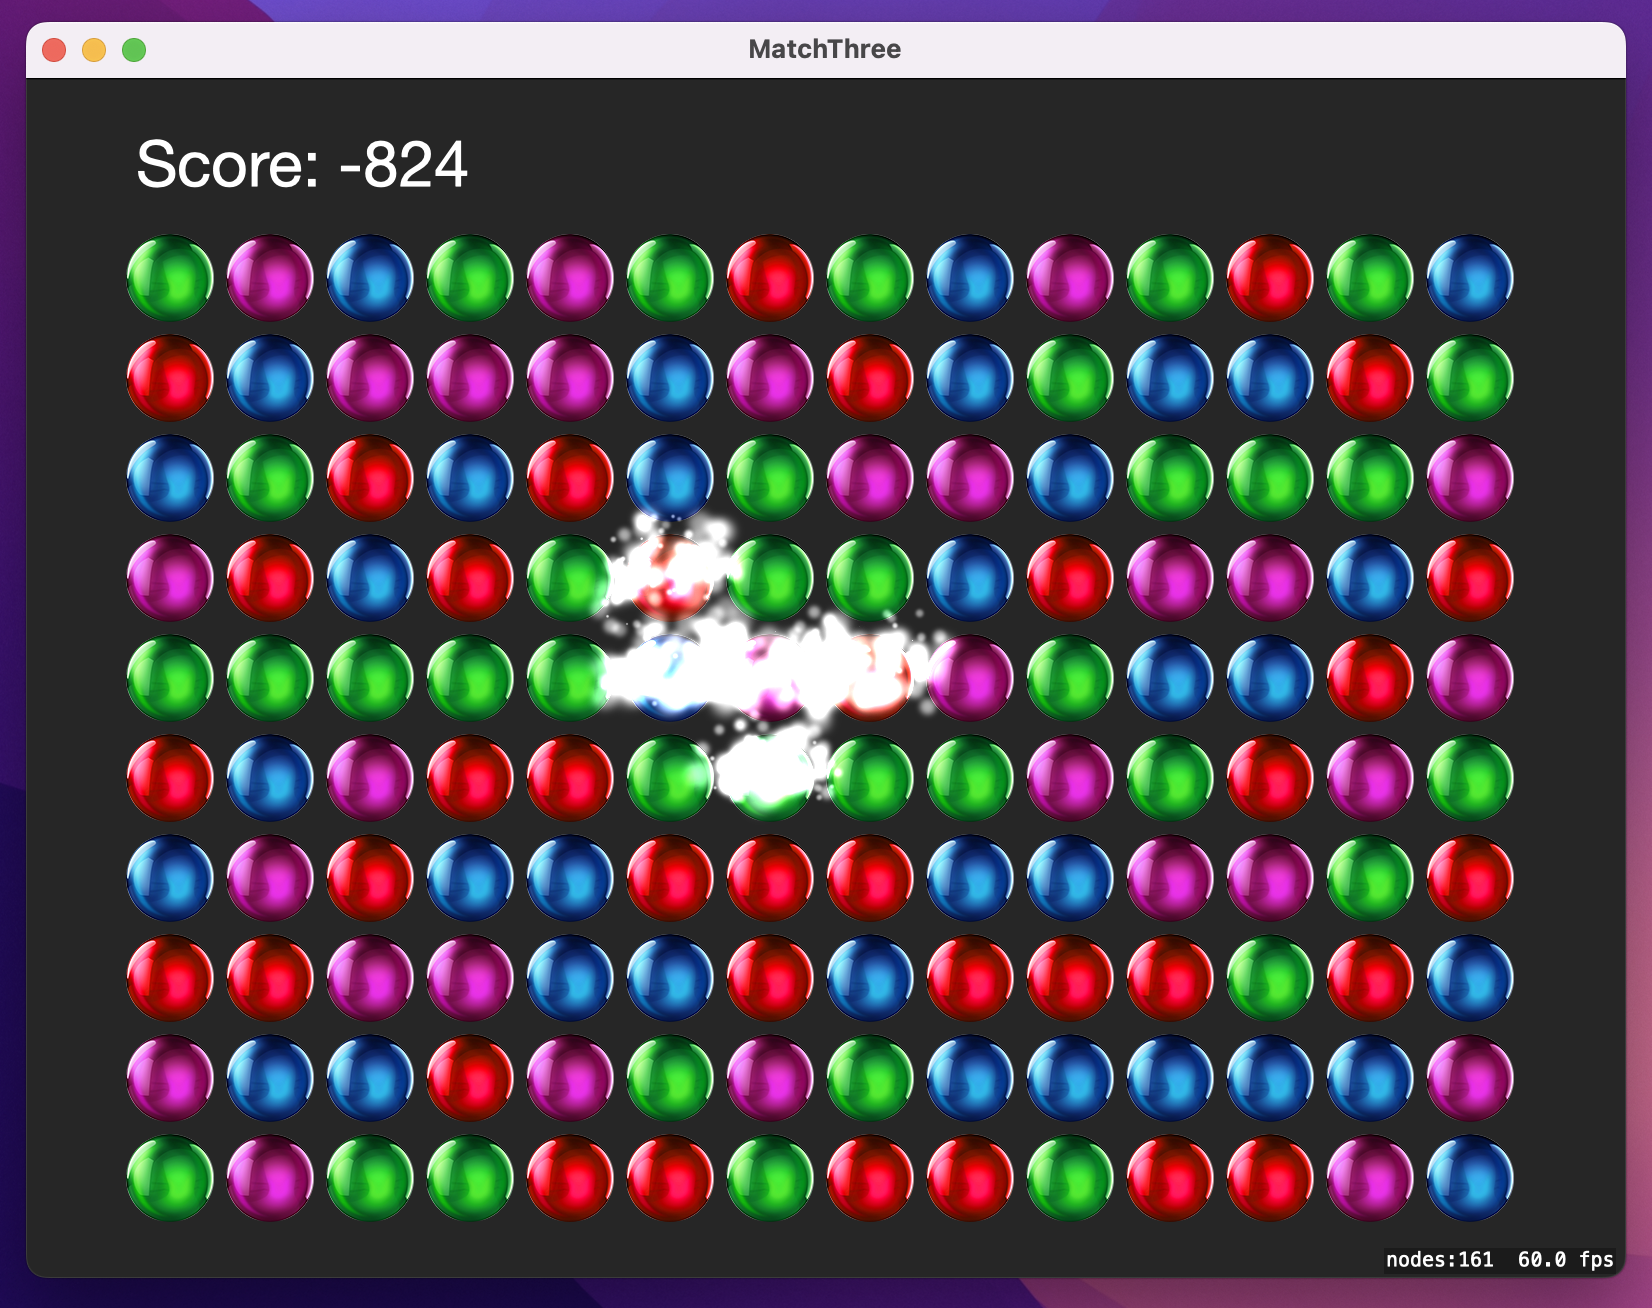
With some more tinkering in Xcode’s graphical editor you could make the particles look even nicer, but the code doesn’t change.
That’s the game complete, so go and play! Match three games like this are ten a penny, and you can see why: we implemented one in less than 200 lines of code!
That’s the final game project in this book, and I hope you enjoyed it! We covered a variety of new things, not least GKShuffledDistribution, NumberFormatter, and SKShapeNode, and let’s not forget particle effects – everyone loves particle effects, right?
While building this game, you might have wondered why I didn’t use physics. After all, having balls disappear and fall down seems like the perfect use for it! Sadly, physics are a bit too real – we need our balls to stay aligned in their invisible columns with precise spacing, and if they started to behave realistically then we could no longer perfectly predict where everything would be. As you saw in project 11, SpriteKit makes physics really easy, but that doesn’t mean they always need to be used!
There are two changes I think you should investigate for this game. First, an obvious one: make the game end once the time runs out. This should stop the player from clicking any further, and also show a large “Game over!” message.
Once you have a game over screen in place, the second change I would recommend is forcibly ending the game if the player selects 1 ball. This makes the game much harder, because right now you can click a few 1s to sacrifice a few thousand points, but it’s worth it if the pay off is 65,000 points when you match 16 of the same type. To discourage players from doing that, make it so that clicking any ball by itself ends the game immediately.
Copyright © 2023 Paul Hudson, hackingwithswift.com.
You should follow me on Twitter.