![]()
Xcode is Apple’s programming application for developers. It’s free from the Mac App Store, and it's required to do development for Apple’s platforms. So, your first action is to click here to install Xcode from the Mac App Store – it’s quite a big download, so start downloading it now and carry on reading.
While that's downloading, I can explain a couple of the absolute basics to you:
That’s it for the basics – if Xcode still hasn't finished downloading then why not watch some Taylor Swift videos while you wait? The examples in this tutorial will certainly make a lot more sense…
Got Xcode installed? OK! Let’s do this…
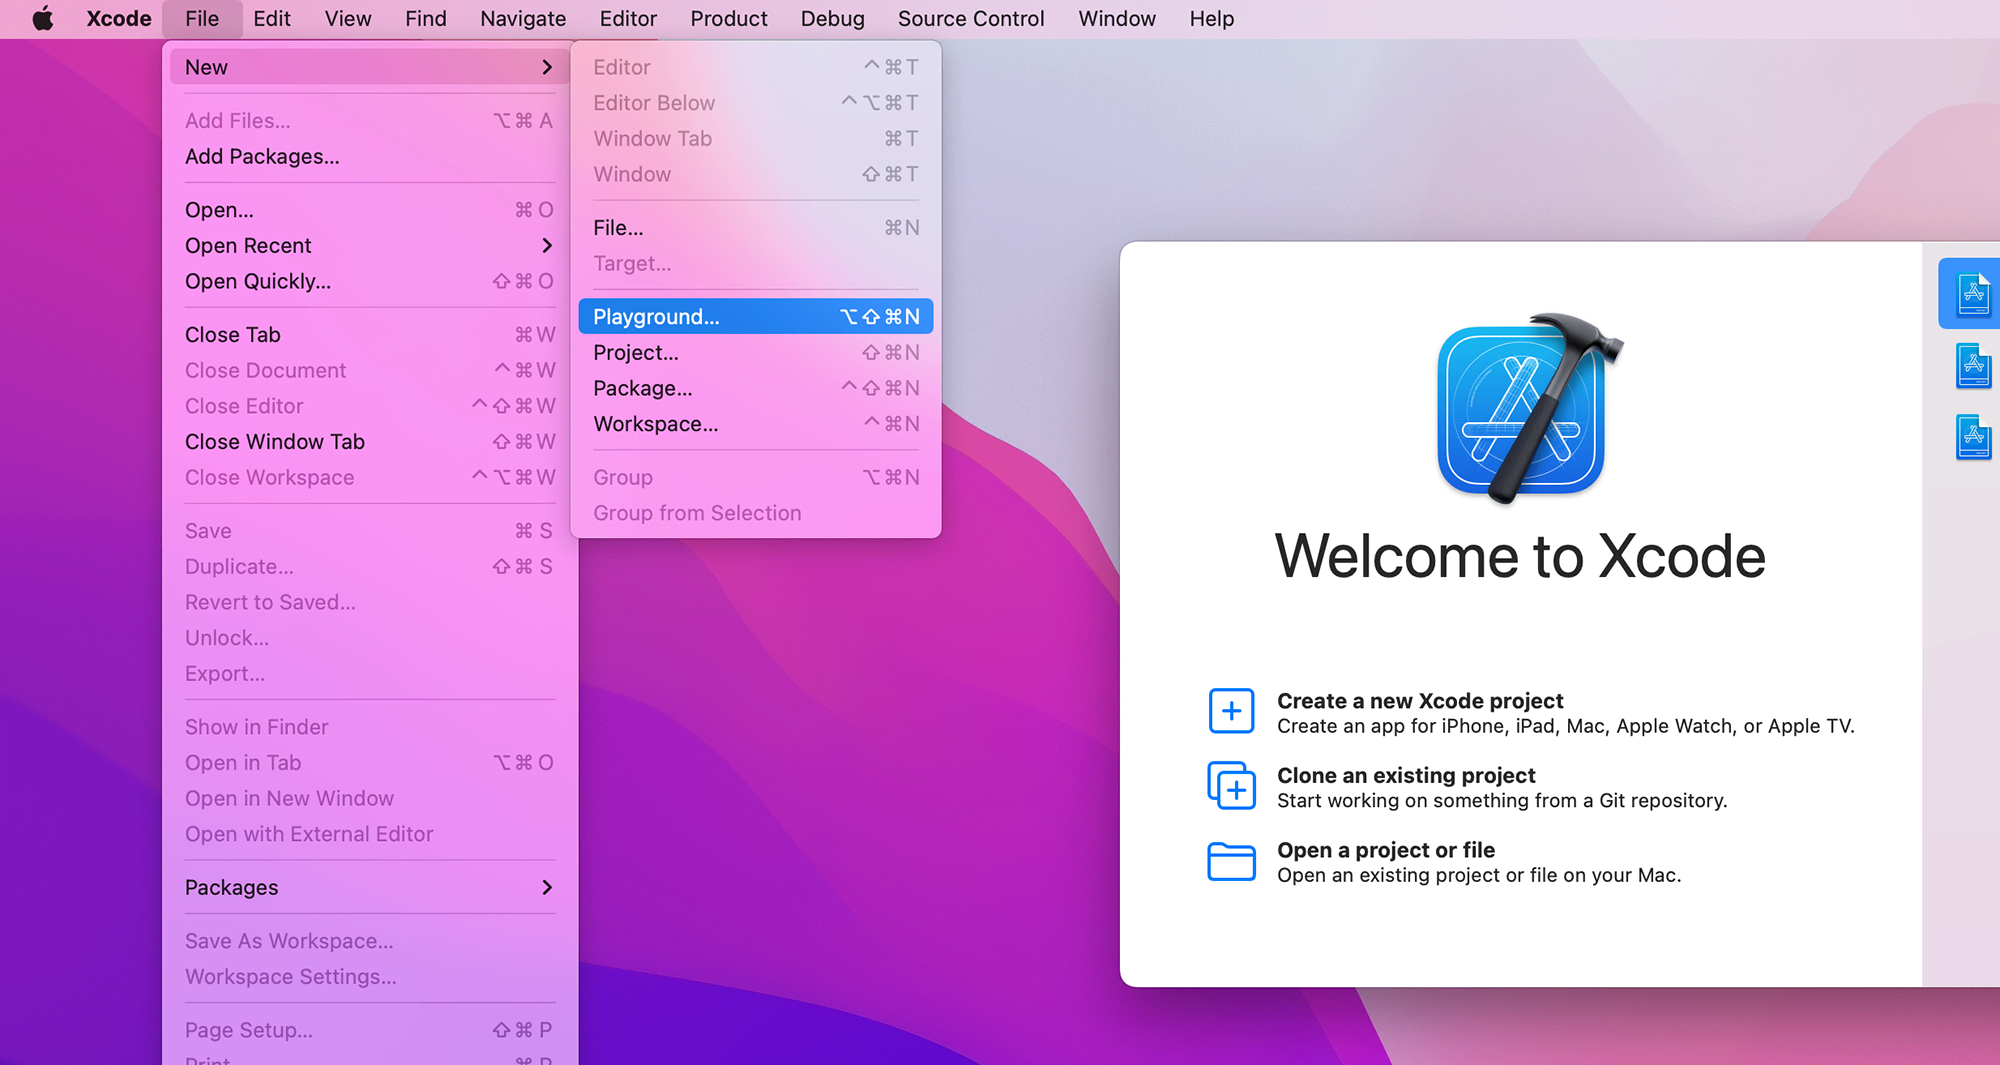
When you launch Xcode, you’ll see the Welcome to Xcode window where you can create a new project or open one of your recent projects. We don’t want a project for now, because we’ll be using a playground – little mini projects that let us run code quickly. You can make a new playground by going to the File menu and choosing New > Playground.
Xcode will ask you whether you want to create a playground for iOS or macOS, but it doesn’t matter here – this introduction is almost exclusively about the Swift language, with no user interface components. For the avoidance of problems, leave “iOS” selected for the platform. You’ll see a list of playground templates you can choose from, but we’re going to start small here so please choose Blank.
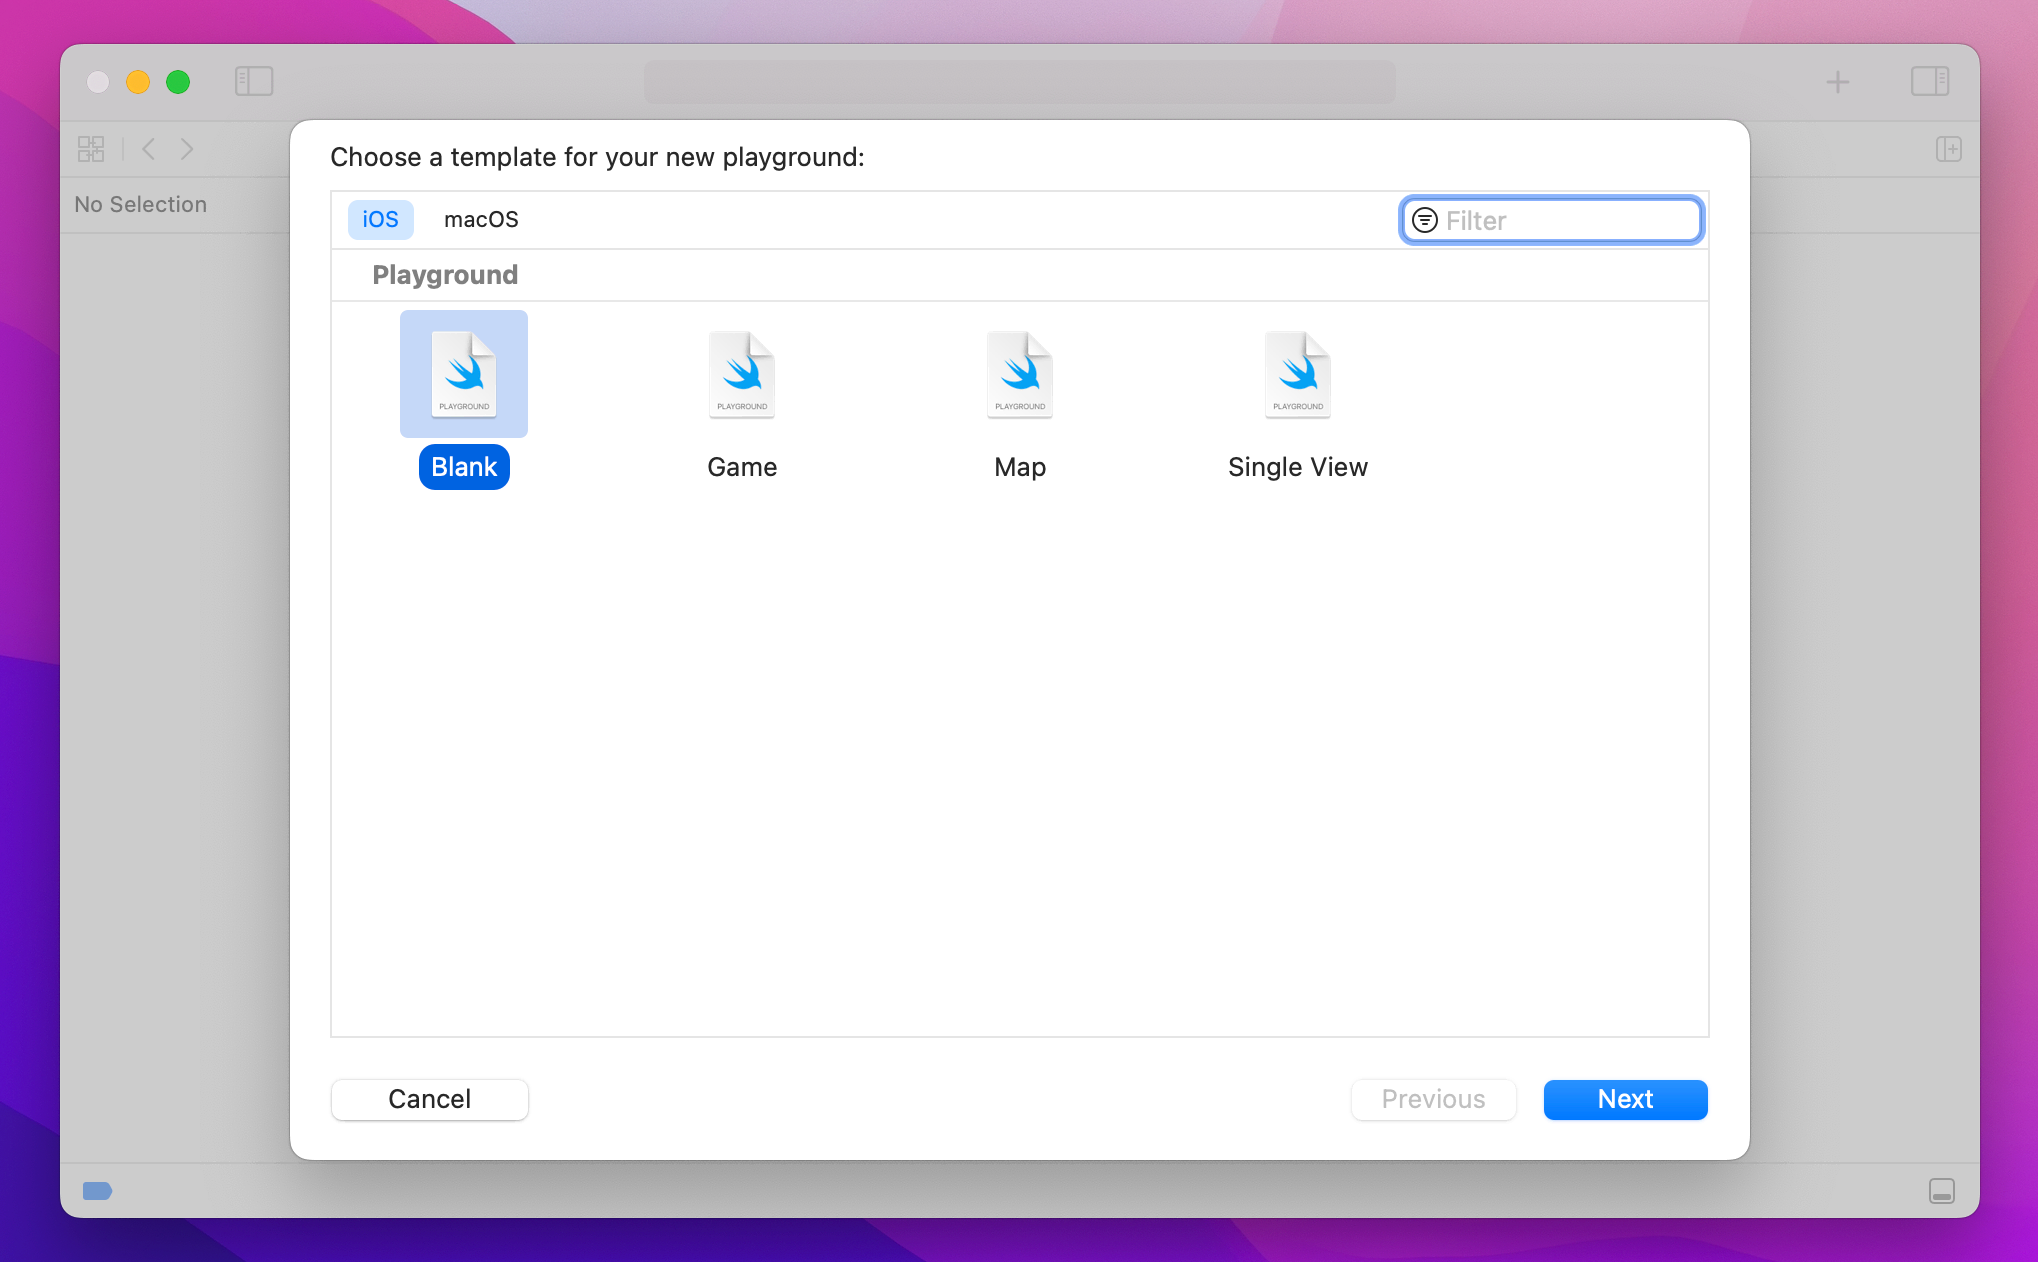
Finally, Xcode will ask you to name your playground – the default name of "MyPlayground" is fine, so go ahead and click Create.
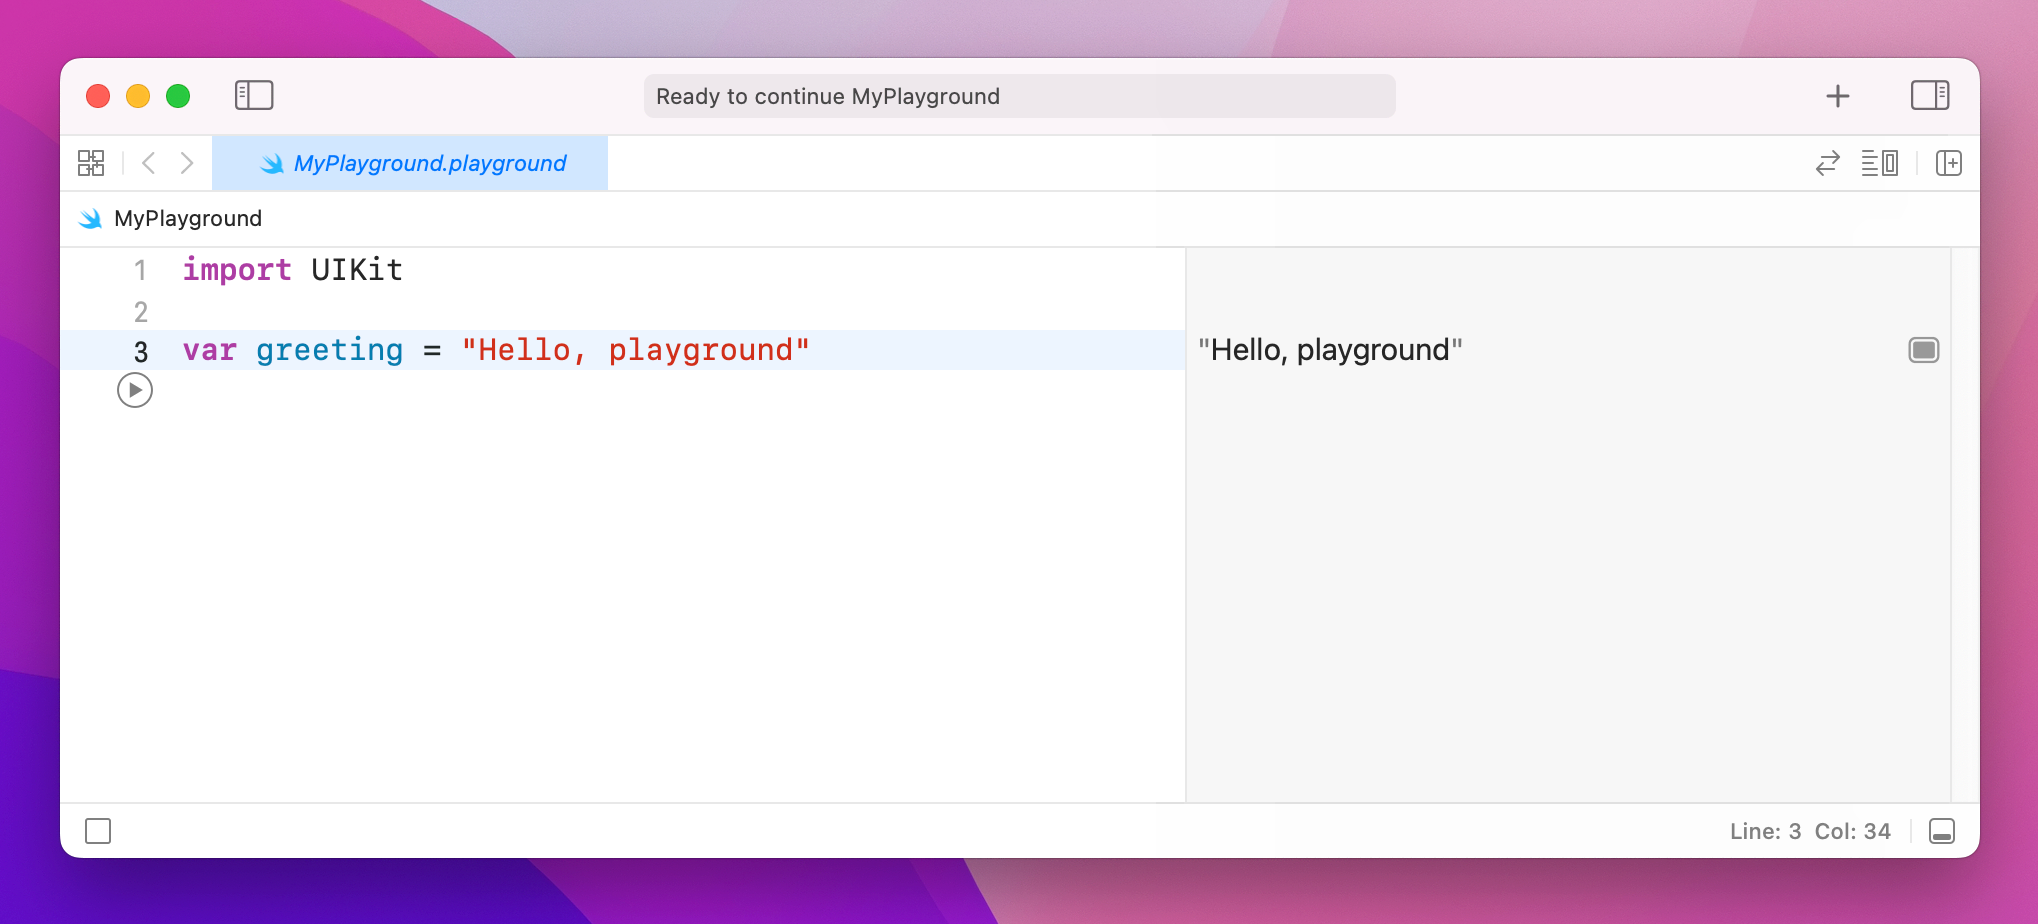
What you'll see is a window split in two. On the left you'll see this:
import UIKit

var greeting = "Hello, playground"
And on the right, once Xcode has built and run the code, you’ll see this: "Hello, playground". Note that build and running the code takes 10 seconds or so the first time, but is fast otherwise – Xcode has to launch a mini simulator behind the scenes.
This split is important, because it divides code and results. The code is in the left pane, and you will edit this to do your own Swift work as we go. The results are in the right pane, and it shows you what your Swift code has done. In this case, it’s telling us that we successfully set the value "Hello, playground."
Playgrounds run whatever code you write, one line at a time, and show the updated results in the side bar. To the left of each line of code you’ll see a blue bar, and if you hover over various lines there you’ll see you can press a play button to run the code up to that point.
Playgrounds are a great way to try some code and see the results quickly. They are extremely powerful too, as you’ll see over the next hour or so. Let’s get started writing Swift!
Every useful program needs to store data at some point, and in Swift there are two ways to do it: variables and constants. A variable is a data store that can have its value changed whenever you want, and a constant is a data store that you set once and can never change. So, variables have values that can vary, and constants have values that are constant – easy, right?
Having both these options might seem pointless, after all you could just create a variable then never change it – why does it need to be made a constant? Well, it turns out that many programmers are – shock! – less than perfect at programming, and we make mistakes.
One of the advantages of separating constants and variables is that Xcode will tell us if we’ve made a mistake. If we say, "make this date a constant, because I know it will never change" then 10 lines later try to change it, Xcode will refuse to build our app.
Constants are also important because they let Xcode make decisions about the way it builds your app. If it knows a value will never change, it is able to apply optimizations to make your code run faster.
In Swift, you make a variable using the var keyword, like this:
var name = "Tim McGraw"Let’s put that into a playground so you can start getting feedback. Delete everything in there apart from the import UIKit line (that's the bit that pulls in Apple's core iOS framework and it's needed later on), and add that variable.
Because this is a variable, you can change it whenever you want, but you shouldn't use the var keyword each time – that's only used when you're declaring new variables. Try writing this:
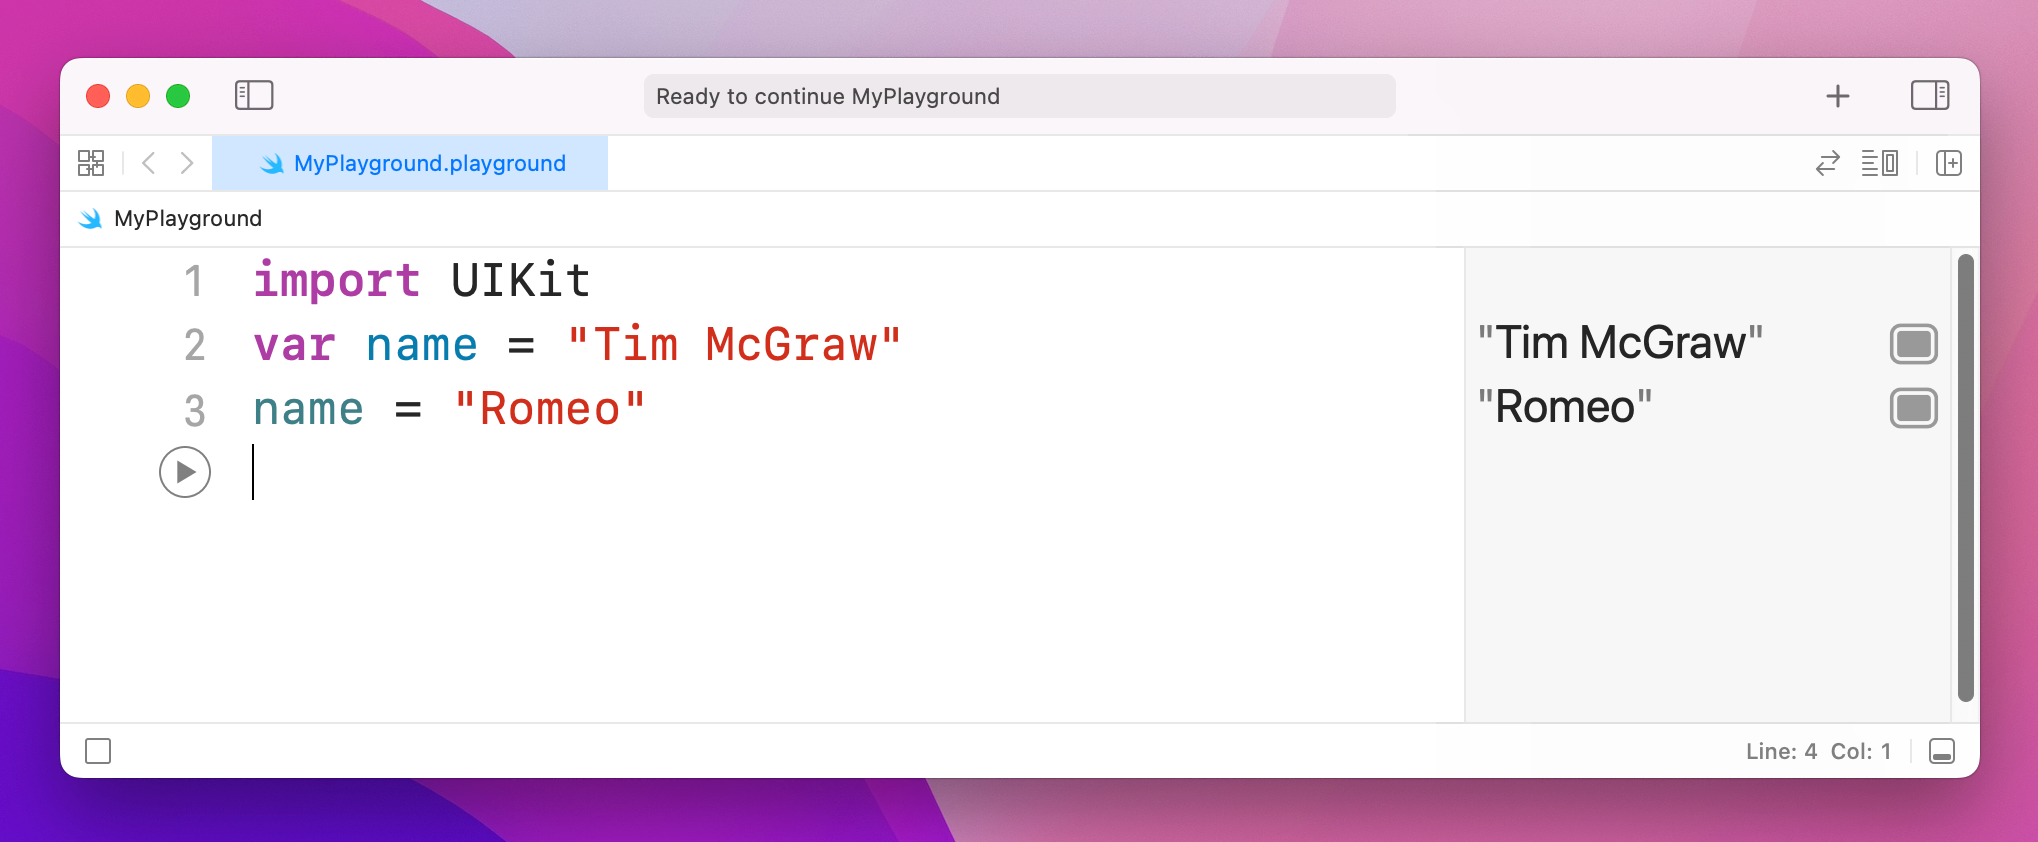
var name = "Tim McGraw"
name = "Romeo"
So, the first line creates the name variable and gives it an initial value, then the second line updates the name variable so that its value is now "Romeo". You'll see both values printed in the results area of the playground.
Now, what if we had made that a constant rather than a variable? Well, constants use the let keyword rather than var, so you can change your first line of code to say let name rather than var name like this:
import UIKit
let name = "Tim McGraw"
name = "Romeo"
But now there's a problem: Xcode will show a red warning next to line three, and it should have drawn a red underline underneath your code. Xcode’s message is “Cannot assign to value: 'name' is a 'let' constant”, which is Xcode-speak for "you're trying to change a constant and you can't do that."

So, constants are a great way to make a promise to Swift and to yourself that a value won't change, because if you do try to change it Xcode will refuse to run. Swift developers have a strong preference to use constants wherever possible because it makes your code easier to understand. In fact, Xcode will actually tell you if you make something a variable then never change it!
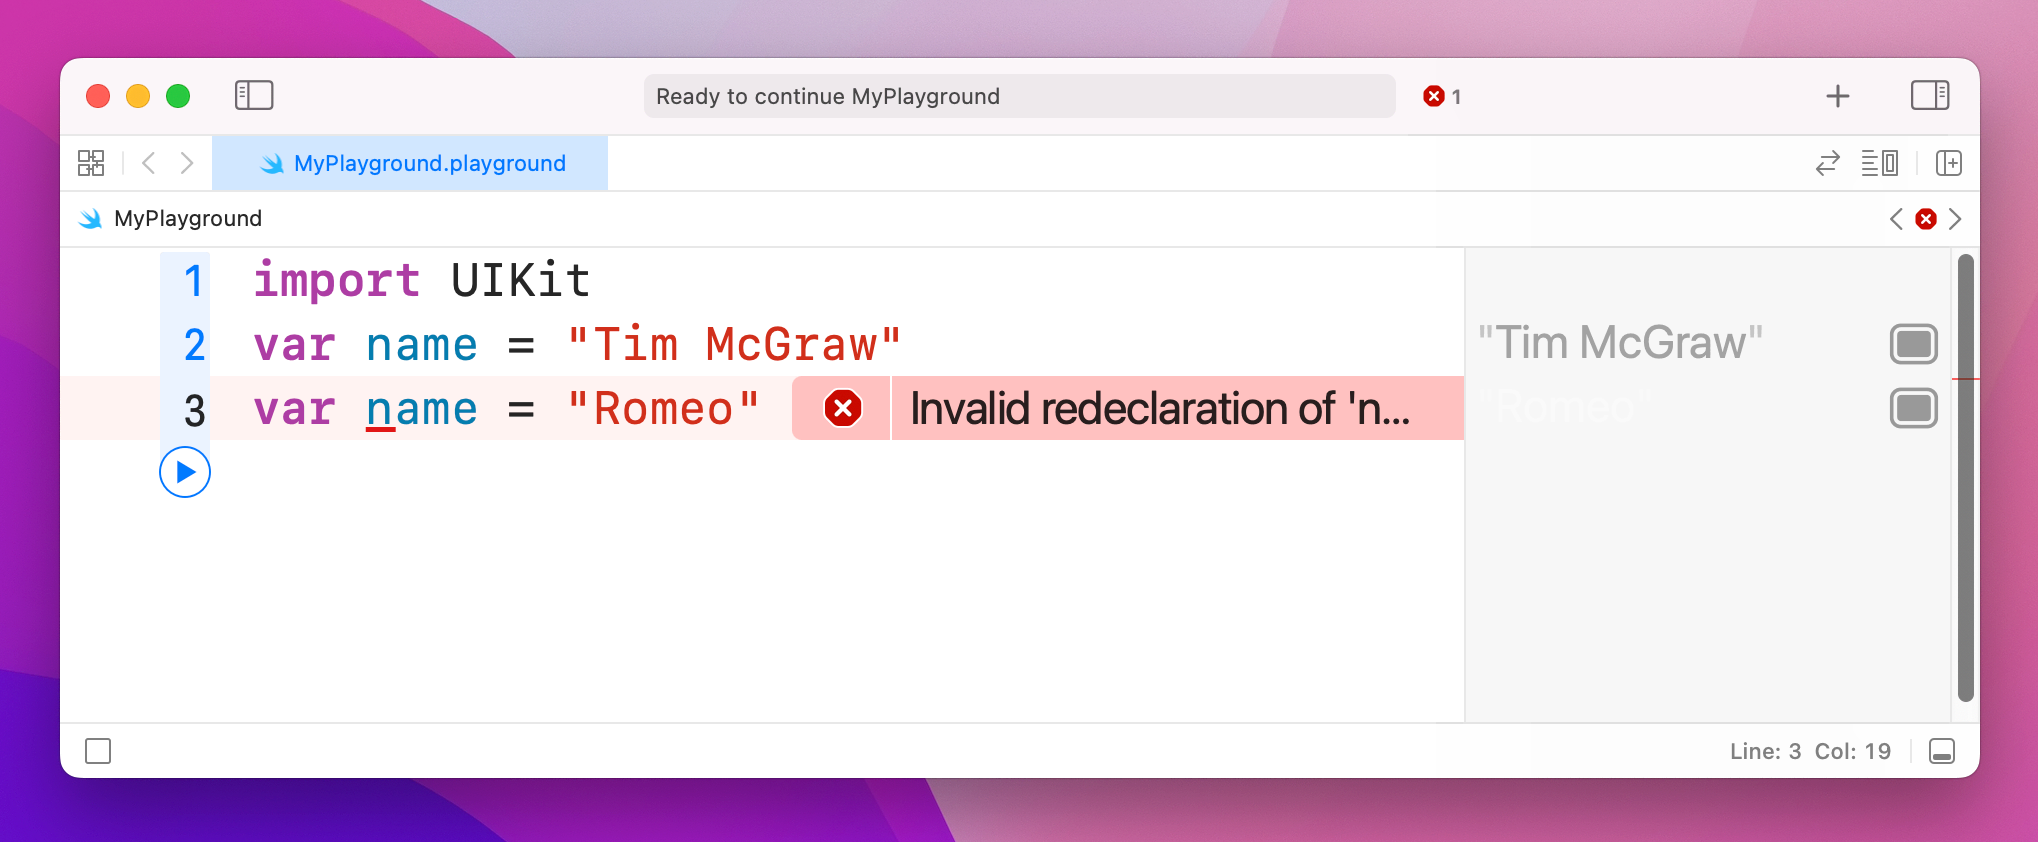
Important note: variable and constant names must be unique in your code. You'll get an error if you try to use the same variable name twice, like this:
var name = "Tim McGraw"
var name = "Romeo"
If the playground finds an error in your code, it will either flag up a warning in a red box, or will just refuse to run. You'll know if the latter has happened because the text in the results pane has gone gray rather than its usual black.
There are lots of kinds of data, and Swift handles them all individually. You already saw one of the most important types when you assigned some text to a variable, but in Swift this is called a String – literally a string of characters.
Strings can be long (e.g. a million letters or more), short (e.g. 10 letters) or even empty (no letters), it doesn't matter: they are all strings in Swift's eyes, and all work the same. Swift knows that name should hold a string because you assign a string to it when you create it: "Tim McGraw". If you were to rewrite your code to this it would stop working:
var name
name = "Tim McGraw"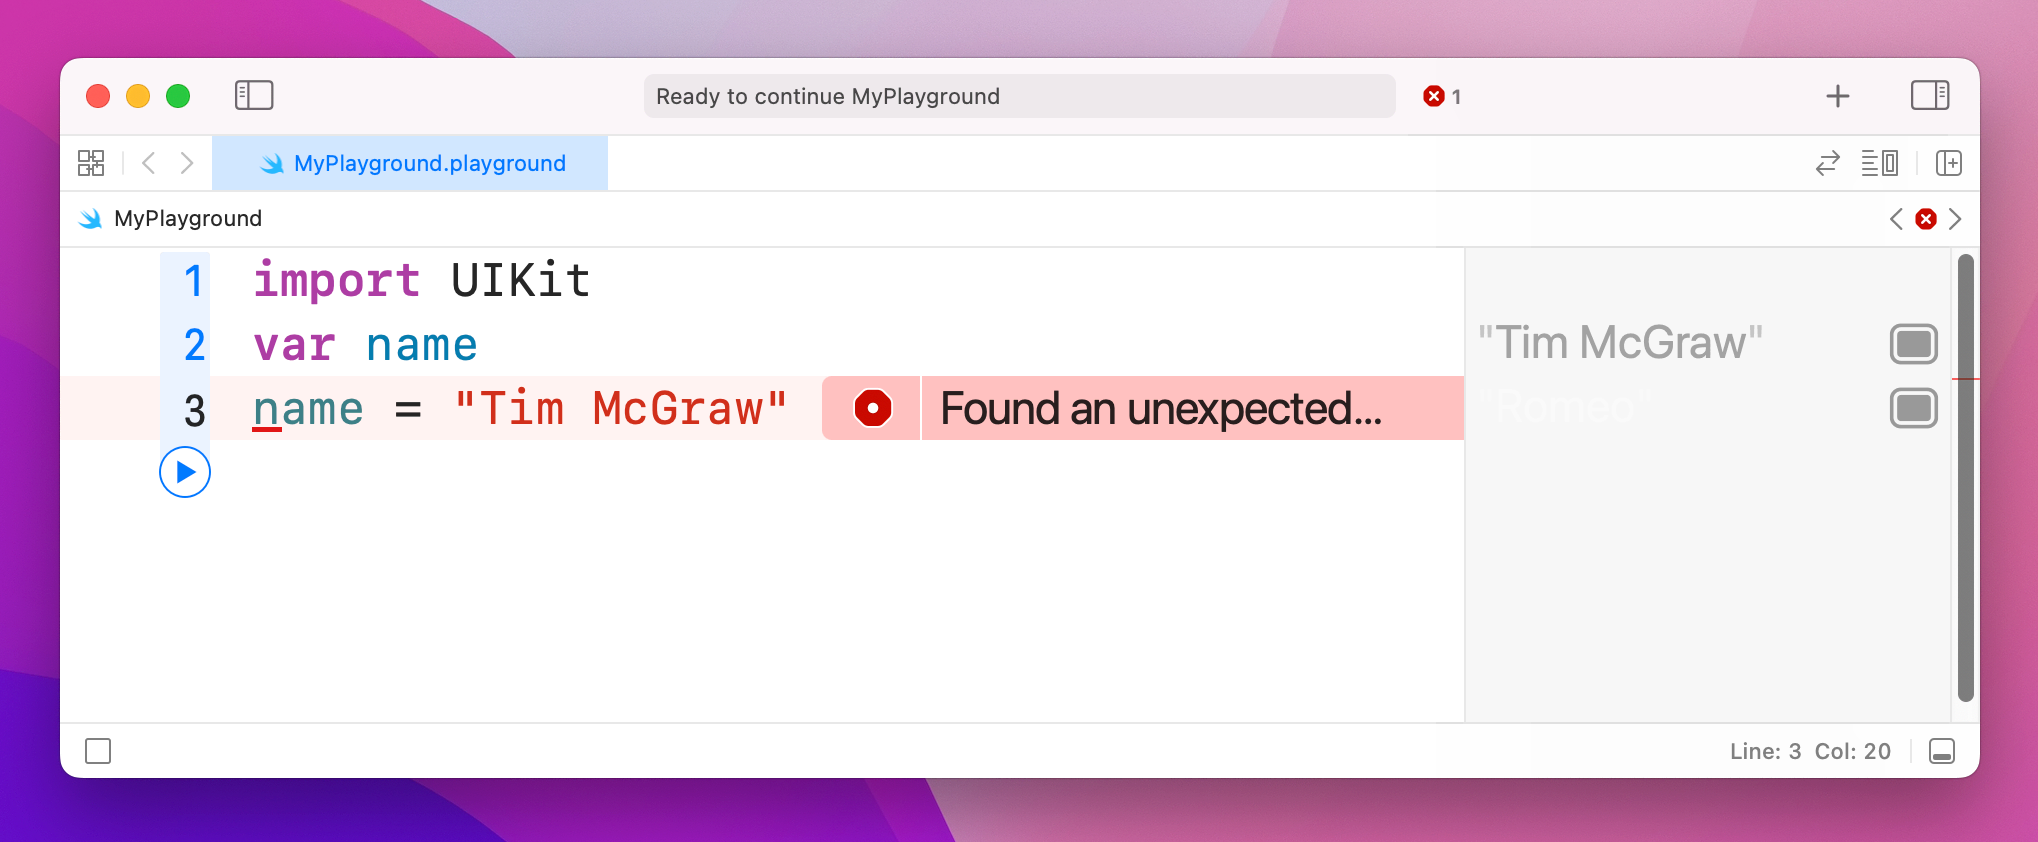
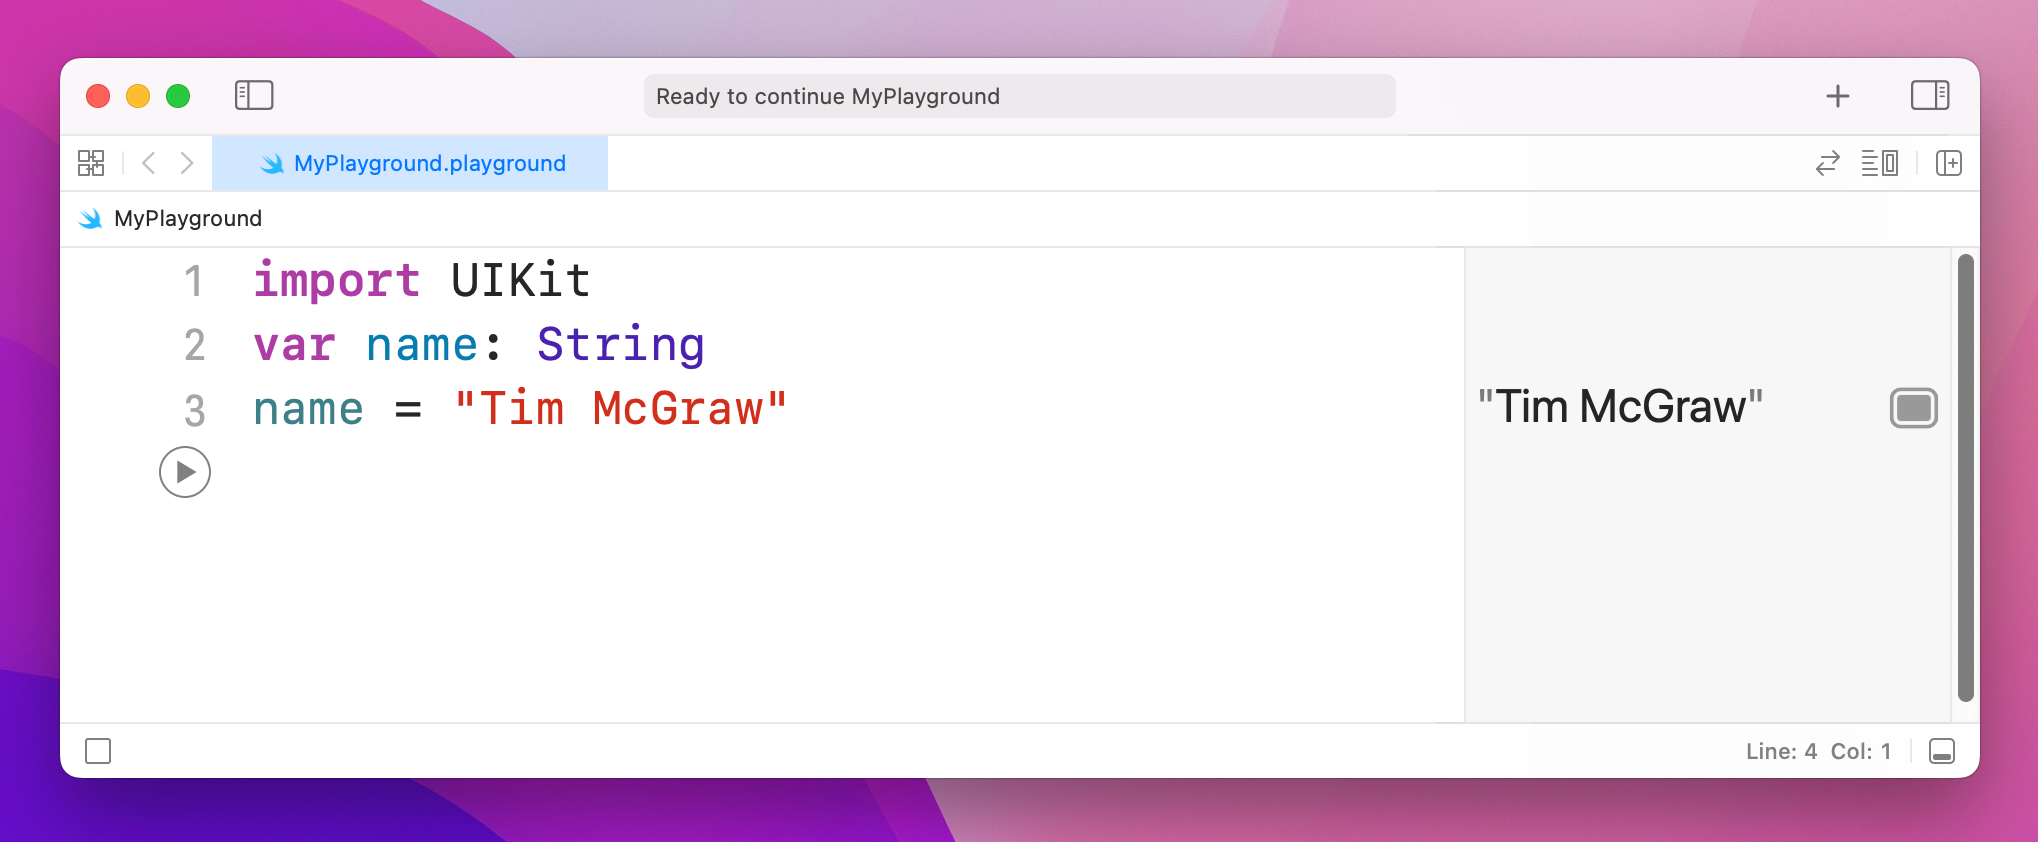
At this point you have two options: either create your variable and give it an initial value on one line of code, or use what's called a type annotation, which is where you tell Swift what data type the variable will hold later on, even though you aren't giving it a value right now.
You've already seen how the first option looks, so let's look at the second: type annotations. We know that name is going to be a string, so we can tell Swift that by writing a colon then String, like this:
var name: String
name = "Tim McGraw"
Note: some people like to put a space before and after the colon, making var name : String, but they are wrong and you should try to avoid mentioning their wrongness in polite company.
The lesson here is that Swift always wants to know what type of data every variable or constant will hold. Always. You can't escape it, and that's a good thing because it provides something called type safety – if you say "this will hold a string" then later try and put a rabbit in there, Swift will refuse.
We can try this out now by introducing another important data type, called Int, which is short for "integer." Integers are round numbers like 3, 30, 300, or -16777216. For example:
var name: String
name = "Tim McGraw"

var age: Int
age = 25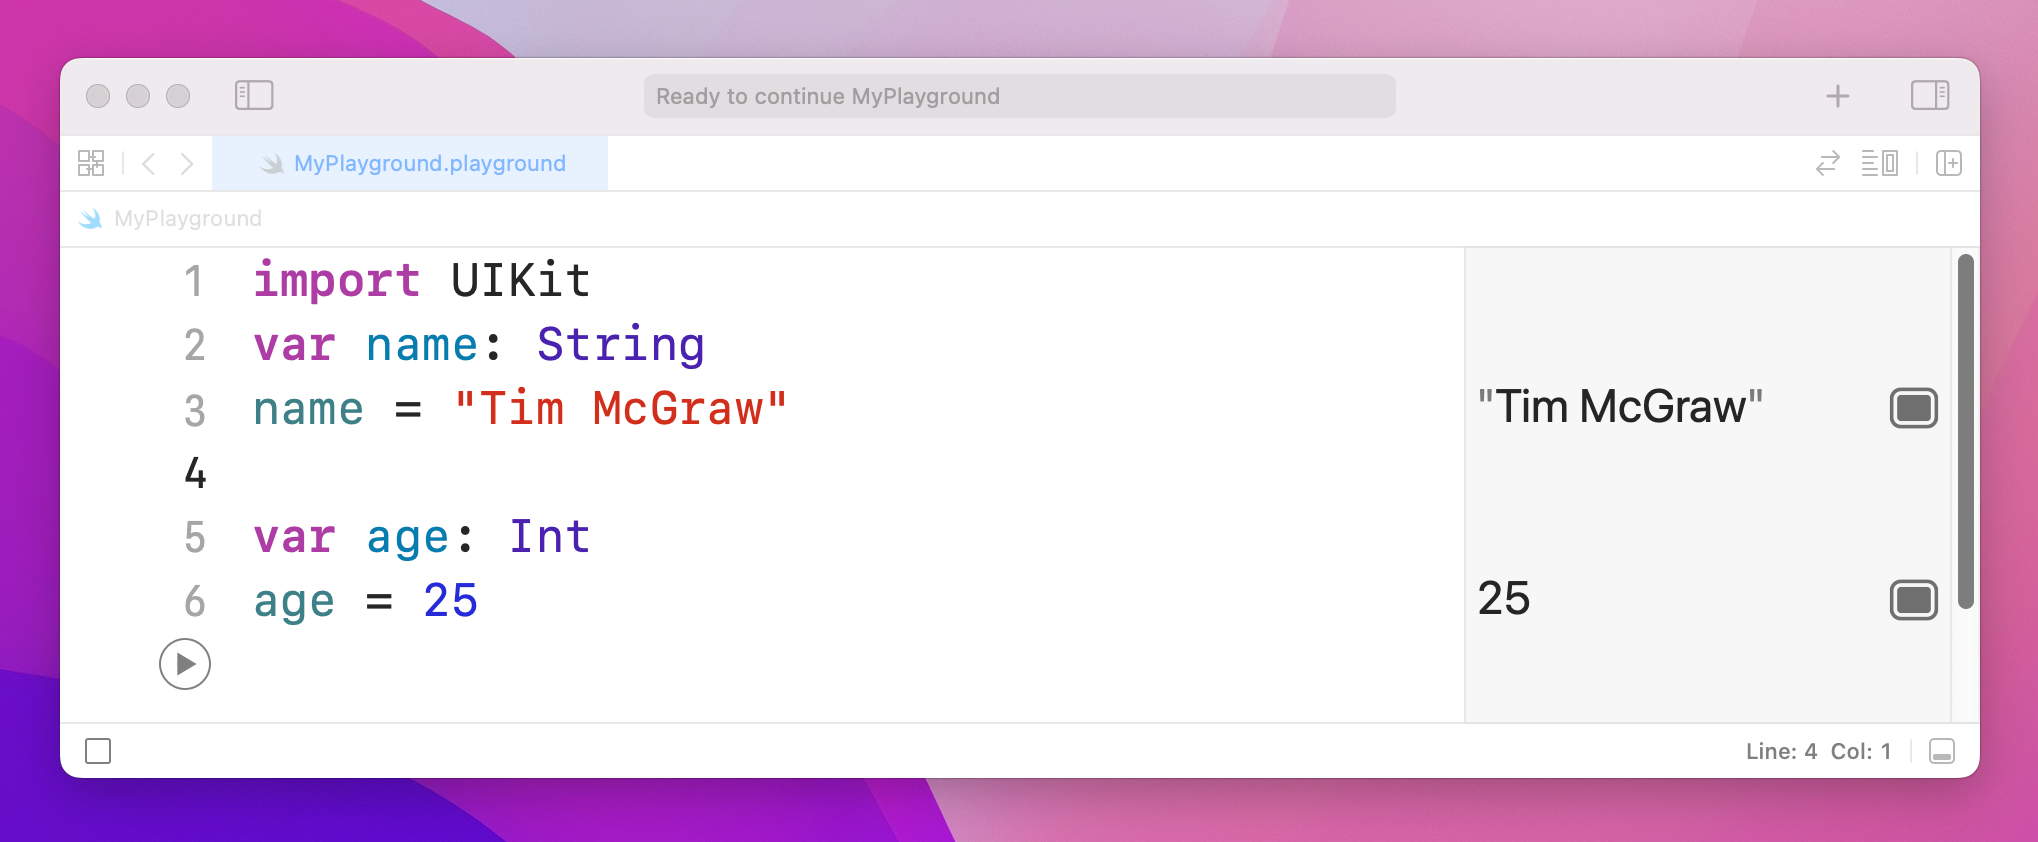
That declares one variable to be a string and one to be an integer. Note how both String and Int have capital letters at the start, whereas name and age do not – this is the standard coding convention in Swift. A coding convention is something that doesn't matter to Swift (you can write your names how you like!) but does matter to other developers. In this case, data types start with a capital letter, whereas variables and constants do not.
Now that we have variables of two different types, you can see type safety in action. Try writing this:
name = 25
age = "Tim McGraw"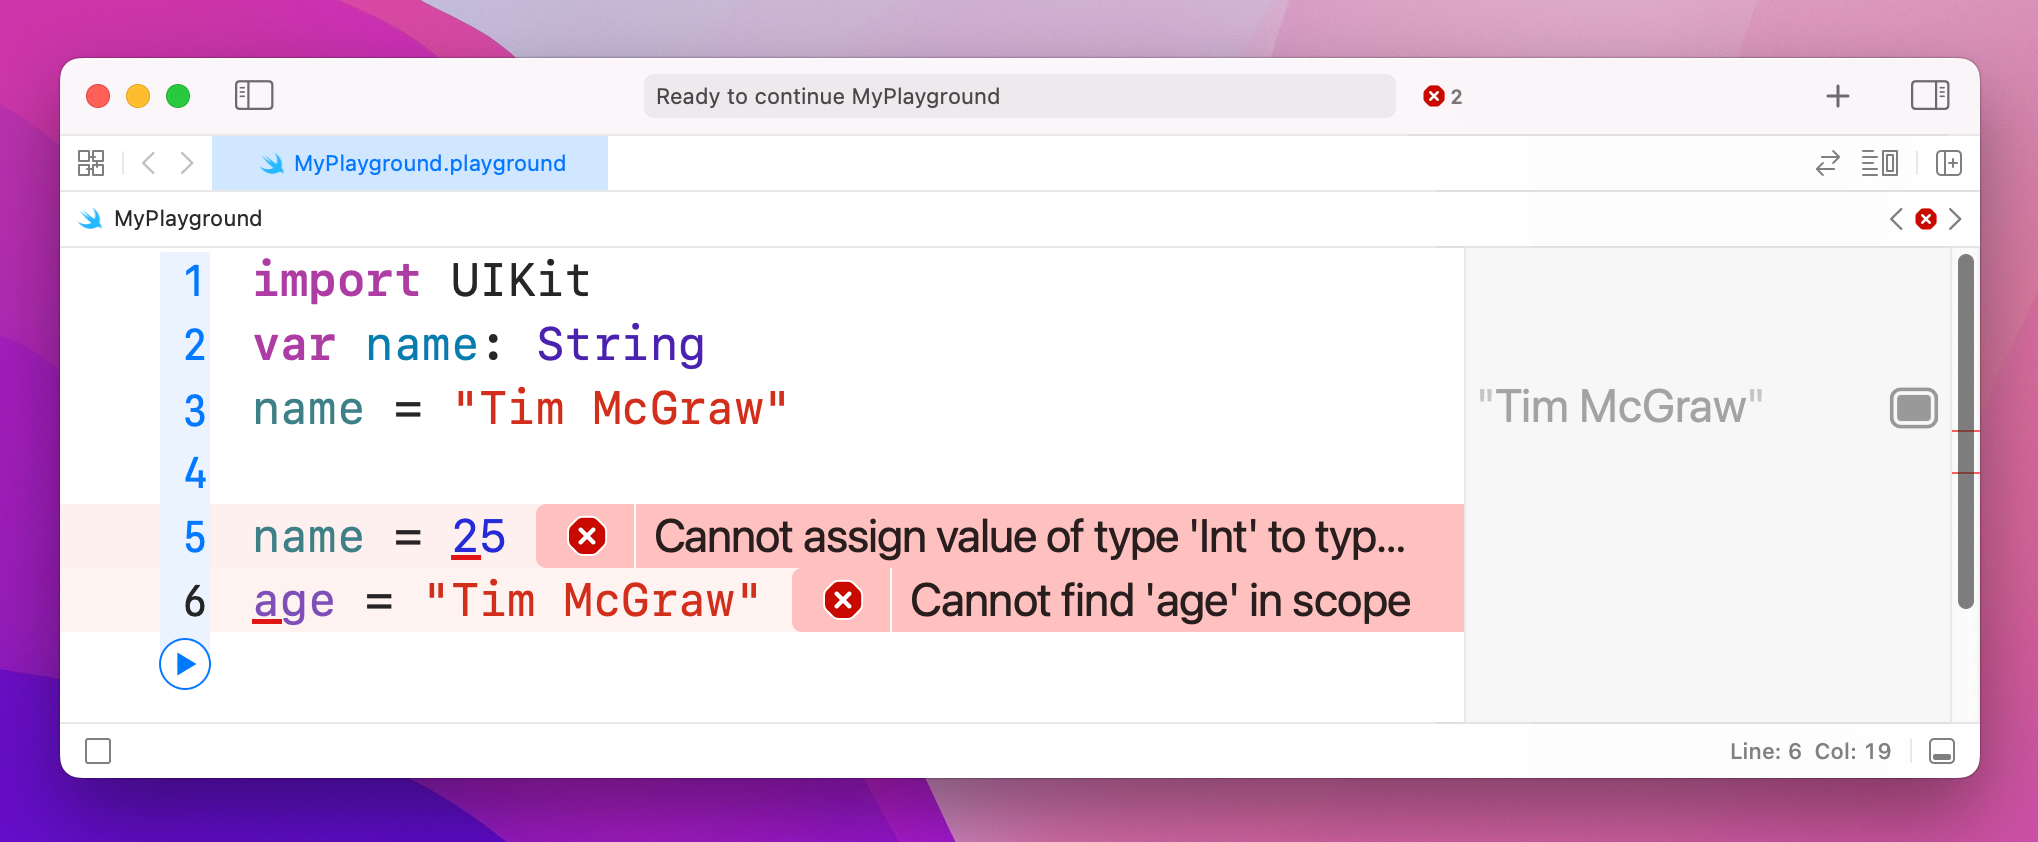
In that code, you're trying to put an integer into a string variable, and a string into an integer variable – and, thankfully, Xcode will throw up errors. You might think this is pedantic, but it's actually quite helpful: you make a promise that a variable will hold one particular type of data, and Xcode will enforce that throughout your work.
Before you go on, please delete those two lines of code causing the error, otherwise nothing in your playground will work going forward!
Let's look at two more data types, called Float and Double. This is Swift's way of storing numbers with a fractional component, such as 3.1, 3.141, 3.1415926, and -16777216.5. There are two data types for this because you get to choose how much accuracy you want, but most of the time it doesn't matter so the official Apple recommendation is always to use Double because it has the highest accuracy.
Try putting this into your playground:
var latitude: Double
latitude = 36.166667

var longitude: Float
longitude = -86.783333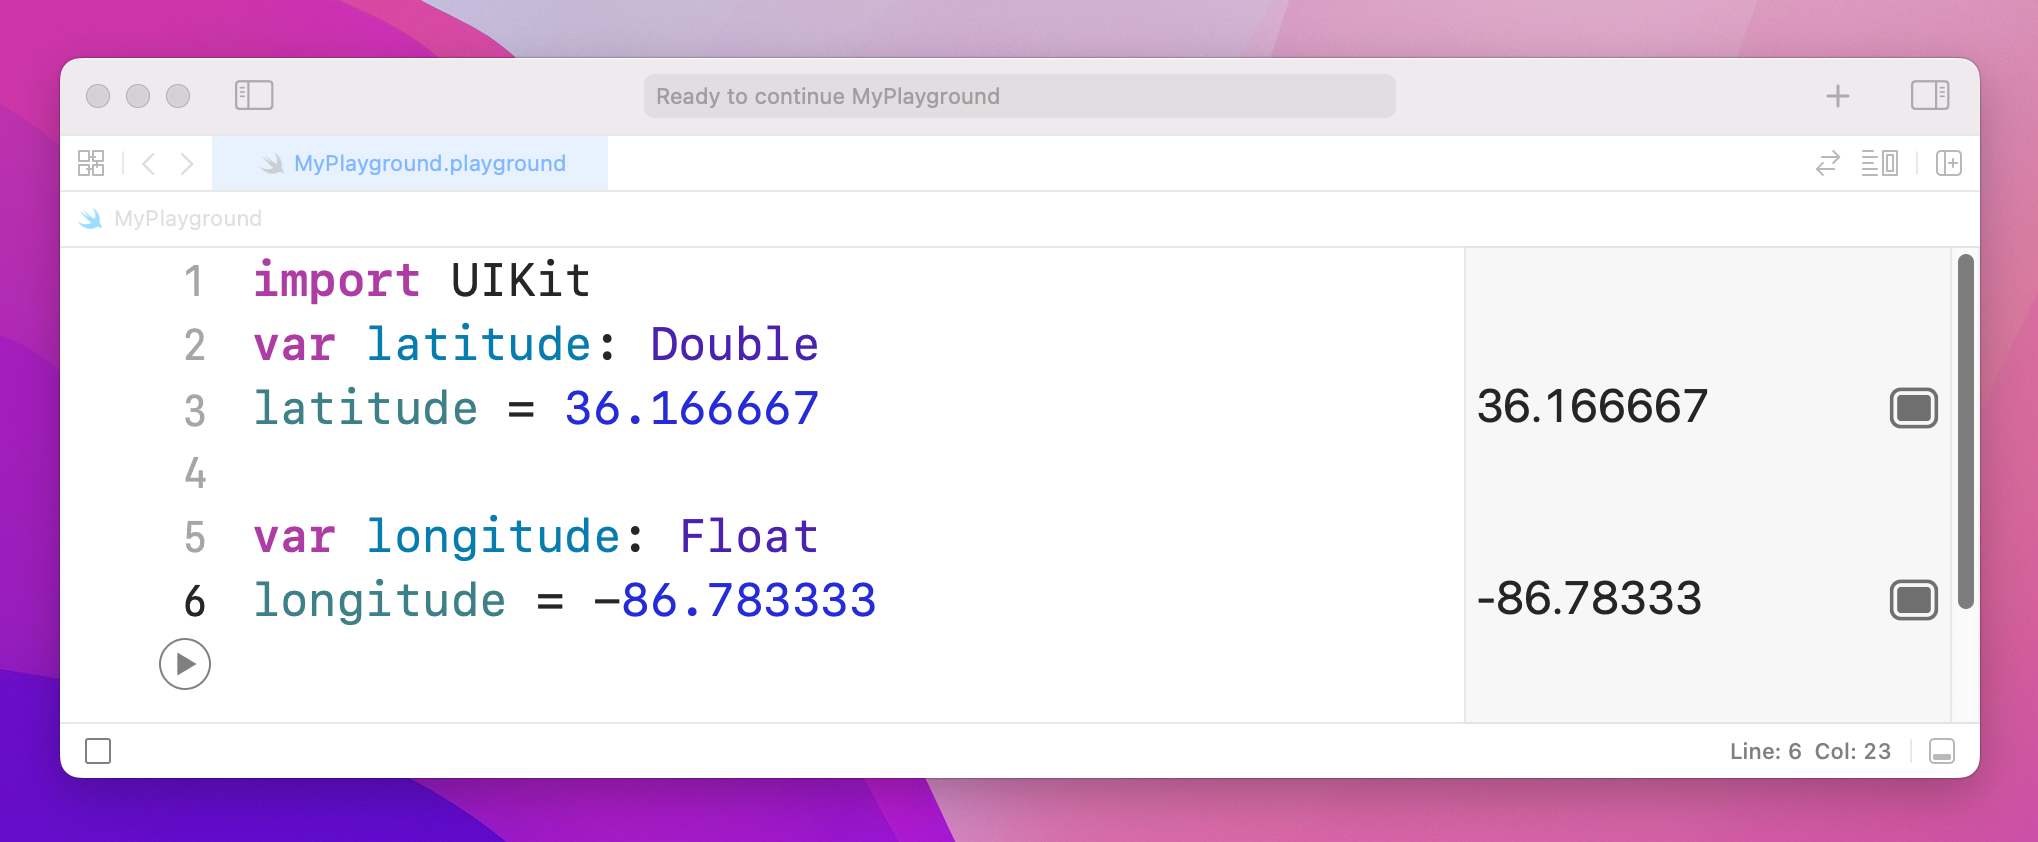
You can see both numbers appear on the right, but look carefully because there's a tiny discrepancy. We said that longitude should be equal to -86.783333, but in the results pane you'll see -86.78333 – it's missing one last 3 on the end. Now, you might well say, "what does 0.000003 matter among friends?" but this is ably demonstrating what I was saying about accuracy.
Because these playgrounds update as you type, we can try things out so you can see exactly how Float and Double differ. Try changing the code to be this:
var longitude: Float
longitude = -86.783333
longitude = -186.783333
longitude = -1286.783333
longitude = -12386.783333
longitude = -123486.783333
longitude = -1234586.783333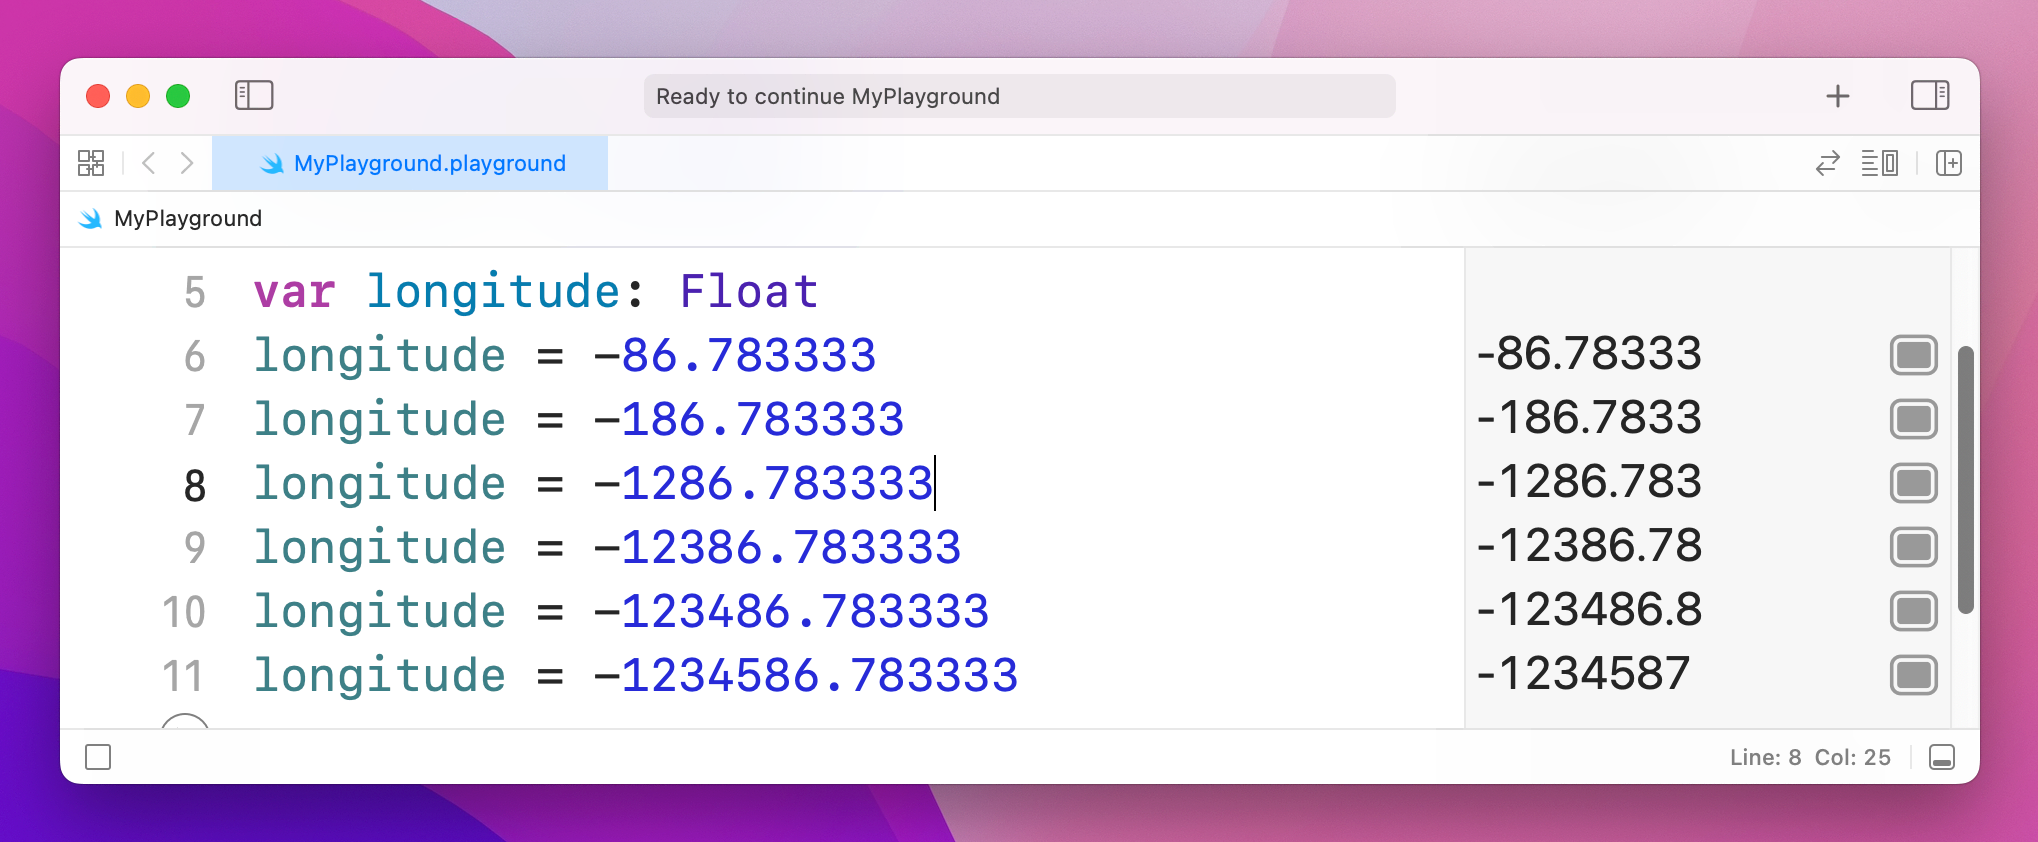
That's adding increasing numbers before the decimal point, while keeping the same amount of numbers after. But if you look in the results pane you'll notice that as you add more numbers before the point, Swift is removing numbers after. This is because it has limited space in which to store your number, so it's storing the most important part first – being off by 1,000,000 is a big thing, whereas being off by 0.000003 is less so.
Now try changing the Float to be a Double and you'll see Swift prints the correct number out every time:
var longitude: Double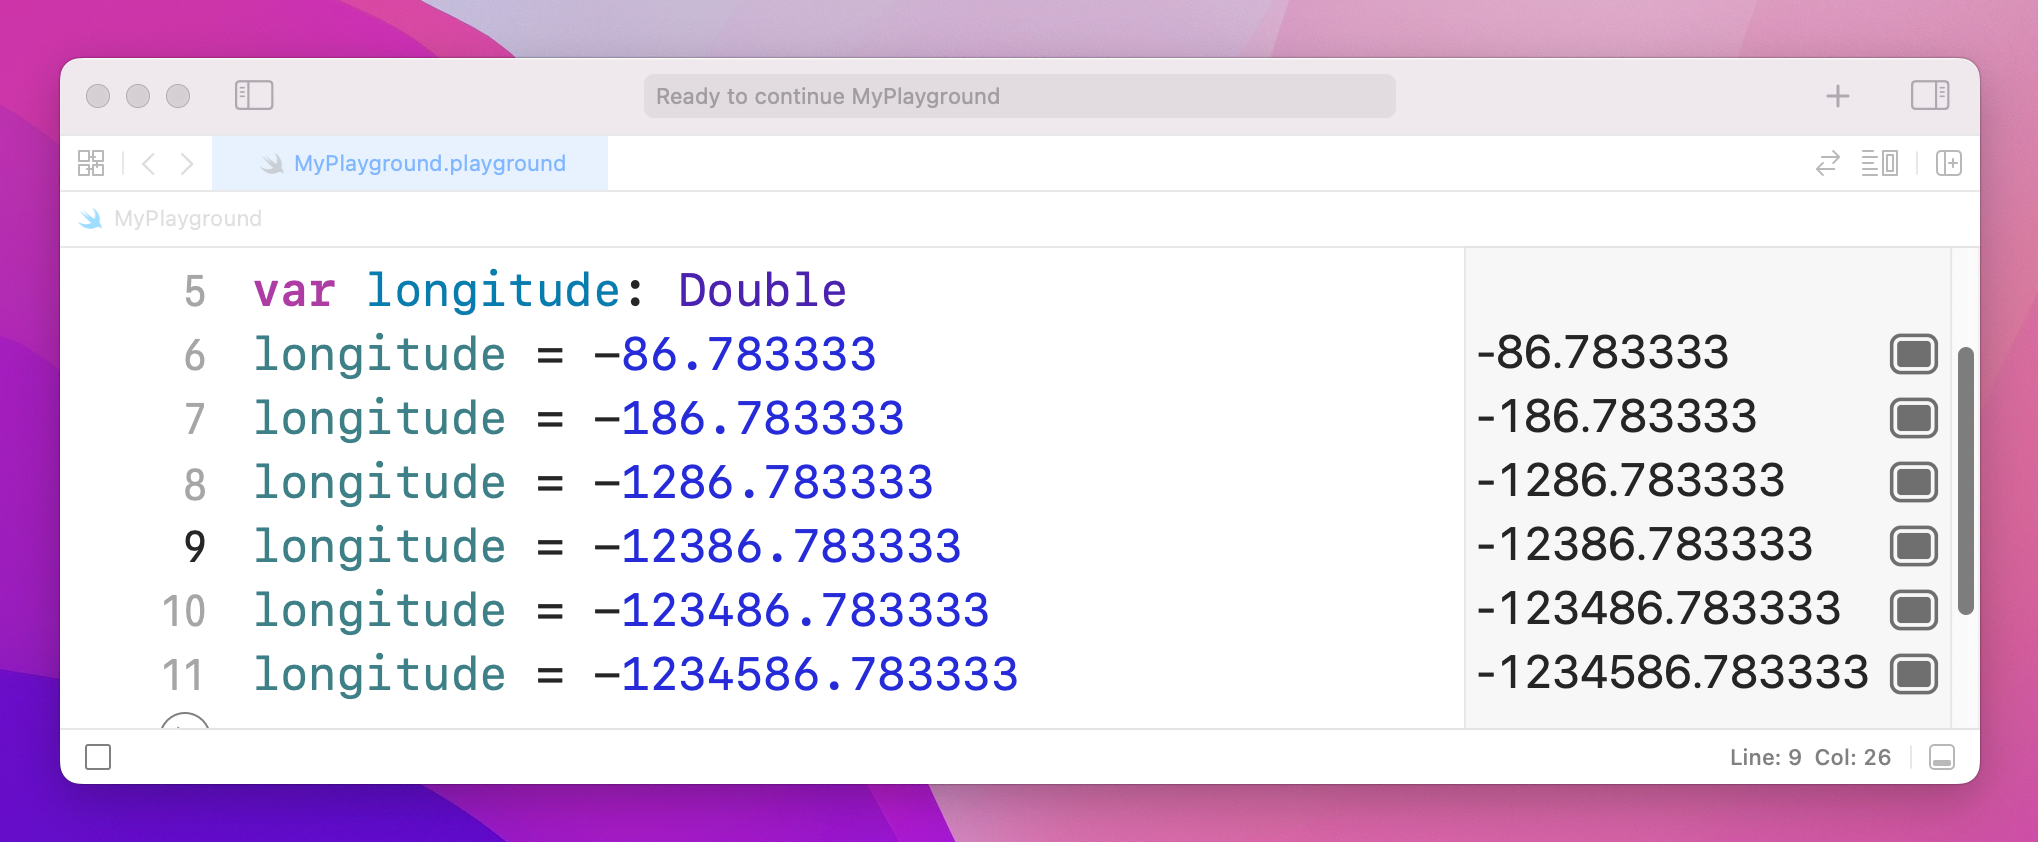
This is because, again, Double has twice the accuracy of Float so it doesn't need to cut your number to fit. Doubles still have limits, though – if you were to try a massive number like 123456789.123456789 you would see it gets cut down to 123456789.1234568.
Swift has a built-in data type that can store whether a value is true or false, called a Bool, short for Boolean. Bools don't have space for "maybe" or "perhaps", only absolutes: true or false. For example:
var stayOutTooLate: Bool
stayOutTooLate = true

var nothingInBrain: Bool
nothingInBrain = true

var missABeat: Bool
missABeat = false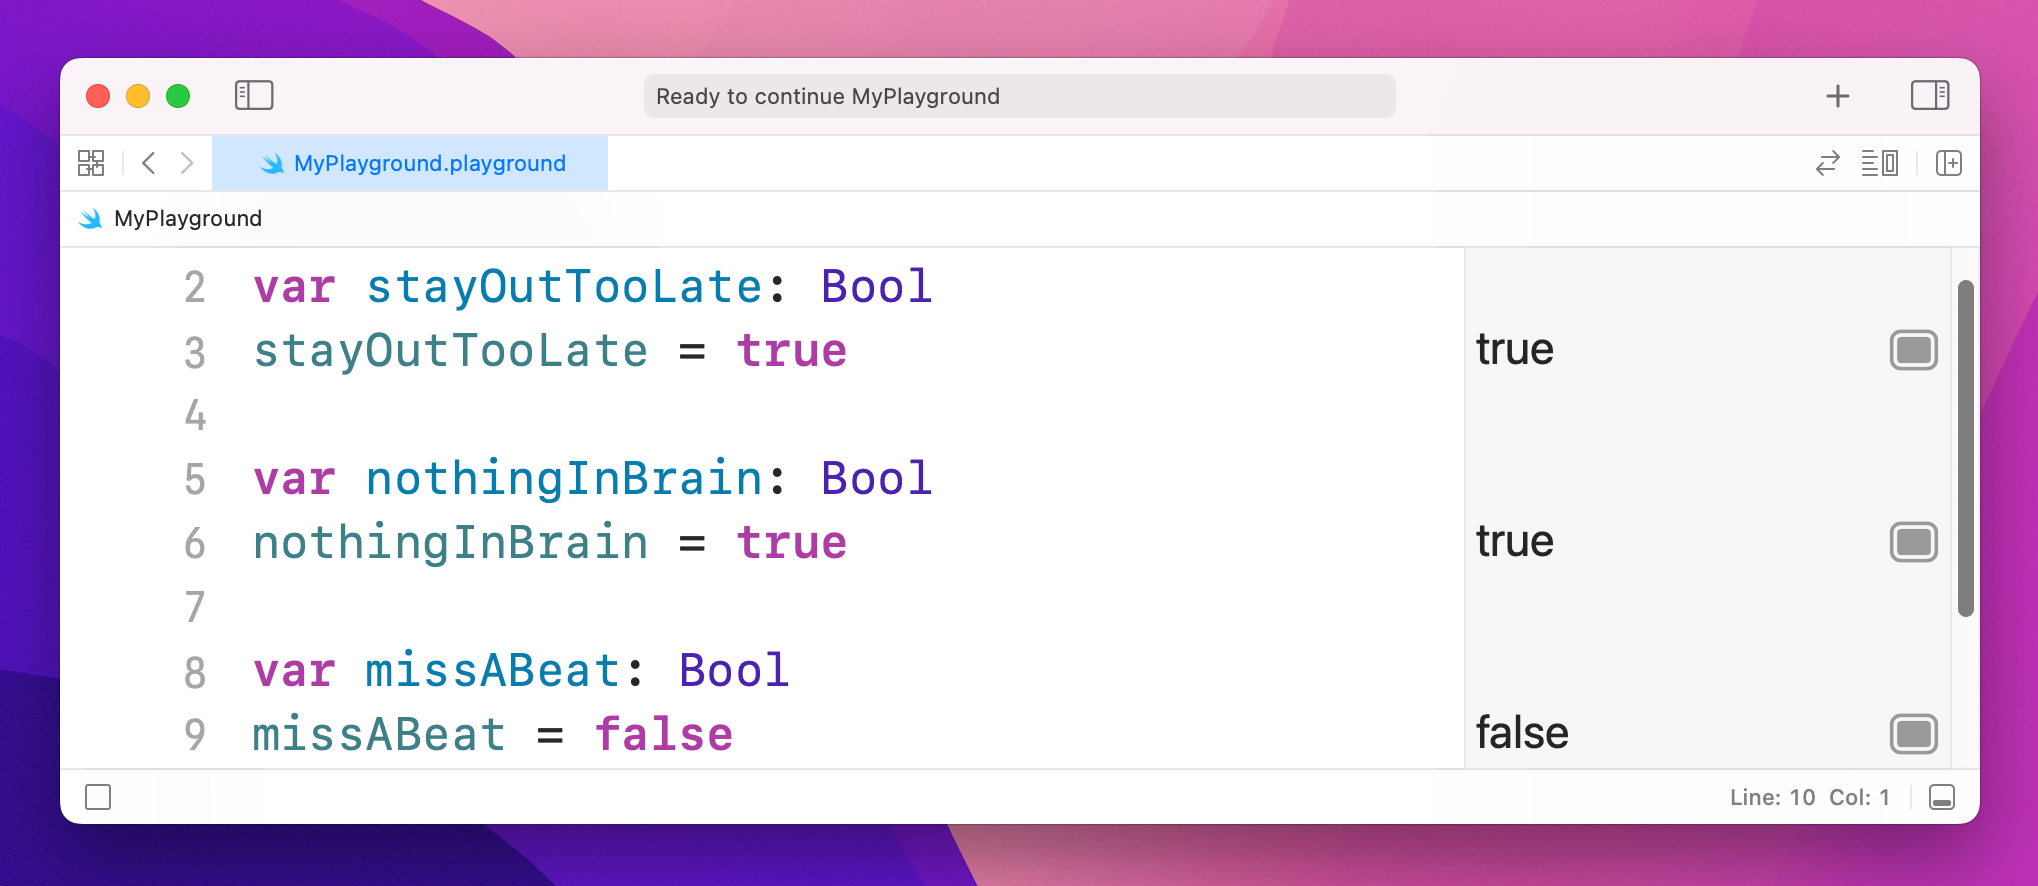
Tip: You’ll notice these variables are written in a very particular way: we don’t write MissABeat, missabeat, or other such variations, but instead make the initial letter lowercase then capitalize the first letter of the second and subsequent words. This is called “camel case” because it looks a bit like the humps of a camel, and it’s used to make it easier to read words in variable names.
As you've learned, there are two ways to tell Swift what type of data a variable holds: assign a value when you create the variable, or use a type annotation. If you have a choice, the first is always preferable because it's clearer. For example:
var name = "Tim McGraw"…is preferred to:
var name: String
name = "Tim McGraw"
This applies to all data types. For example:
var age = 25
var longitude = -86.783333
var nothingInBrain = true
This technique is called type inference, because Swift can infer what data type should be used for a variable by looking at the type of data you want to put in there. When it comes to numbers like -86.783333, Swift will always infer a Double rather than a Float.
For the sake of completeness, I should add that it's possible to specify a data type and provide a value at the same time, like this:
var name: String = "Tim McGraw"Operators are those little symbols you learned in your very first math classes: + to add, - to subtract, * to multiply, / to divide, = to assign value, and so on. They all exist in Swift, along with a few extras.
Let's try a few basics – please type this into your playground:
var a = 10
a = a + 1
a = a - 1
a = a * a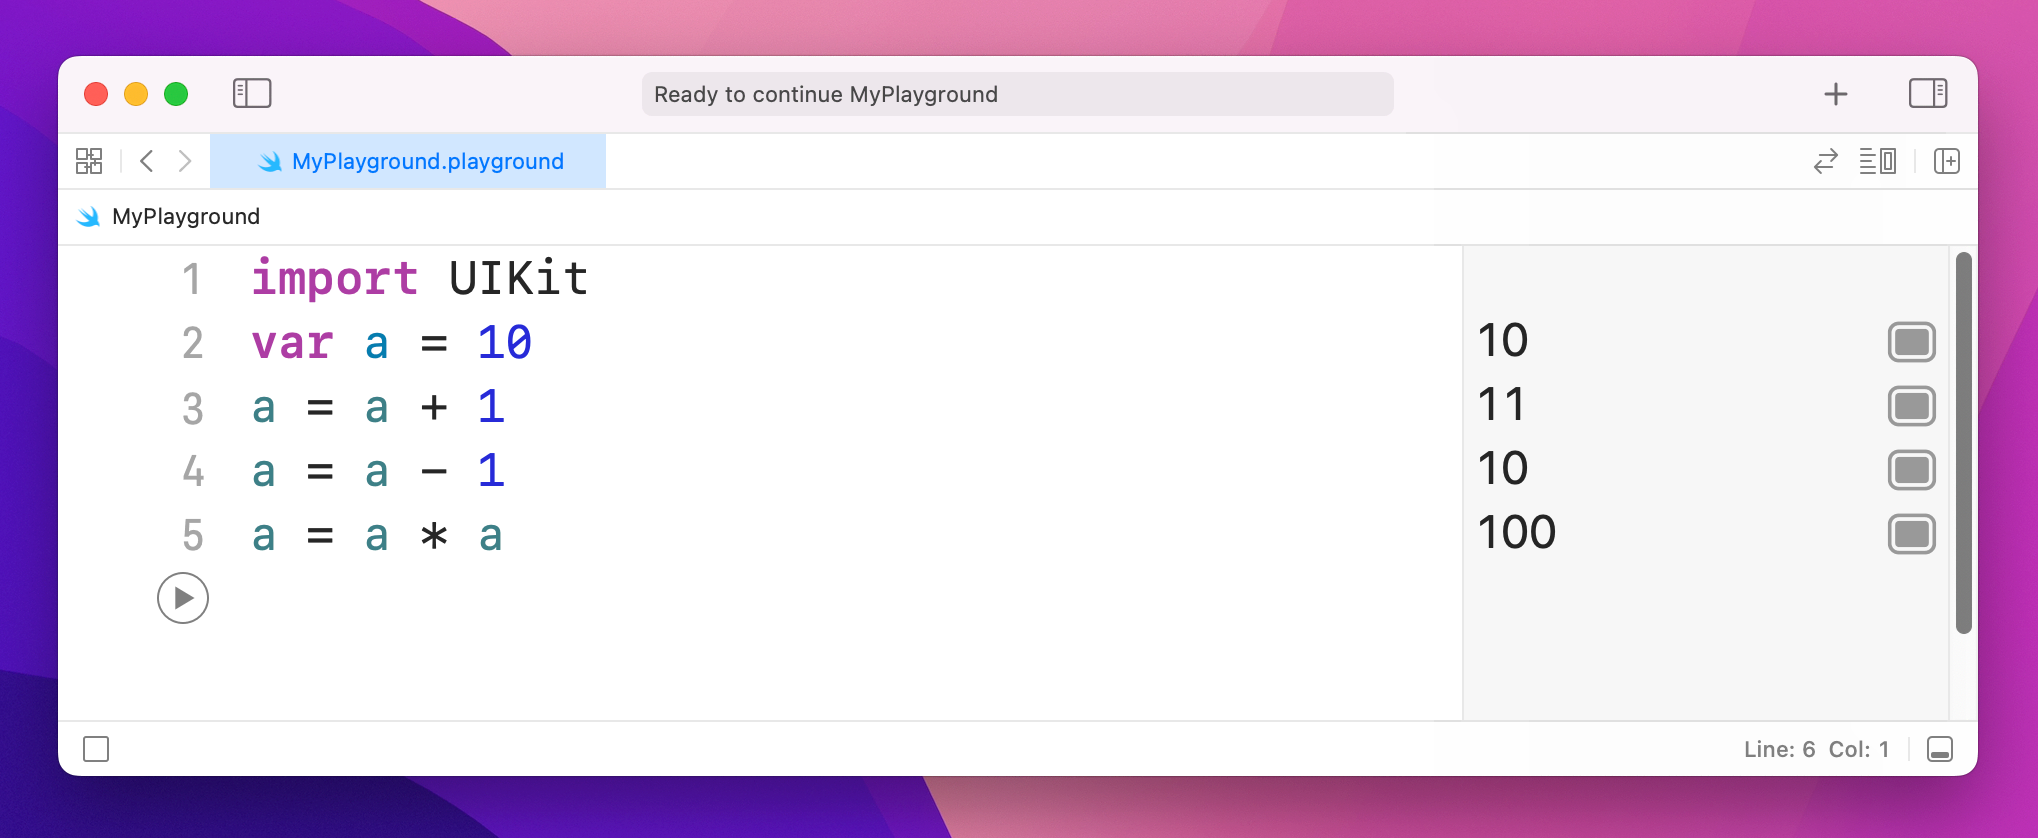
In the results pane, you'll see 10, 11, 10 and 100 respectively. Now try this:
var b = 10
b += 10
b -= 10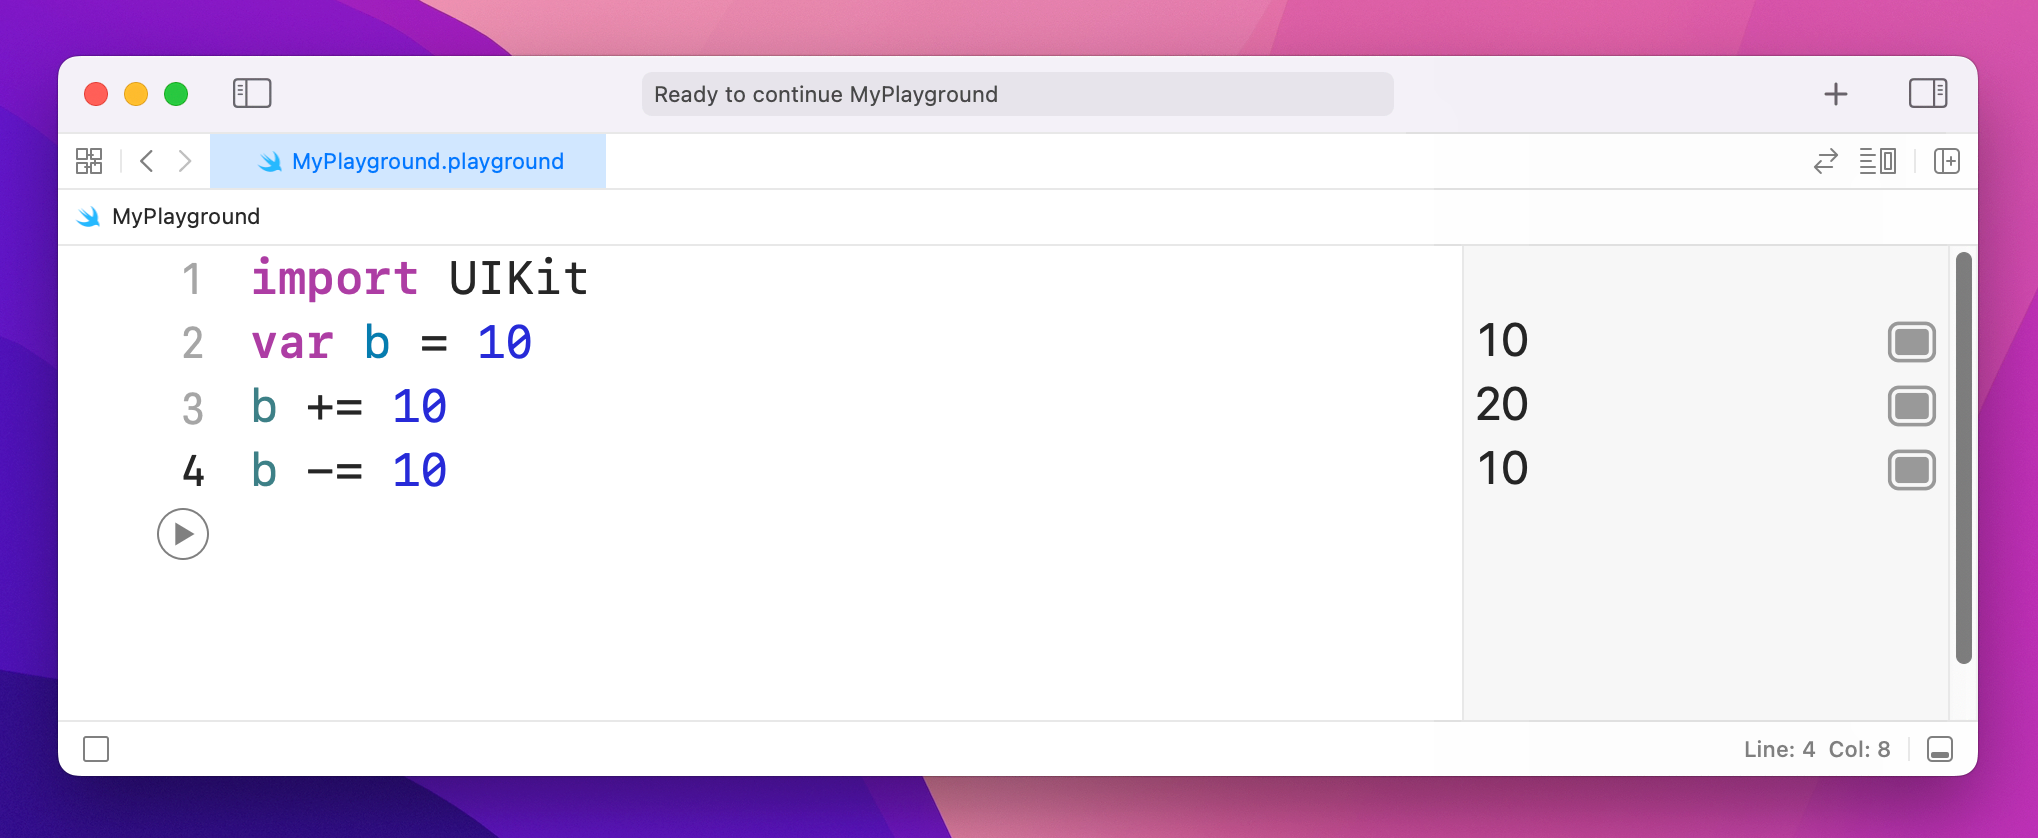
+= is an operator that means "add then assign to." In our case it means "take the current value of b, add 10 to it, then put the result back into b." As you might imagine, -= does the same but subtracts rather than adds. So, that code will show 10, 20, 10 in the results pane.
Some of these operators apply to other data types. As you might imagine, you can add two doubles together like this:
var a = 1.1
var b = 2.2
var c = a + b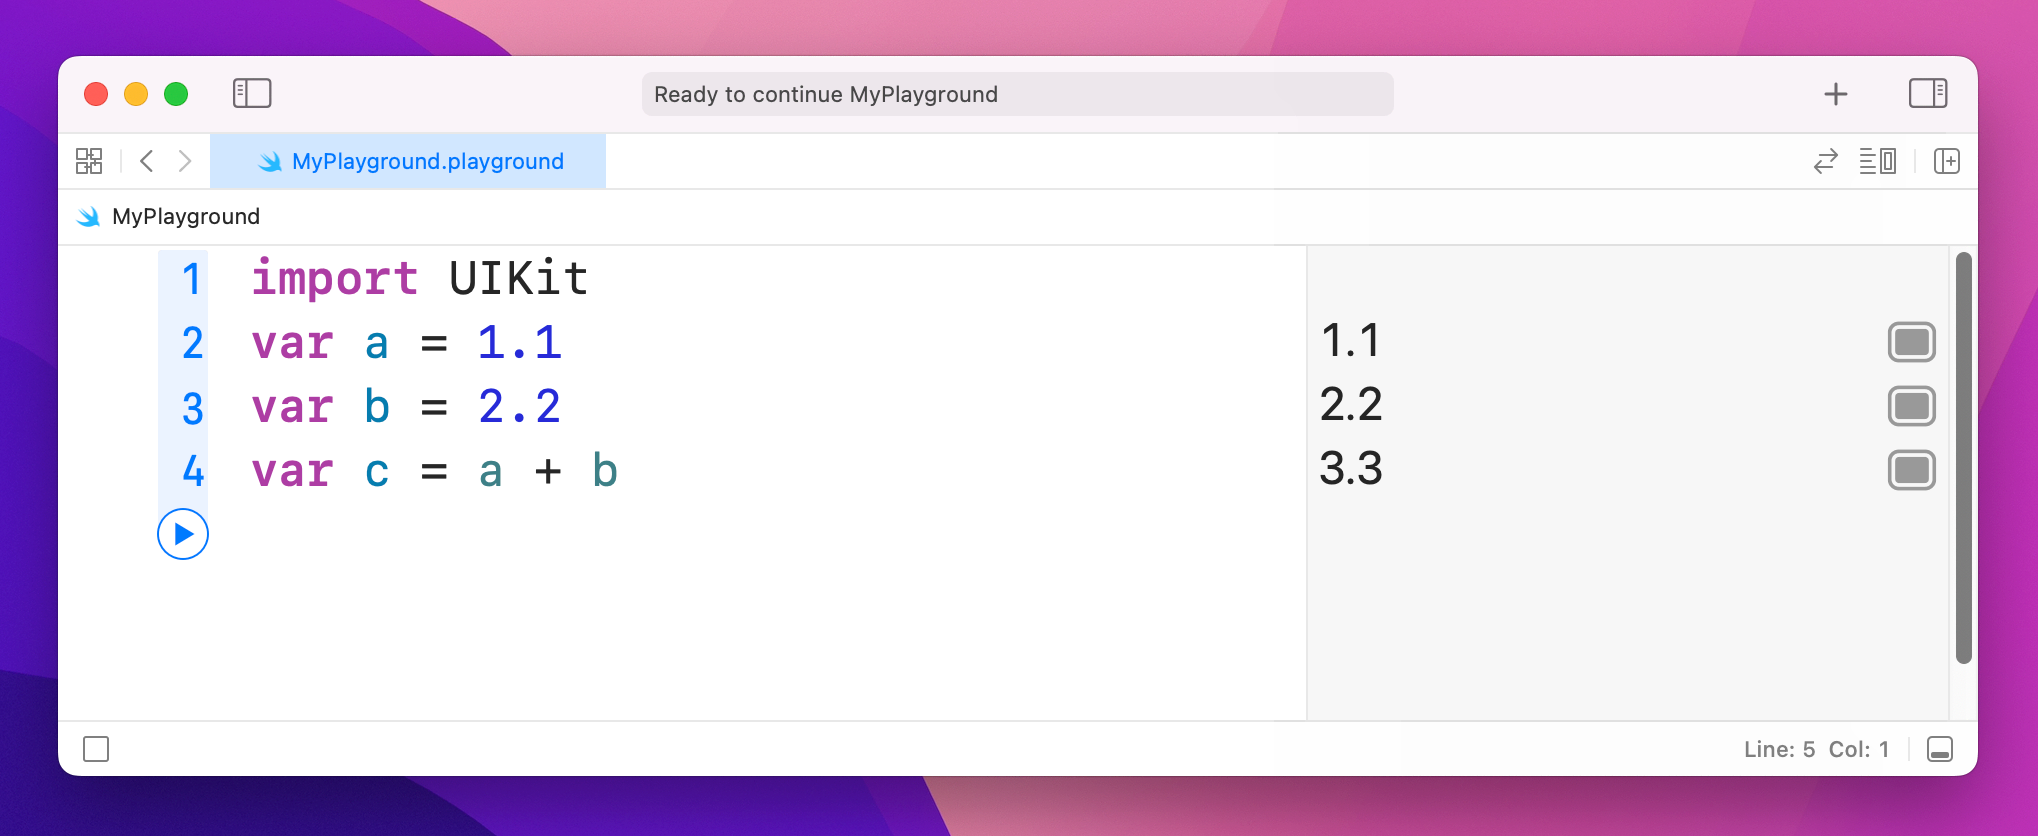
When it comes to strings, + will join them together. For example:
var name1 = "Tim McGraw"
var name2 = "Romeo"
var both = name1 + " and " + name2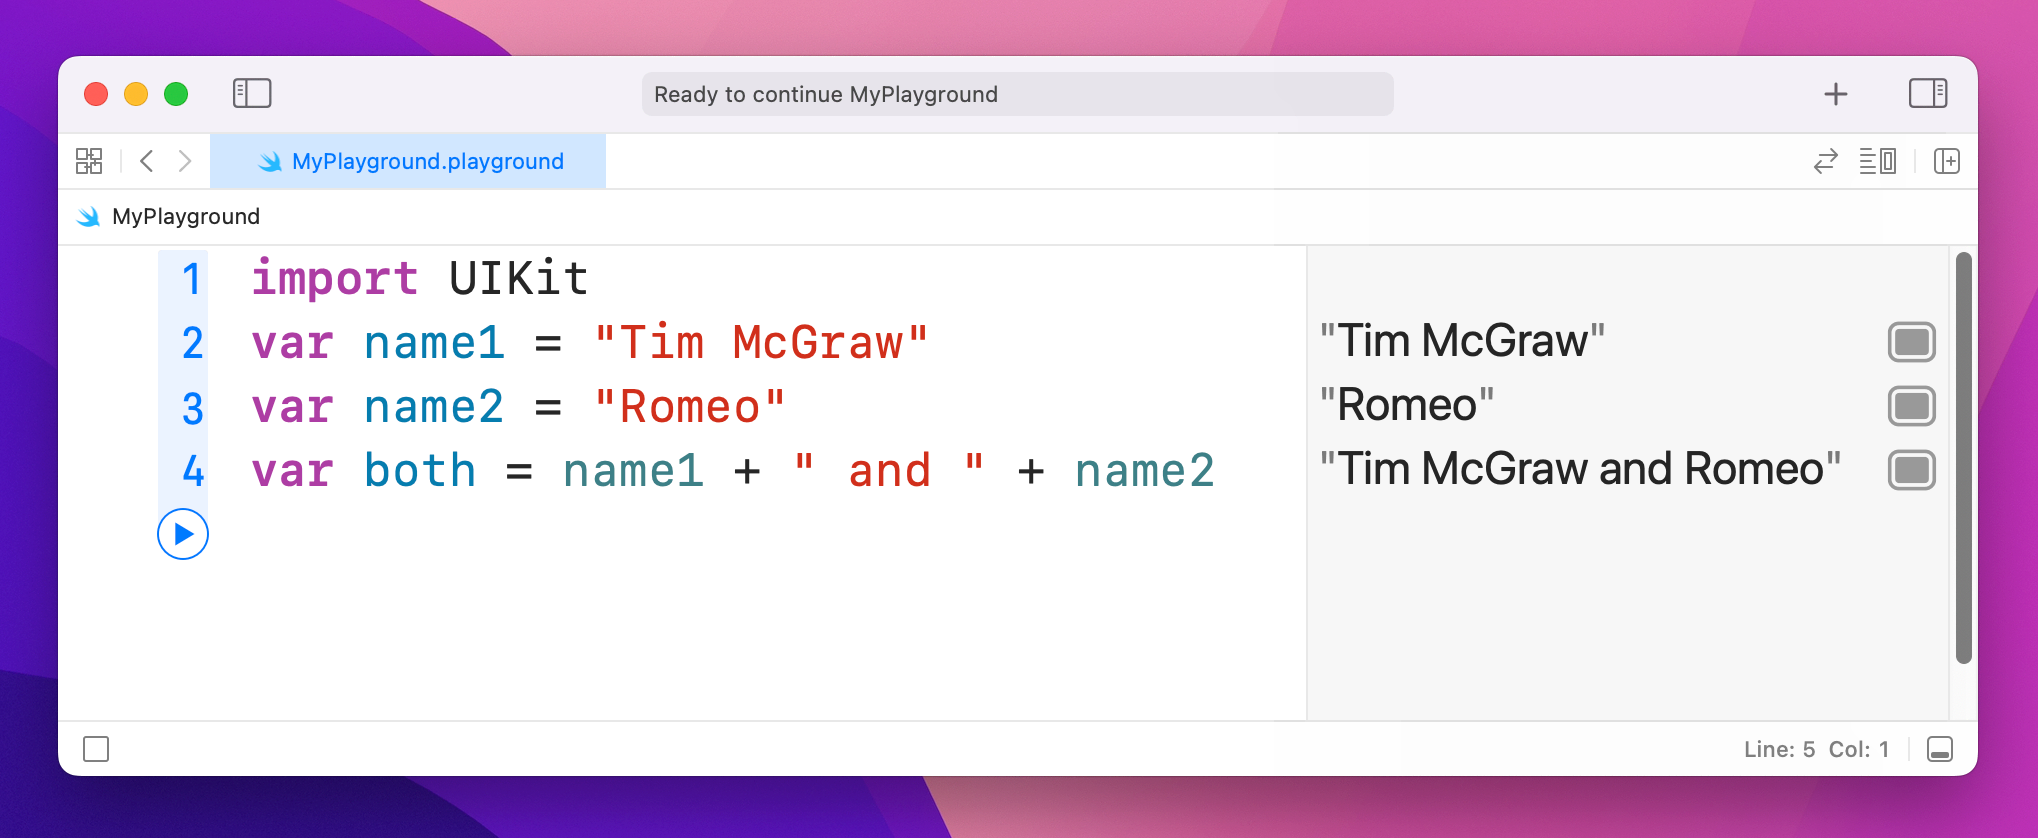
That will write "Tim McGraw and Romeo" into the results pane.
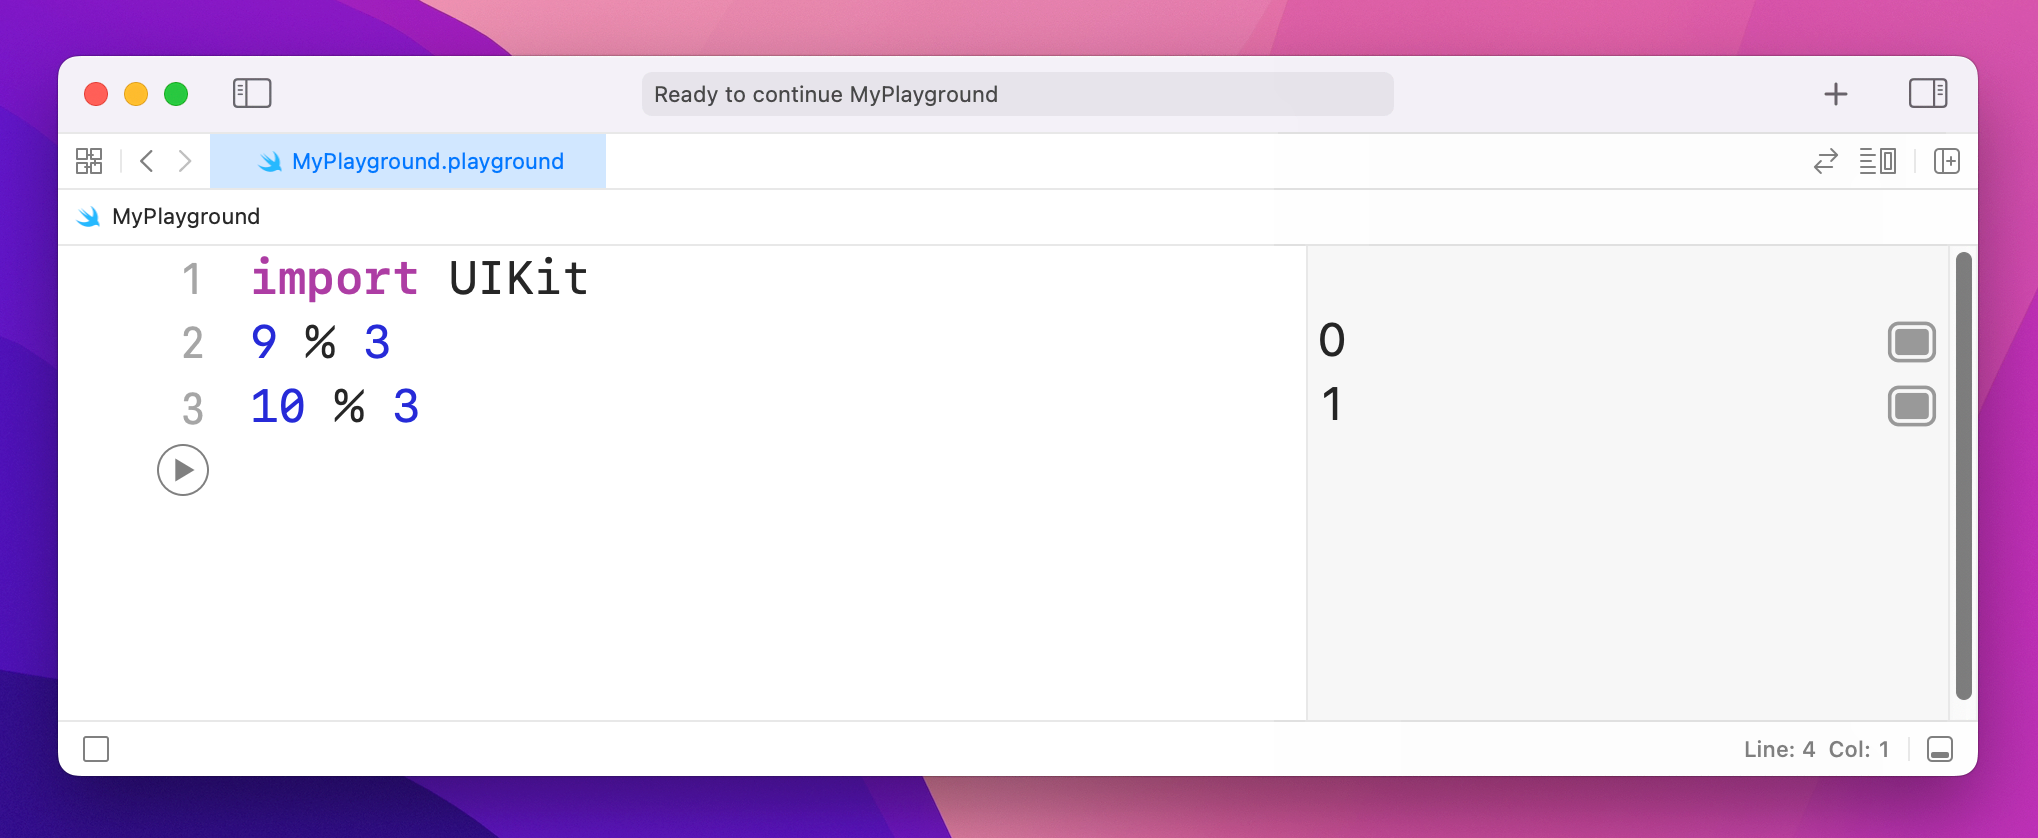
One more common operator you’ll see is called modulus, and is written using a percent symbol: %. It means “divide the left hand number evenly by the right, and return the remainder.” So, 9 % 3 returns 0 because 3 divides evenly into 9, whereas 10 % 3 returns 1, because 10 divides by 3 three times, with remainder 1.
Note: If you bought Hacking with Swift and are using the exclusive guide book accompaniment to the course, you’ll find the modulus operator useful later on.
Swift has a set of operators that perform comparisons on values. For example:
var a = 1.1
var b = 2.2
var c = a + b

c > 3
c >= 3
c > 4
c < 4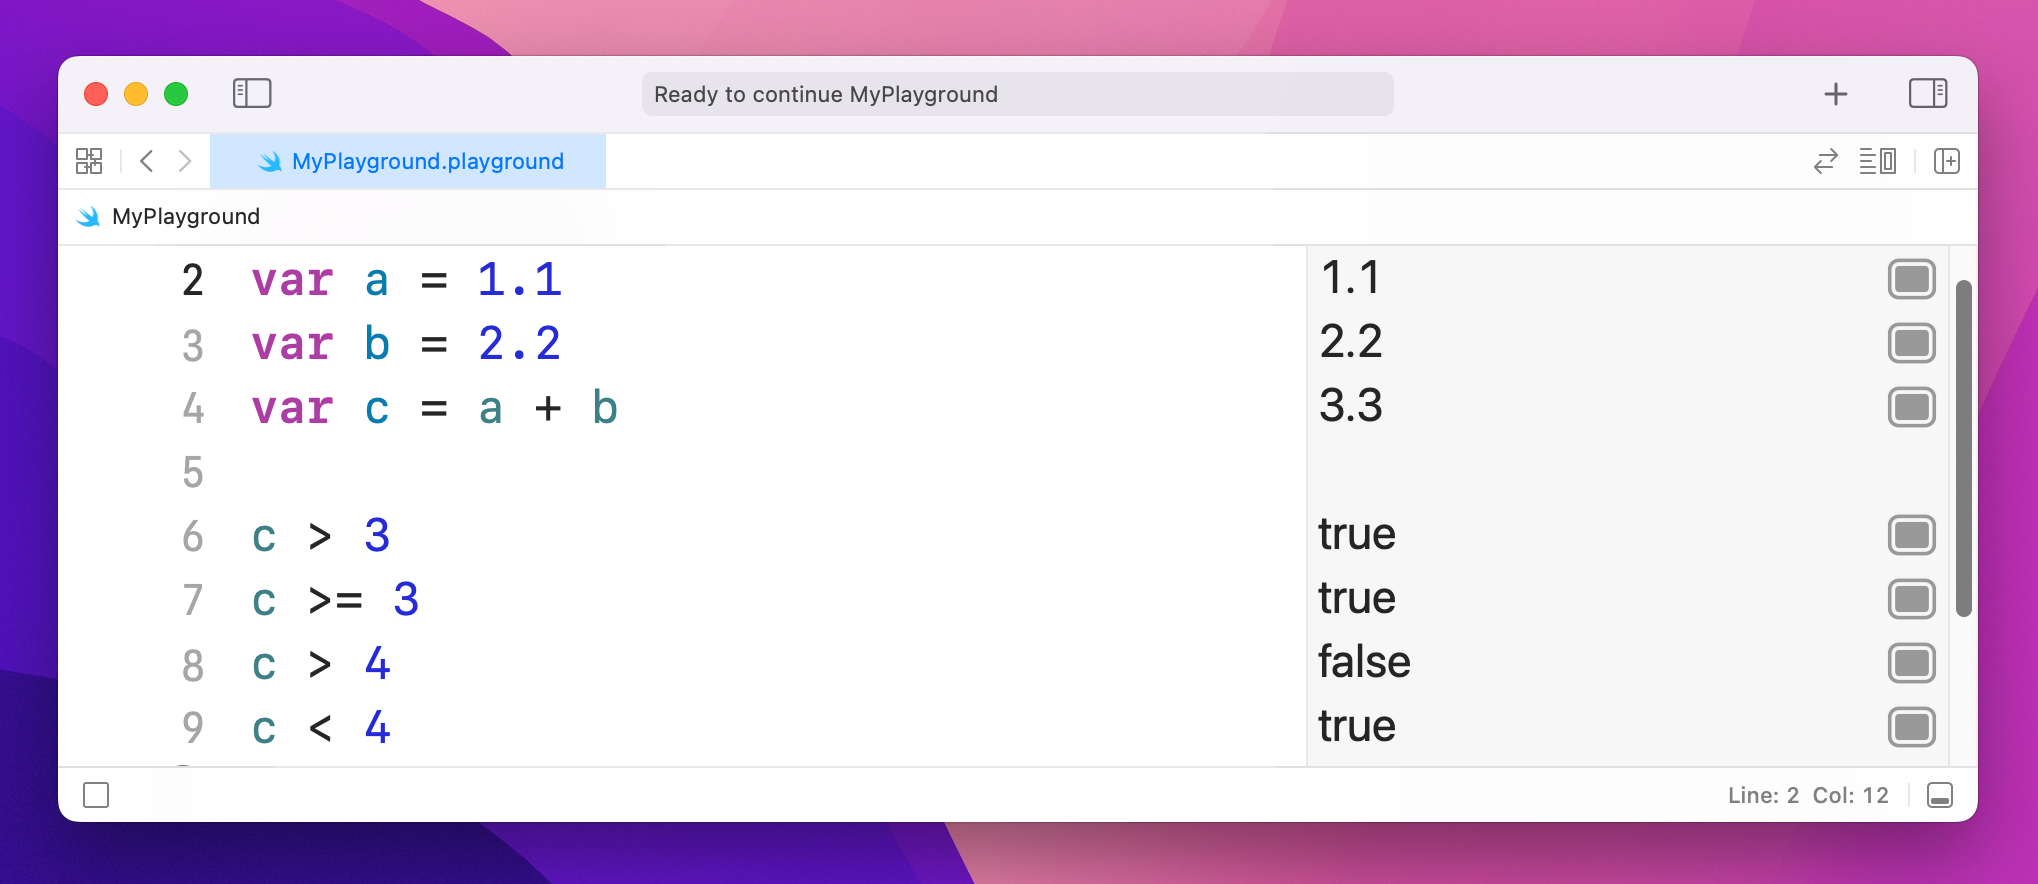
That shows off greater than (>), greater than or equal (>=), and less than (<). In the results window you'll see true, true, false, true – these are Booleans, because the answer to each of these statements can only ever be true or false.
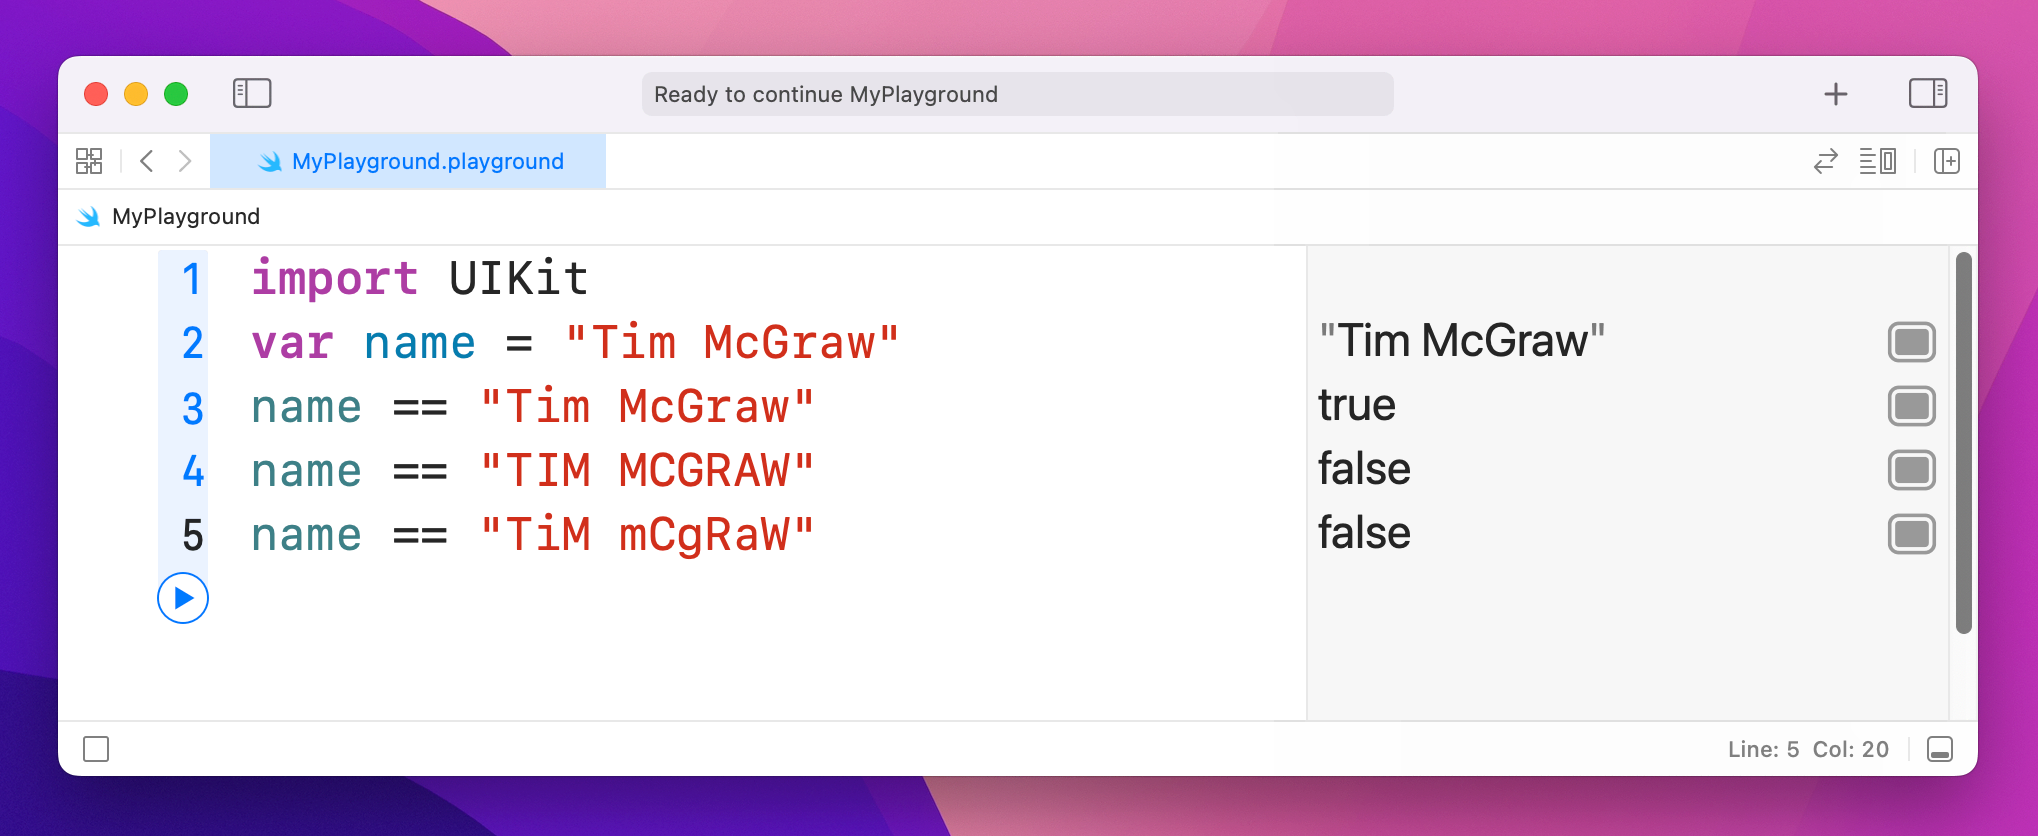
If you want to check for equality, you can't use = because it already has a meaning: it's used to give a variable a value. So, Swift has an alternative in the form of ==, meaning "is equal to." For example:
var name = "Tim McGraw"
name == "Tim McGraw"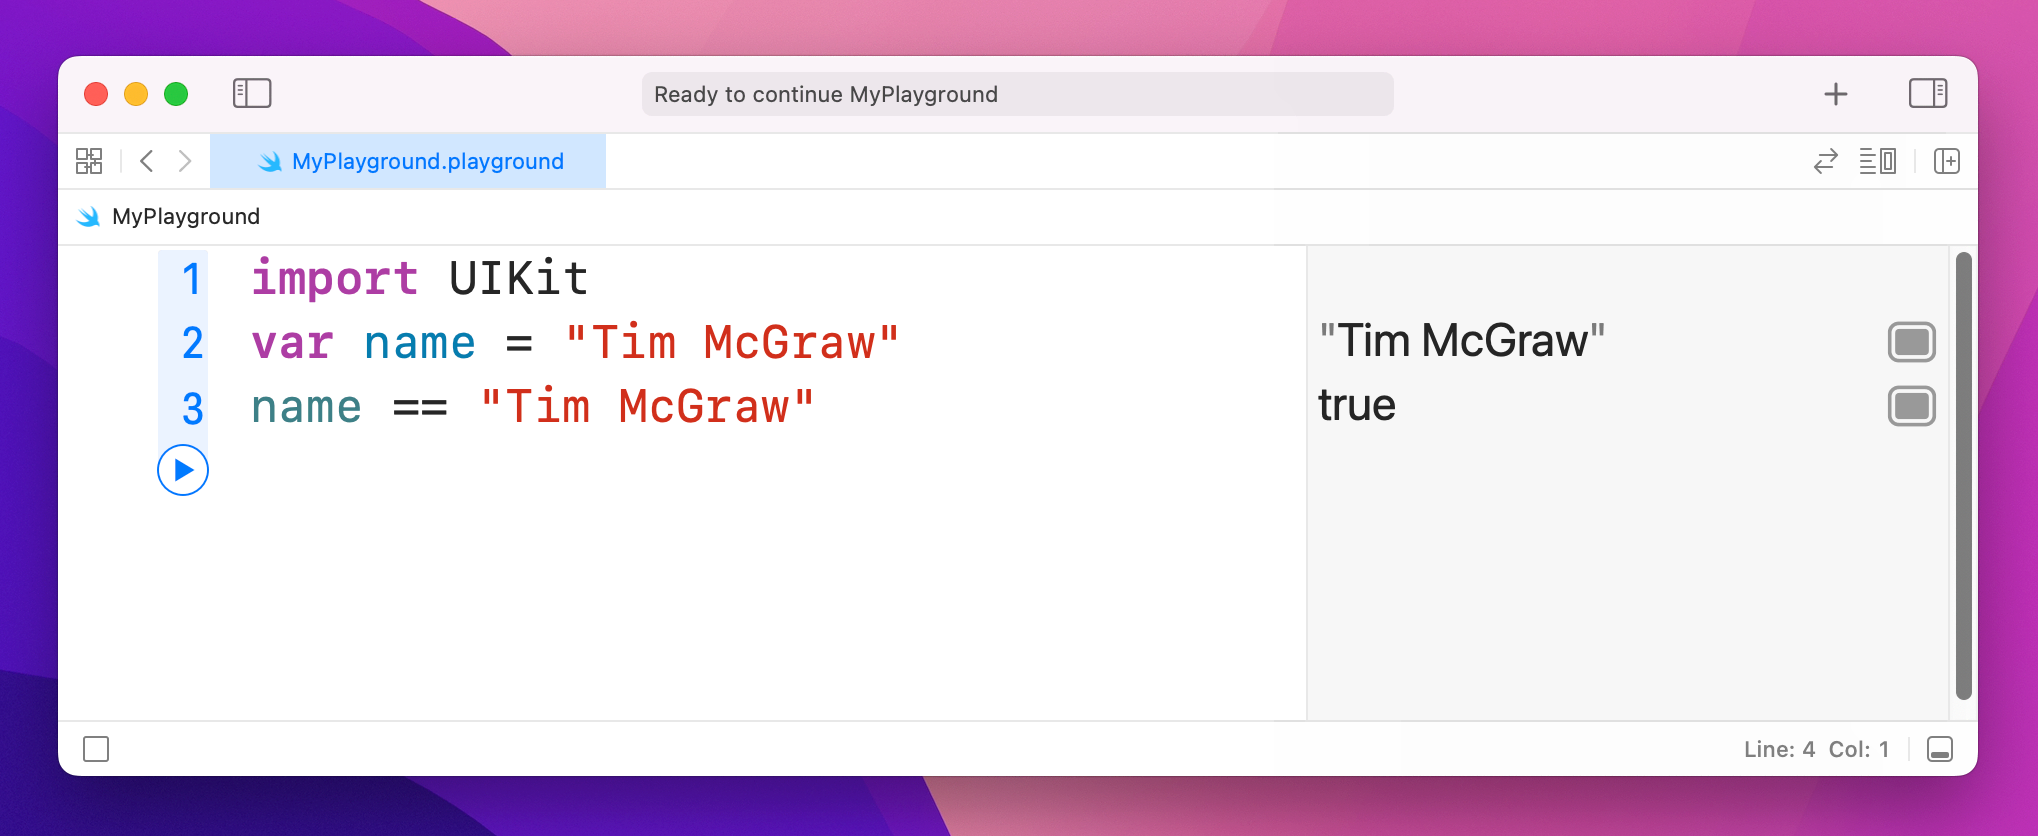
That will show "true" in the results pane. Now, one thing that might catch you out is that in Swift strings are case-sensitive, which means "Tim McGraw", "TIM MCGRAW" and "TiM mCgRaW" are all considered different. If you use == to compare two strings, you need to make sure they have the same letter case.
There's one more operator I want to introduce you to, and it's called the "not" operator: !. Yes, it's just an exclamation mark. This makes your statement mean the opposite of what it did. For example:
var stayOutTooLate = true
stayOutTooLate
!stayOutTooLate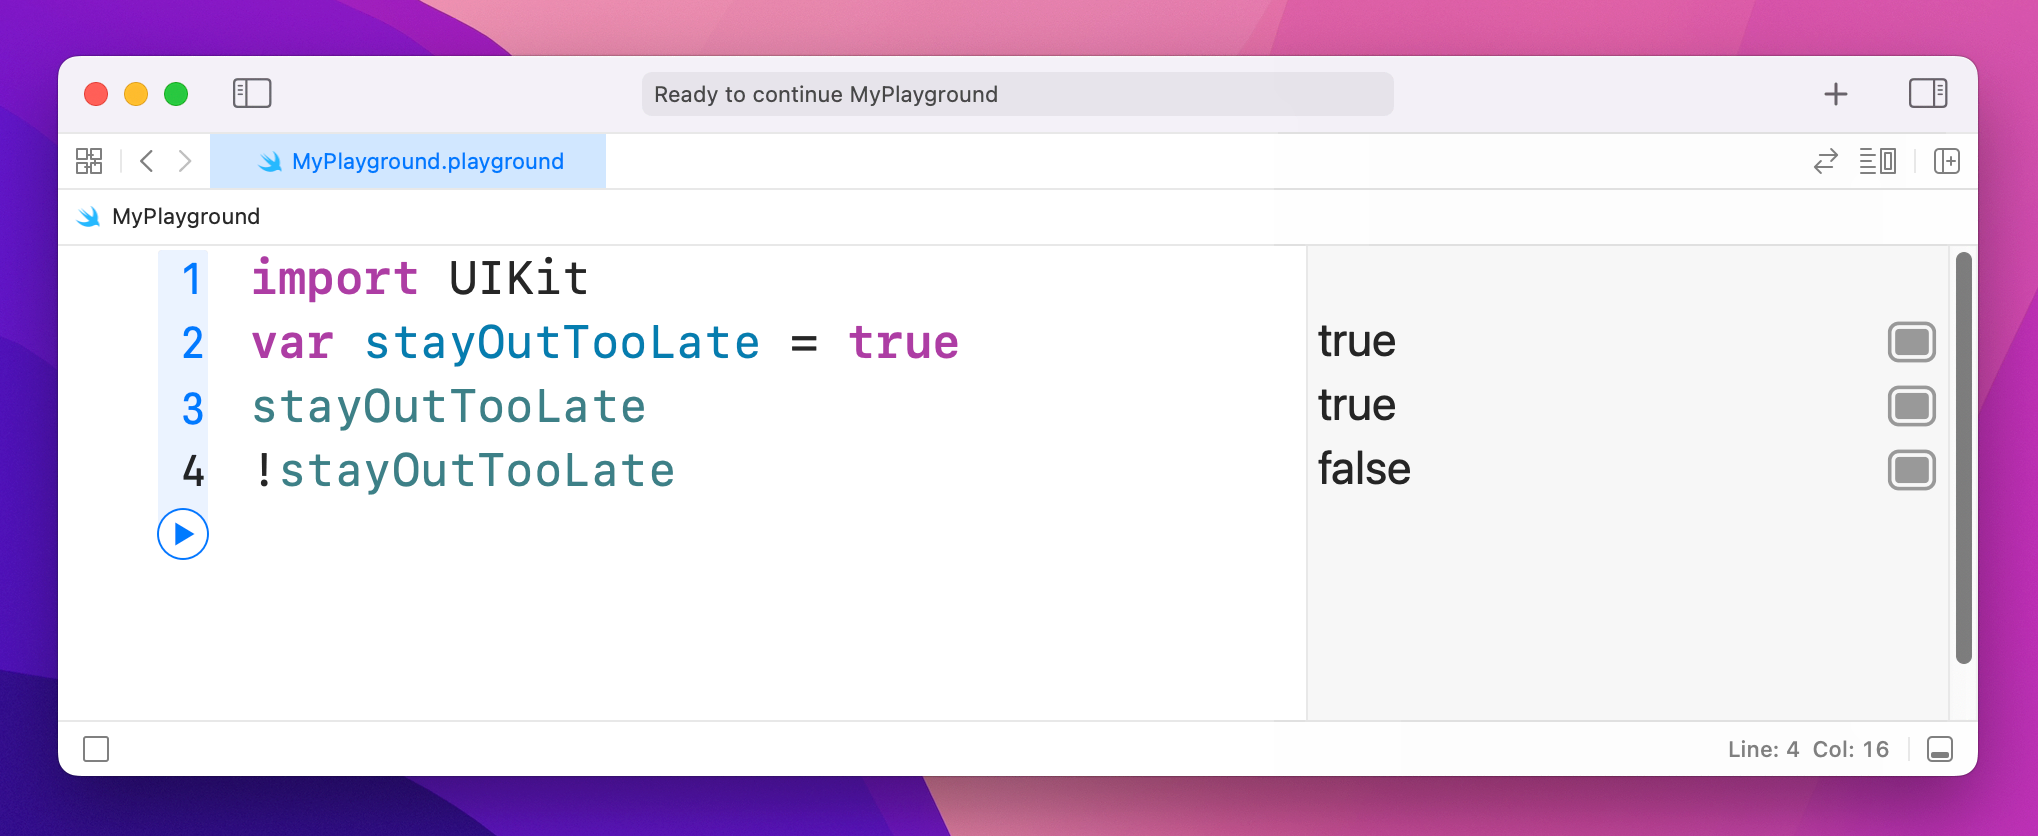
That will print out true, true, false – with the last value there because it flipped the previous true.
You can also use ! with = to make != or "not equal". For example:
var name = "Tim McGraw"
name == "Tim McGraw"
name != "Tim McGraw"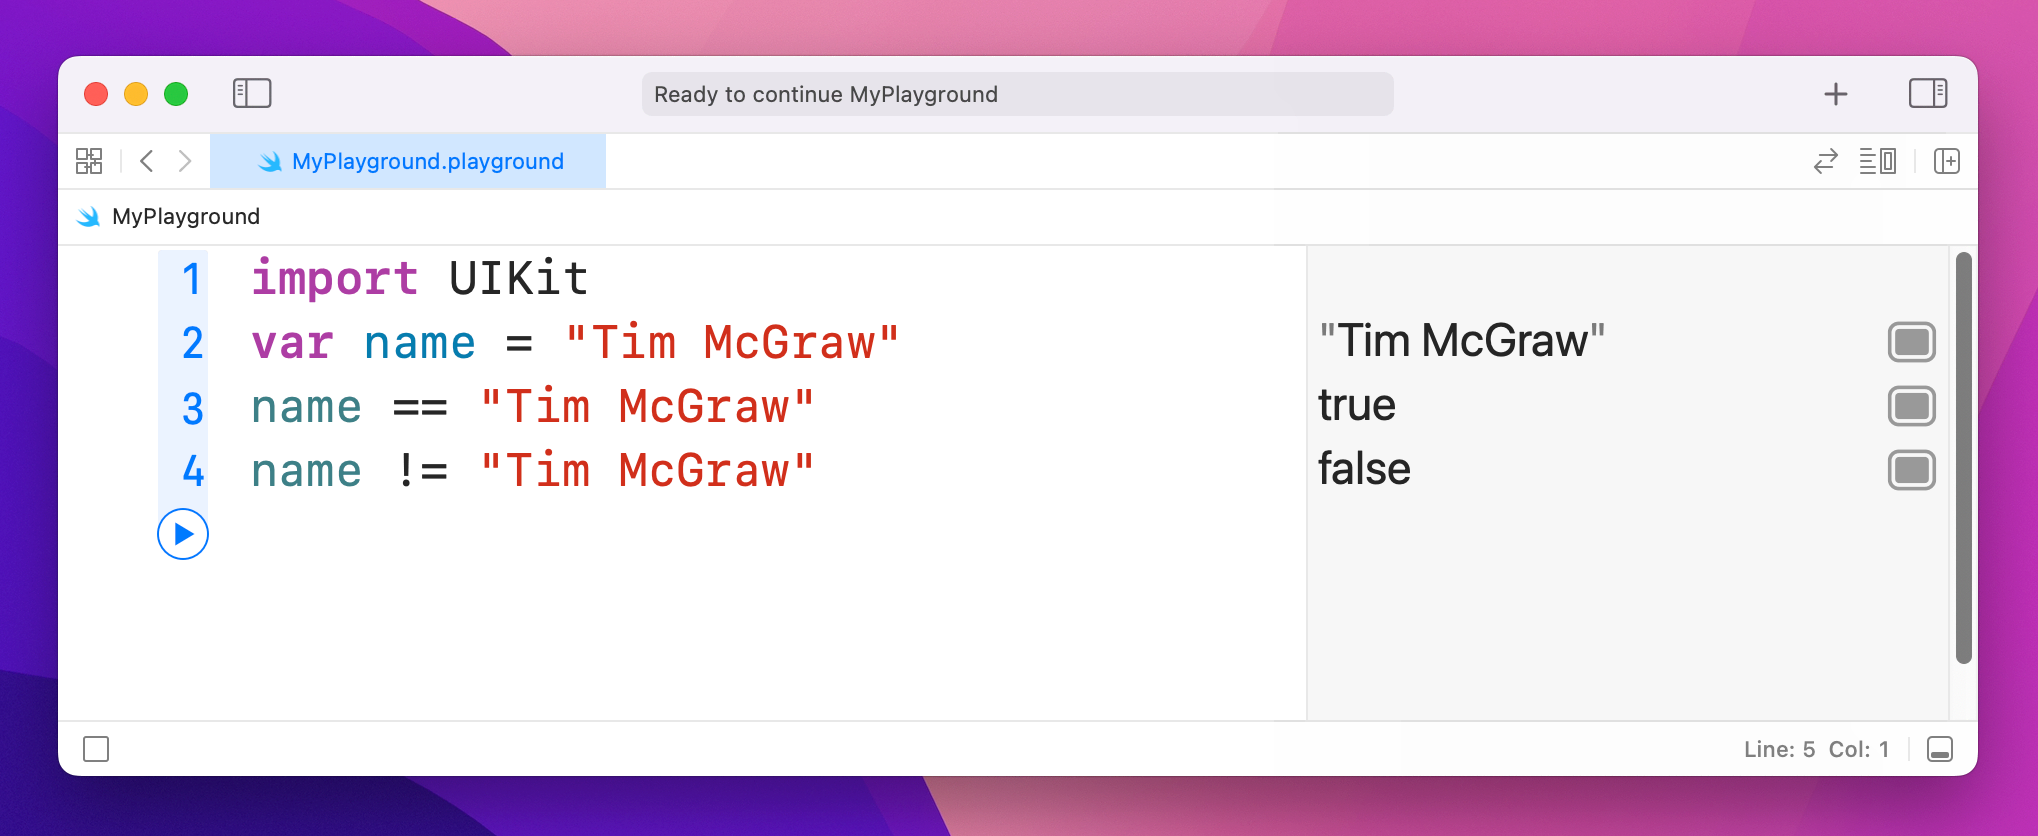
This is a fancy name for what is actually a very simple thing: combining variables and constants inside a string.
Clear out all the code you just wrote and leave only this:
var name = "Tim McGraw"If we wanted to print out a message to the user that included their name, string interpolation is what makes that easy: you just write a backslash, then an open parenthesis, then your code, then a close parenthesis, like this:
var name = "Tim McGraw"
"Your name is \(name)"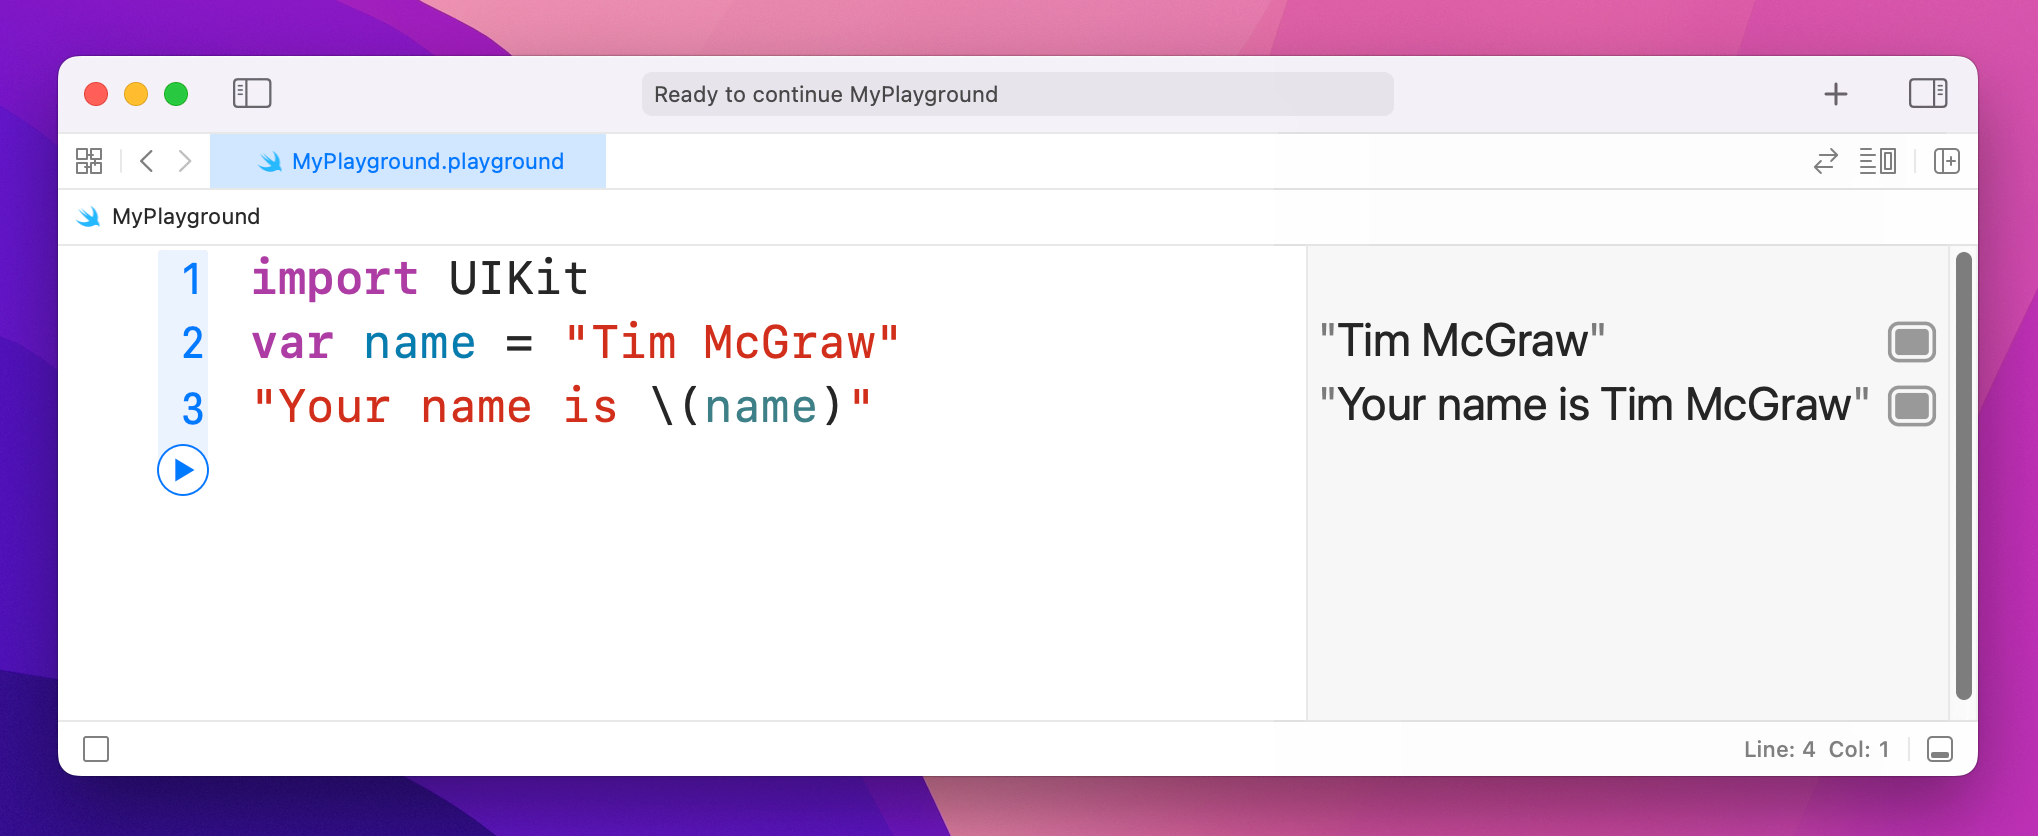
The results pane will now show "Your name is Tim McGraw" all as one string, because string interpolation combined the two for us.
Now, we could have written that using the + operator, like this:
var name = "Tim McGraw"
"Your name is " + name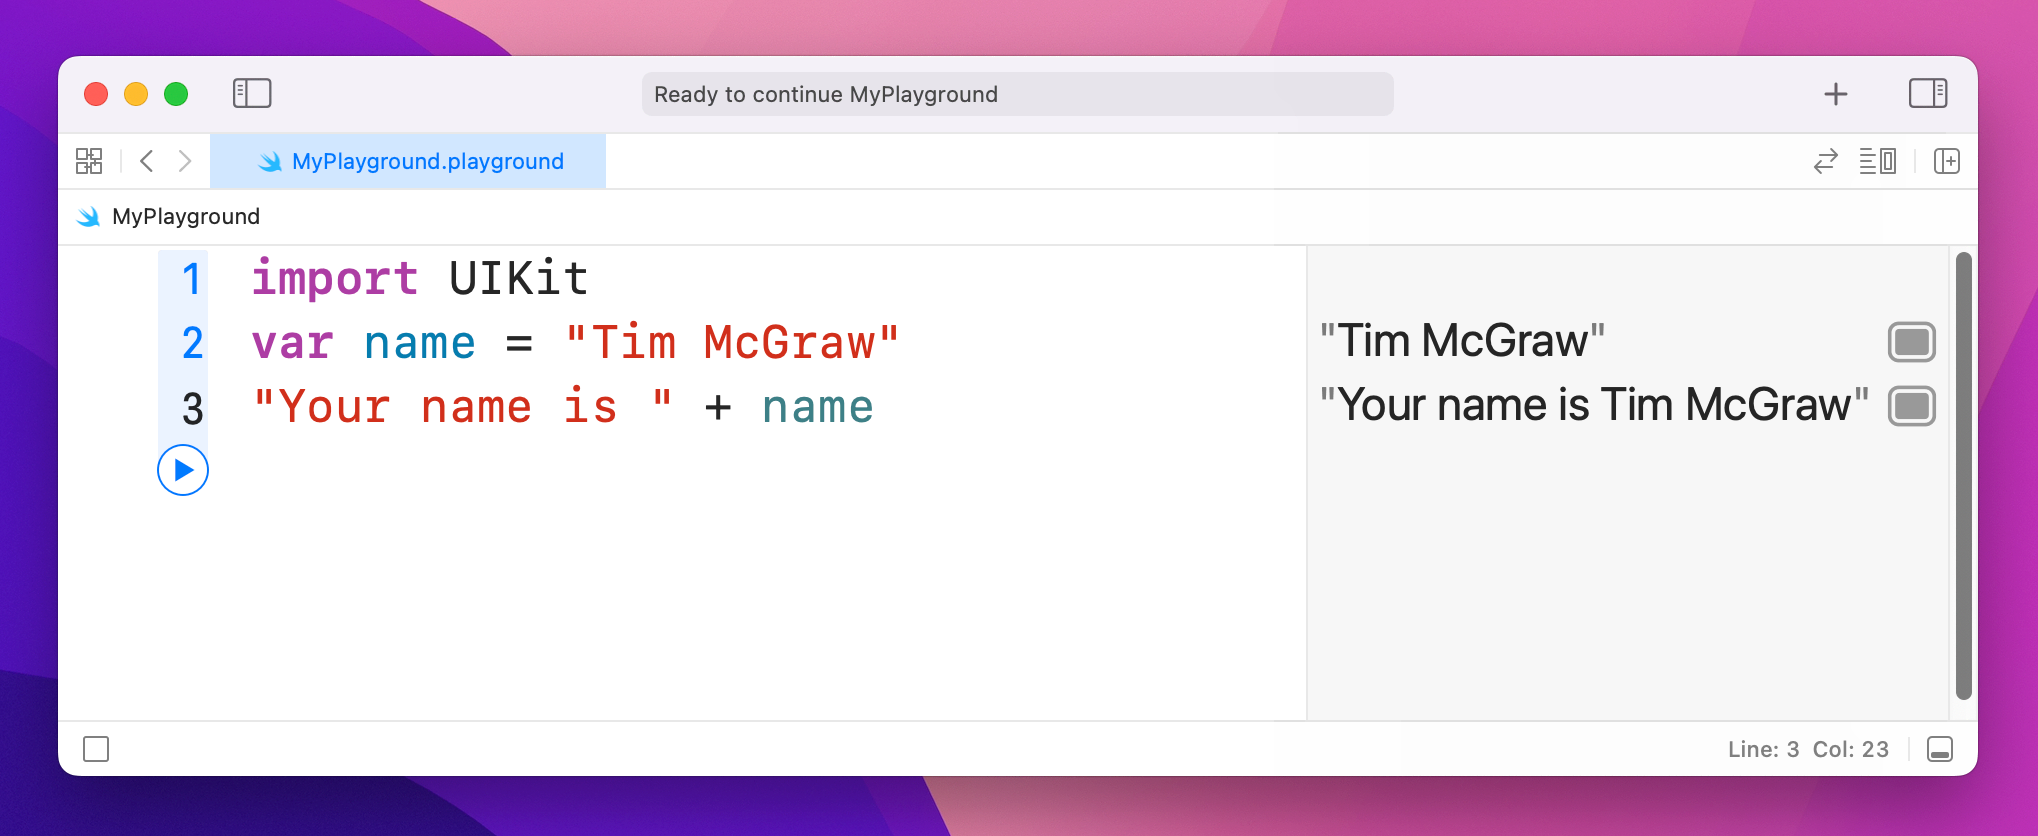
…but that's not as efficient, particularly if you're combining multiple variables together. In addition, string interpolation in Swift is smart enough to be able to handle a variety of different data types automatically. For example:
var name = "Tim McGraw"
var age = 25
var latitude = 36.166667

"Your name is \(name), your age is \(age), and your latitude is \(latitude)"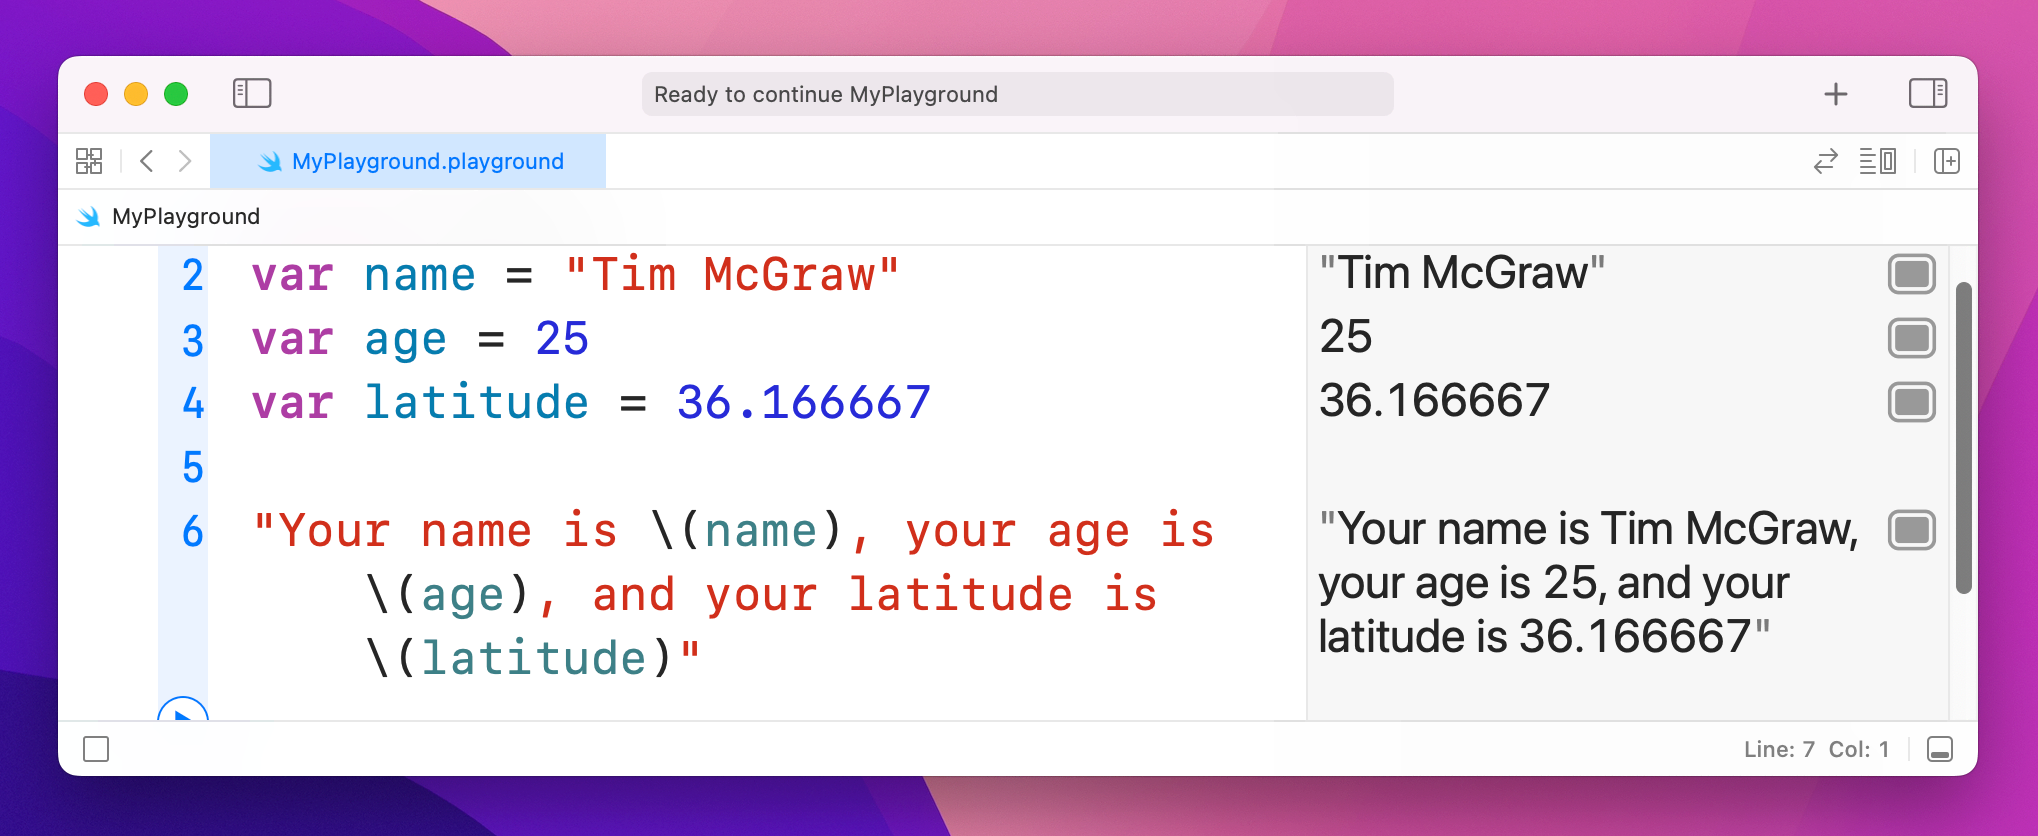
Doing that using + is much more difficult, because Swift doesn't let you add integers and doubles to a string.
At this point your result may no longer fit in the results pane, so either resize your window or hover over the result and click the + button that appears to have it shown inline.
One of the powerful features of string interpolation is that everything between \( and ) can actually be a full Swift expression. For example, you can do mathematics in there using operators, like this:
var age = 25
"You are \(age) years old. In another \(age) years you will be \(age * 2)."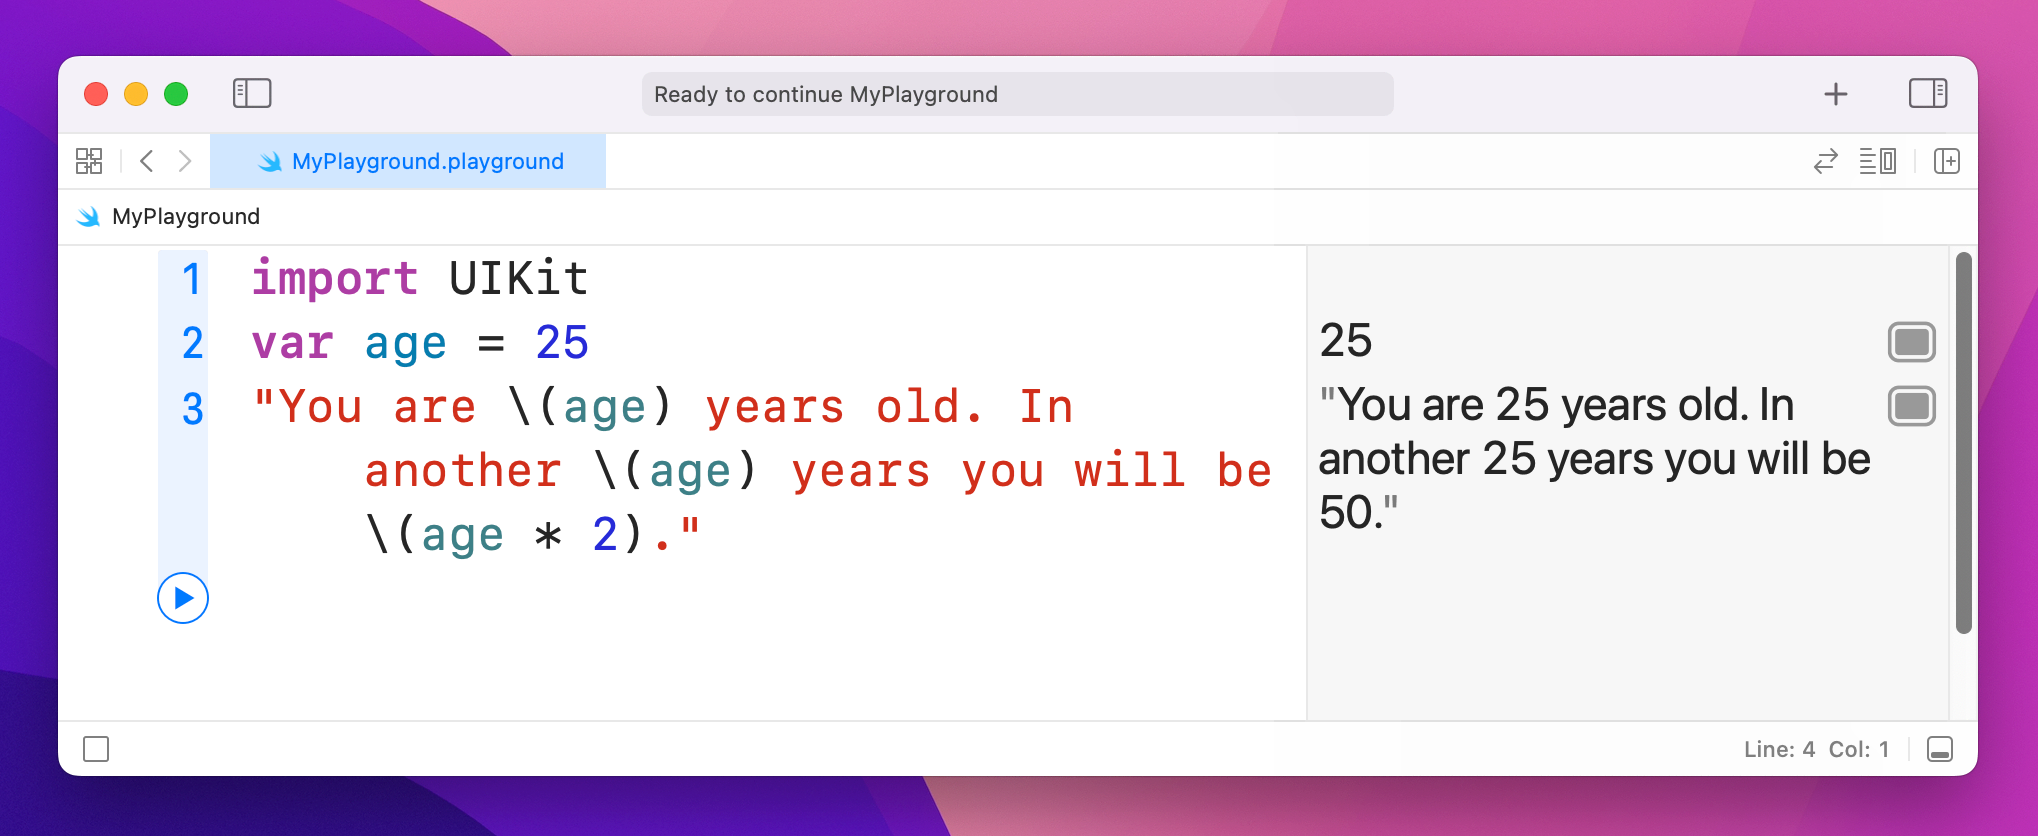
Arrays let you group lots of values together into a single collection, then access those values by their position in the collection. Swift uses type inference to figure out what type of data your array holds, like so:
var evenNumbers = [2, 4, 6, 8]
var songs = ["Shake it Off", "You Belong with Me", "Back to December"]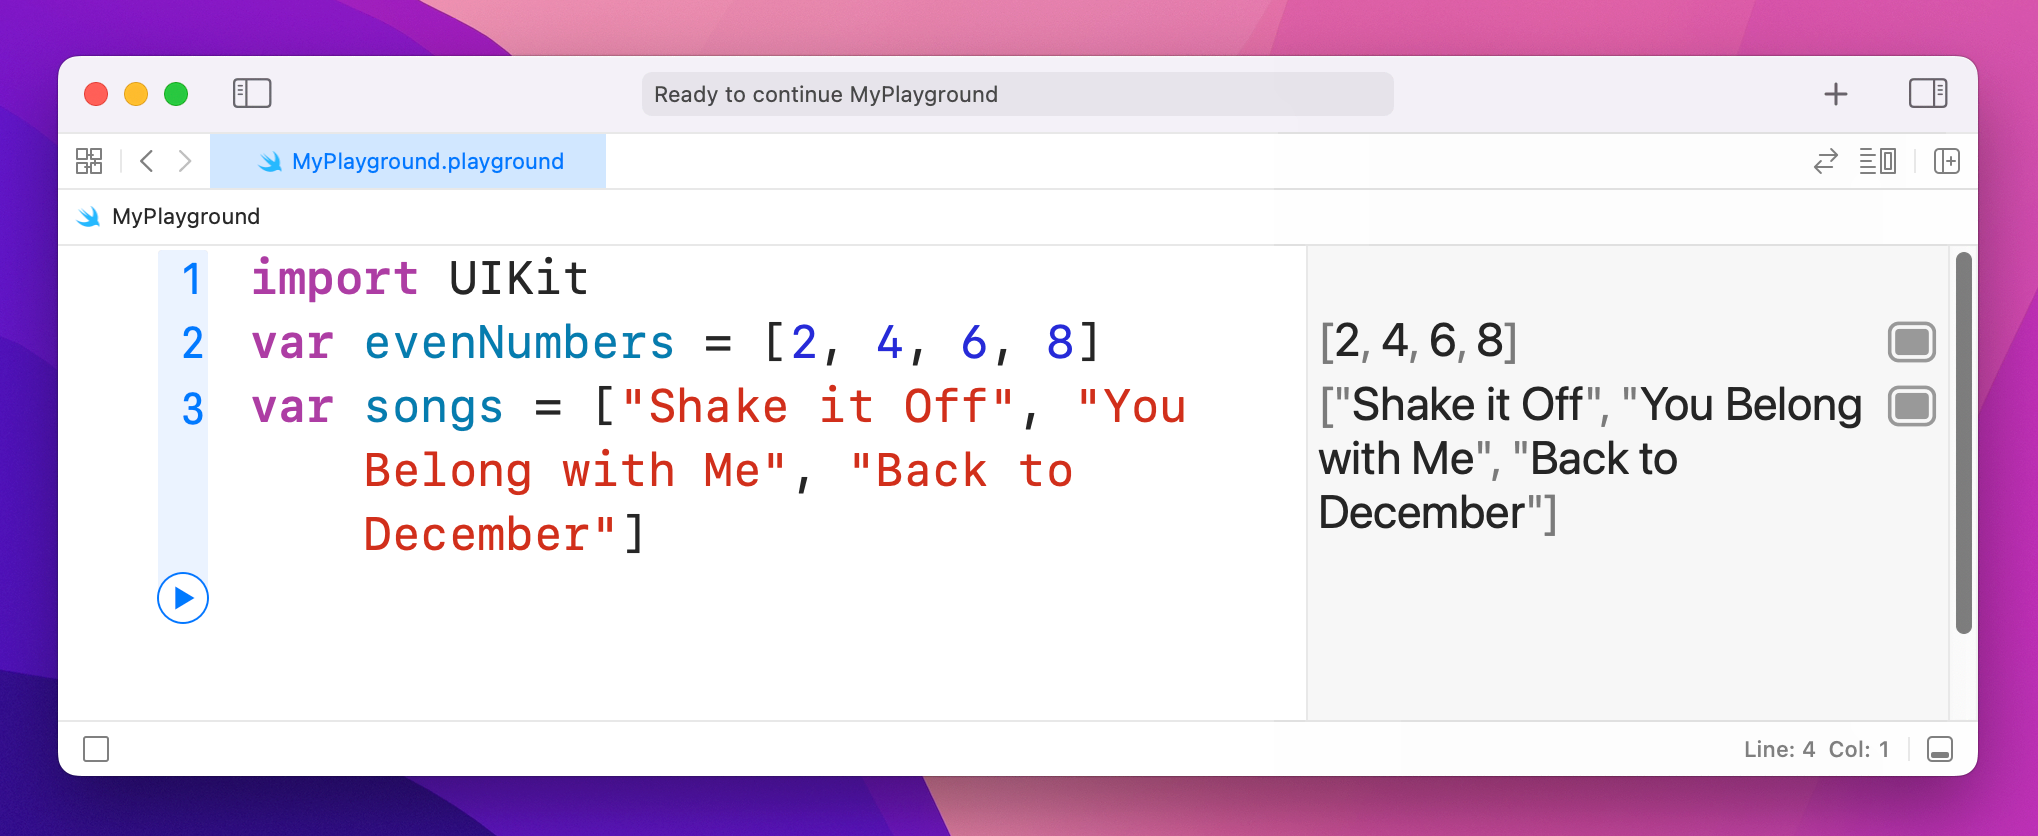
As you can see, Swift uses brackets to mark the start and end of an array, and each item in the array is separated with a comma.
When it comes to reading items out an array, there's a catch: Swift starts counting at 0. This means the first item is 0, the second item is 1, the third is 2, and so on. Try putting this into your playground:
var songs = ["Shake it Off", "You Belong with Me", "Back to December"]
songs[0]
songs[1]
songs[2]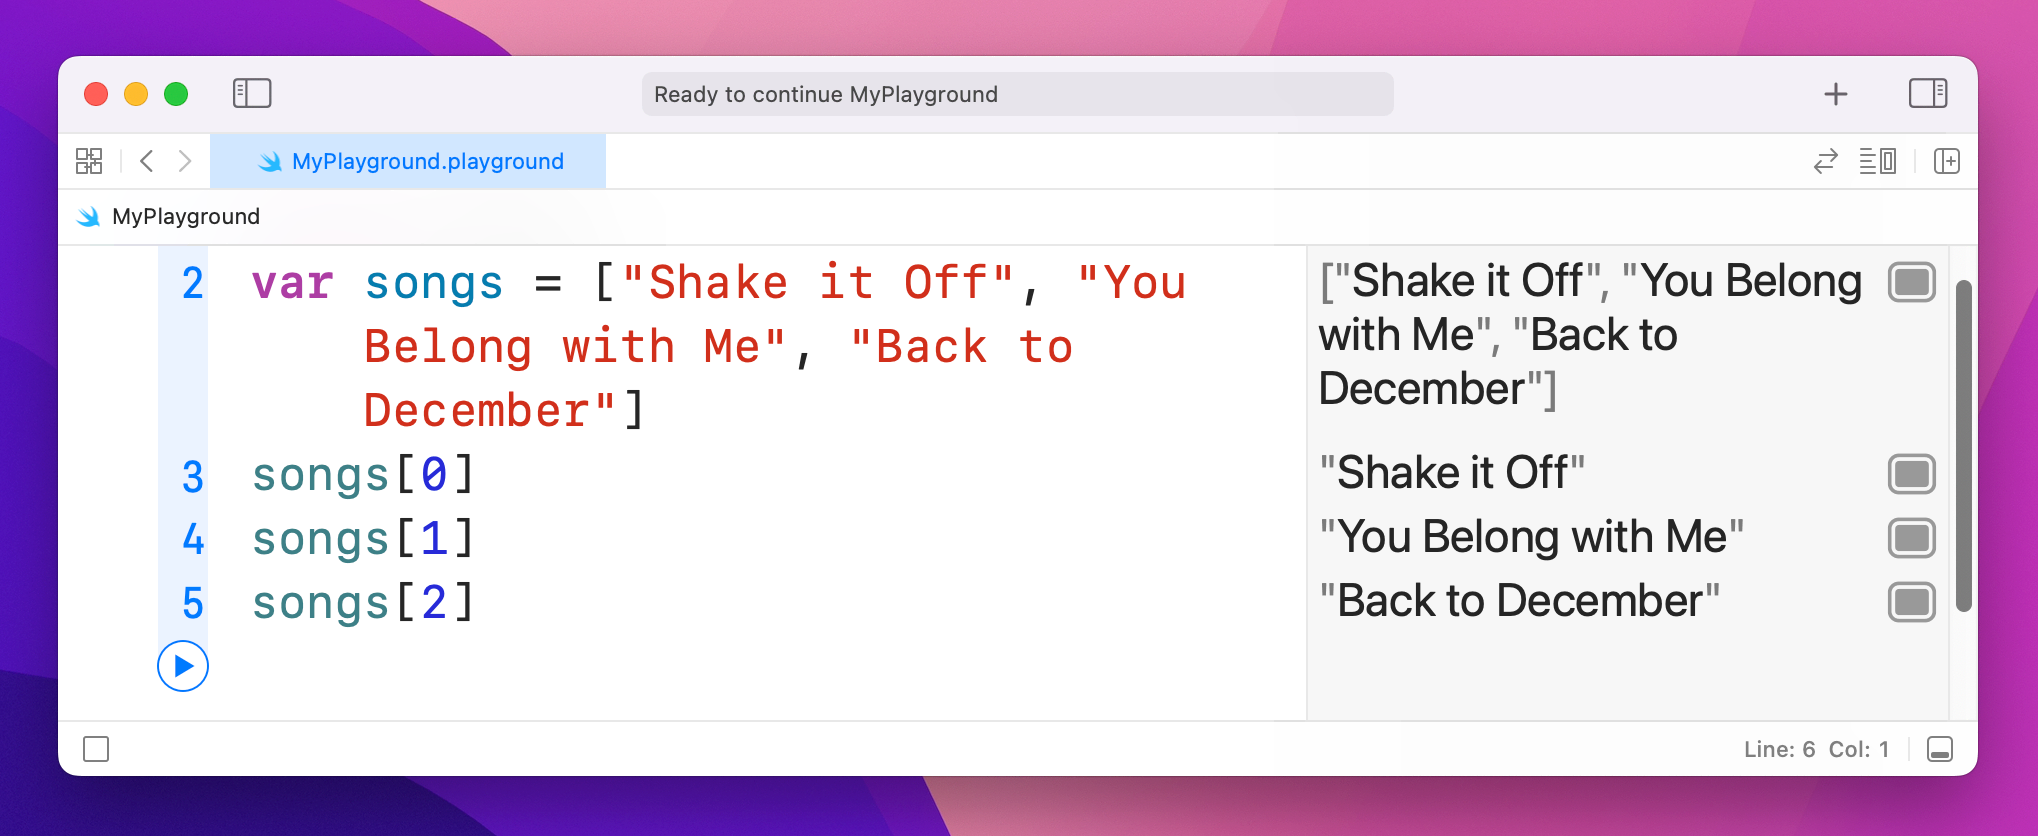
That will print "Shake it Off", "You Belong with Me", and "Back to December" in the results pane.
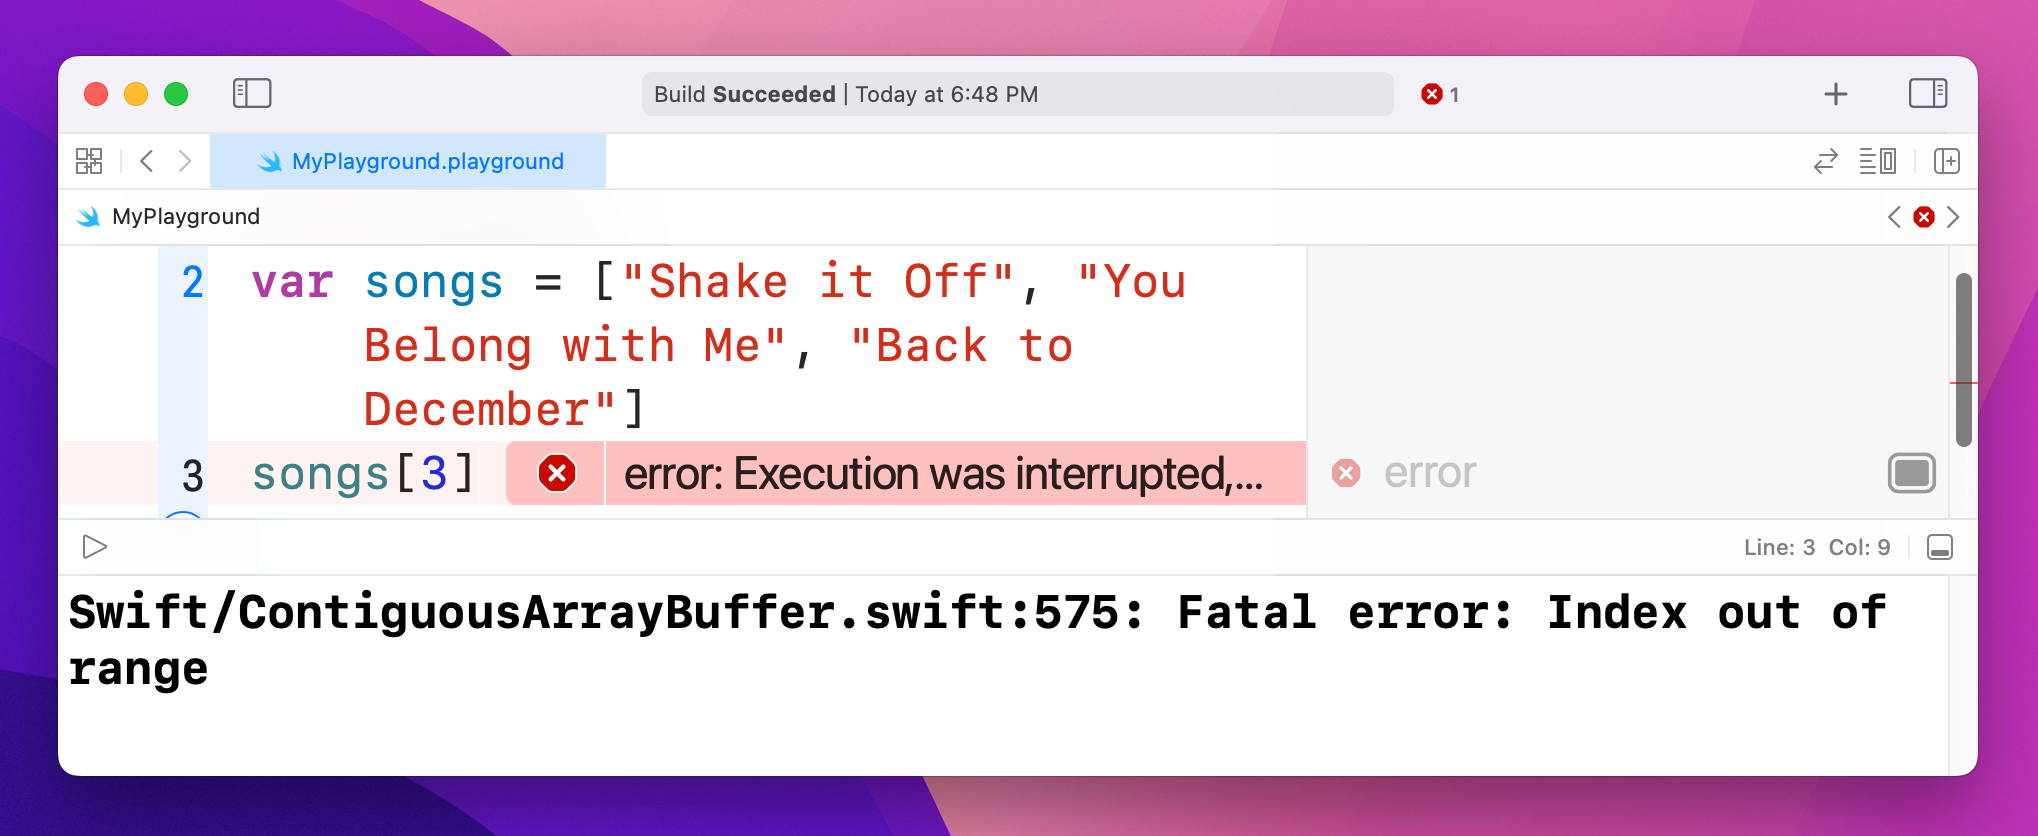
An item's position in an array is called its index, and you can read any item from the array just by providing its index. However, you do need to be careful: our array has three items in, which means indexes 0, 1 and 2 work great. But if you try and read songs[3] your playground will stop working – and if you tried that in a real app it would crash!
Because you've created your array by giving it three strings, Swift knows this is an array of strings. You can confirm this by using a special command in the playground that will print out the data type of any variable, like this:
var songs = ["Shake it Off", "You Belong with Me", "Back to December"]
type(of: songs)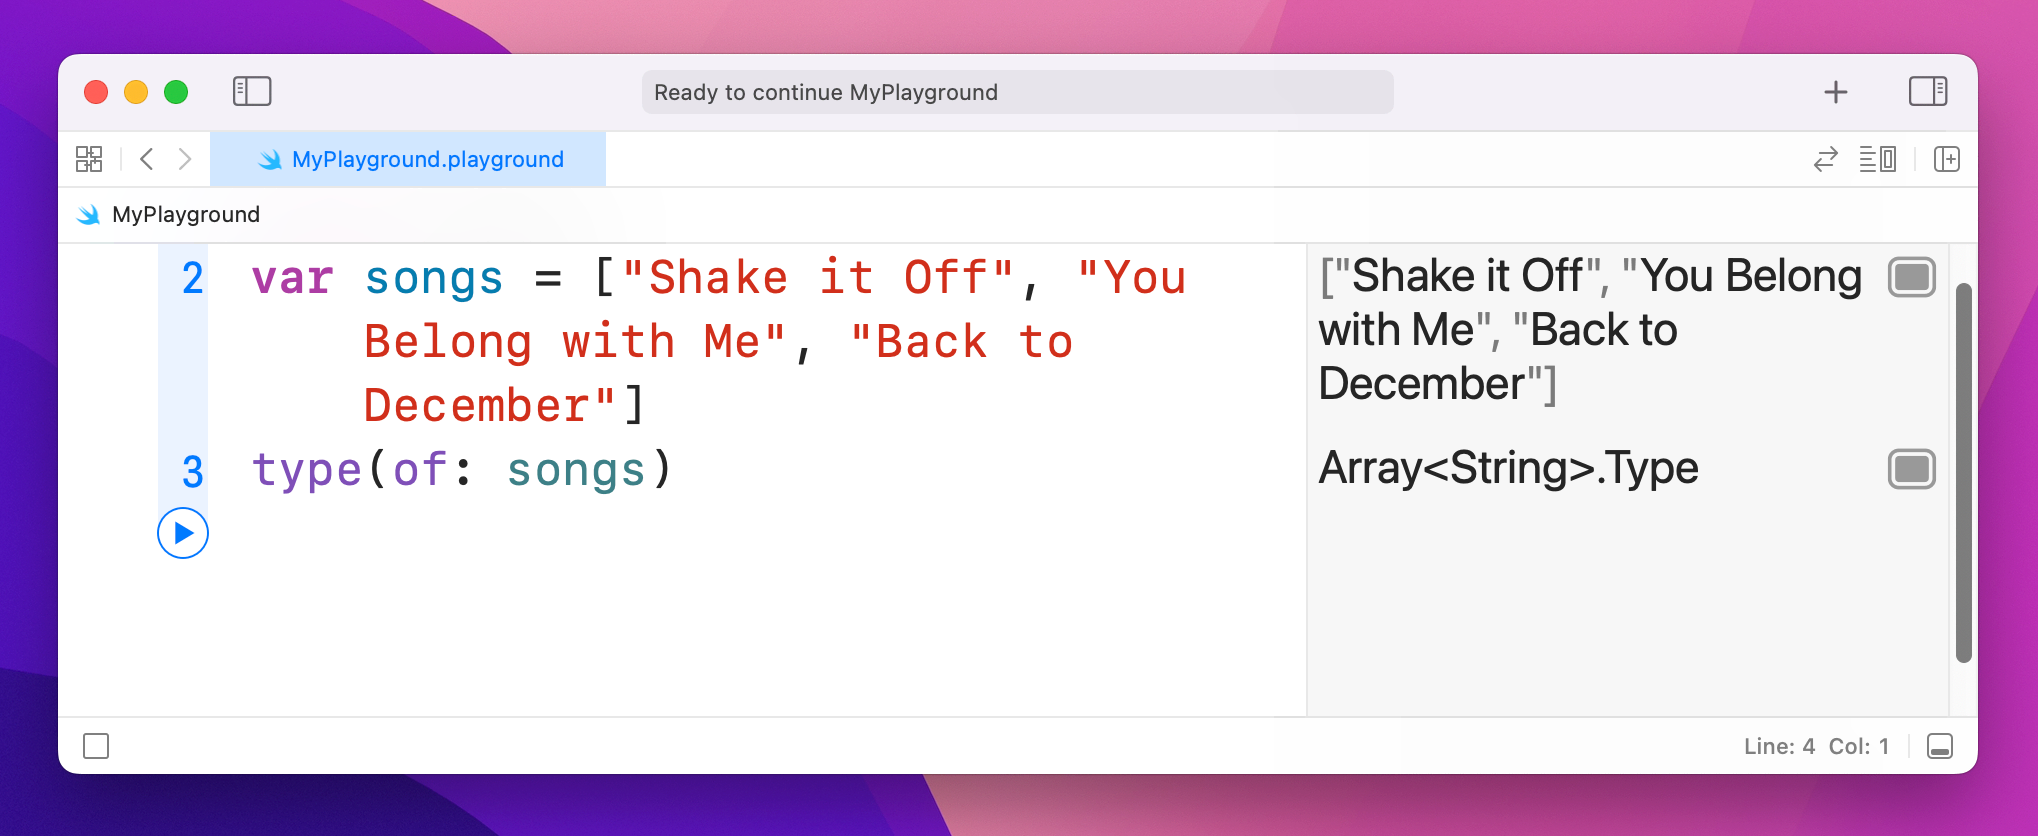
That will print Array<String>.Type into the results pane, telling you that Swift considers songs to be an array of strings.
Let's say you made a mistake, and accidentally put a number on the end of the array. Try this now and see what the results pane prints:
var songs = ["Shake it Off", "You Belong with Me", "Back to December", 3]
type(of: songs)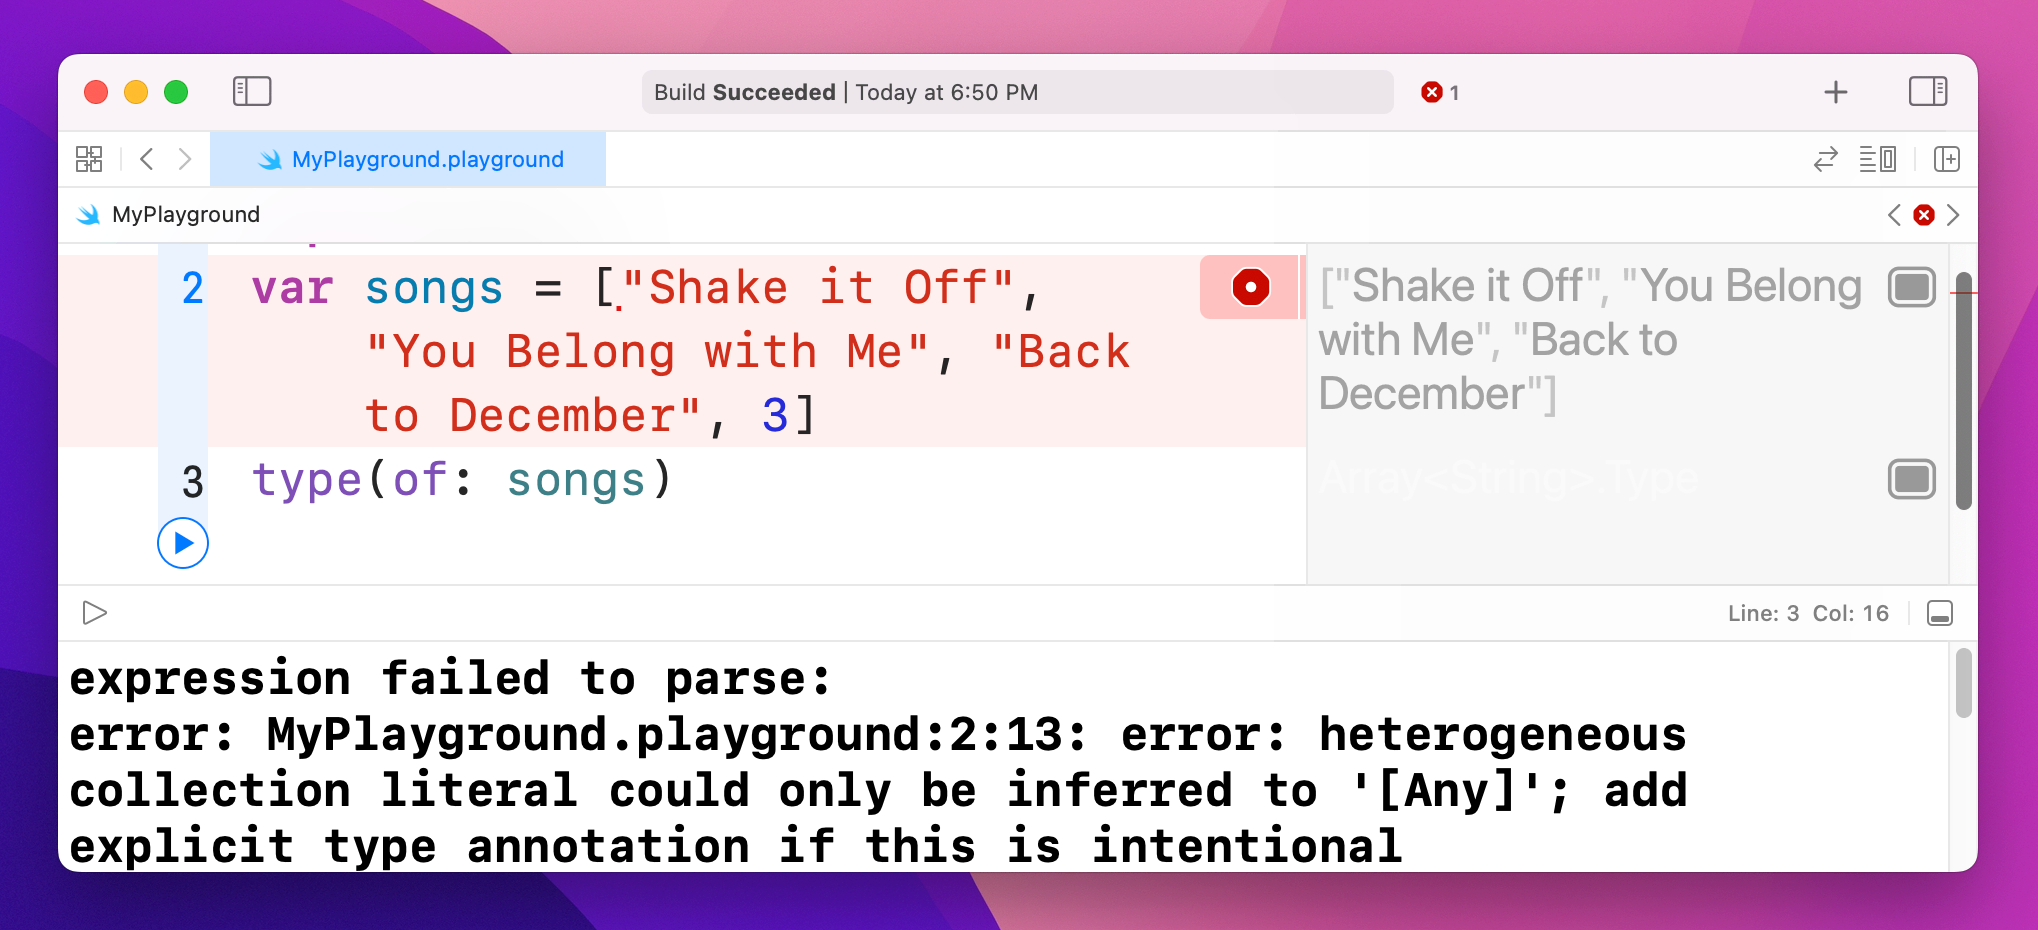
This time you'll see an error. The error isn’t because Swift can’t handle mixed arrays like this one – I’ll show you how to do that in just a moment! – but instead because Swift is being helpful. The error message you’ll see is, “heterogenous collection literal could only be inferred to '[Any]'; add explicit type annotation if this is intentional.” Or, in plain English, “it looks like this array is designed to hold lots of types of data – if you really meant that, please make it explicit.”
Type safety is important, and although it's neat that Swift can make arrays hold any kind of data this particular case was an accident. Fortunately, I've already said that you can use type annotations to specify exactly what type of data you want an array to store. To specify the type of an array, write the data type you want to store with brackets around it, like this:
var songs: [String] = ["Shake it Off", "You Belong with Me", "Back to December", 3]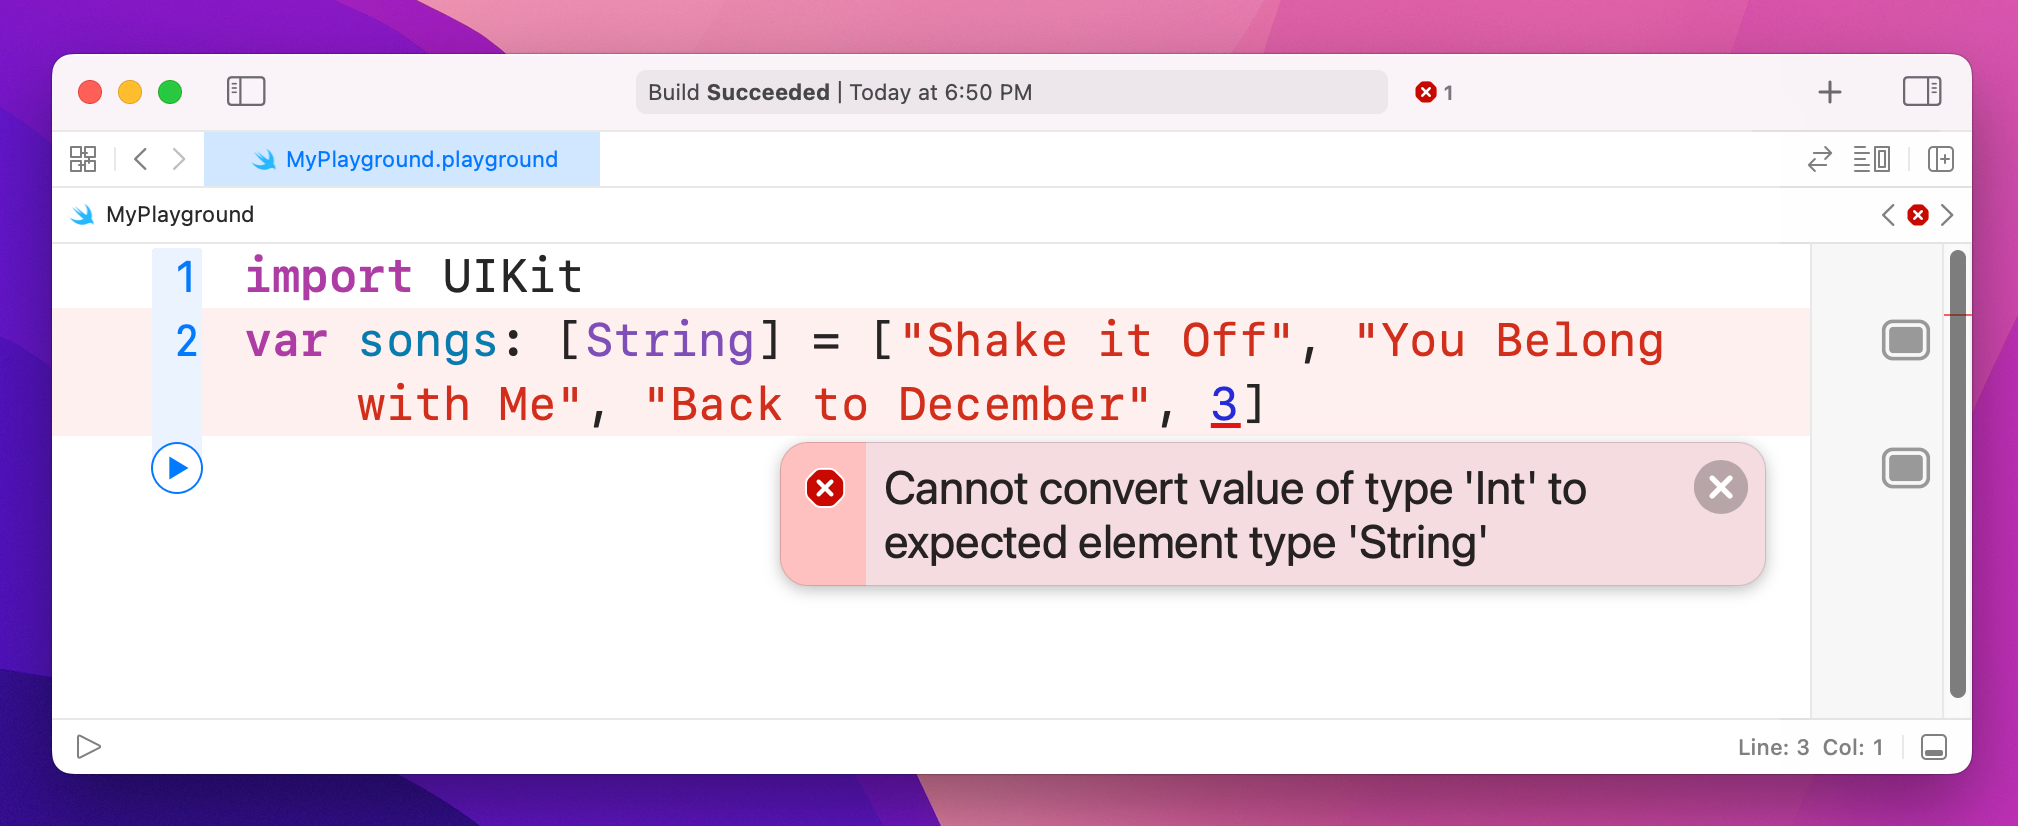
Now that we've told Swift we want to store only strings in the array, it will always refuse to run the code because 3 is not a string.
If you really want the array to hold any kind of data, use the special Any data type, like this:
var songs: [Any] = ["Shake it Off", "You Belong with Me", "Back to December", 3]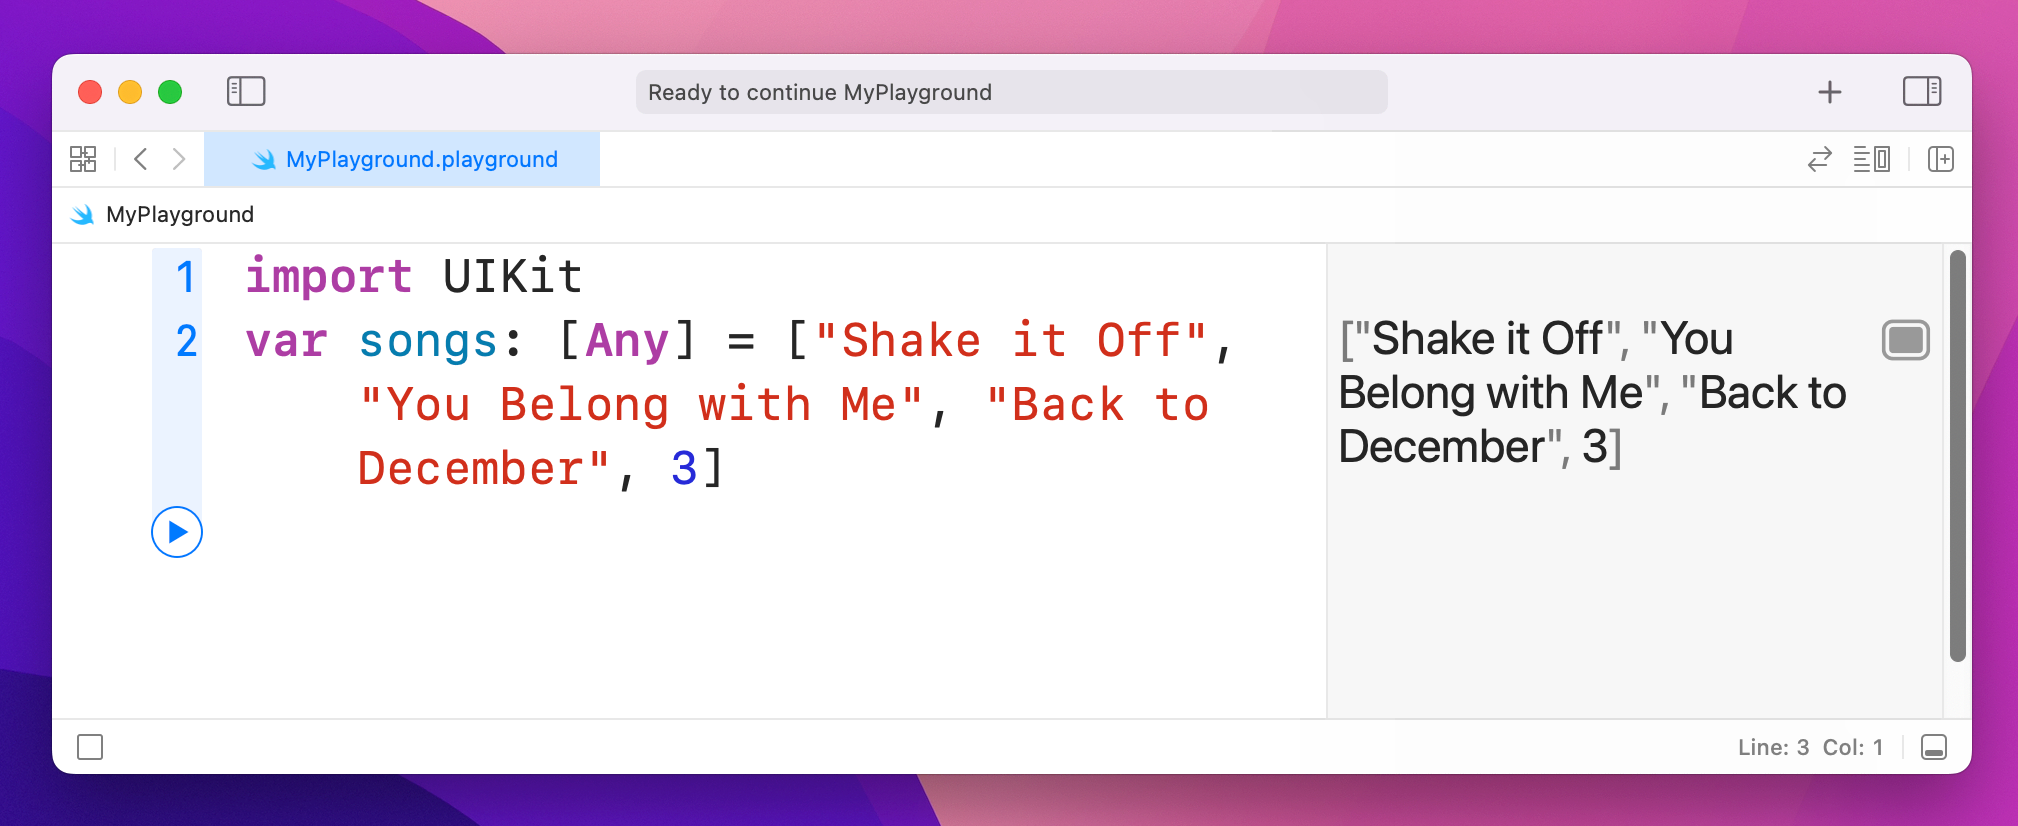
If you make an array using the syntax shown above, Swift creates the array and fills it with the values we specified. Things aren't quite so straightforward if you want to create the array then fill it later – this syntax doesn't work:
var songs: [String]
songs[0] = "Shake it Off"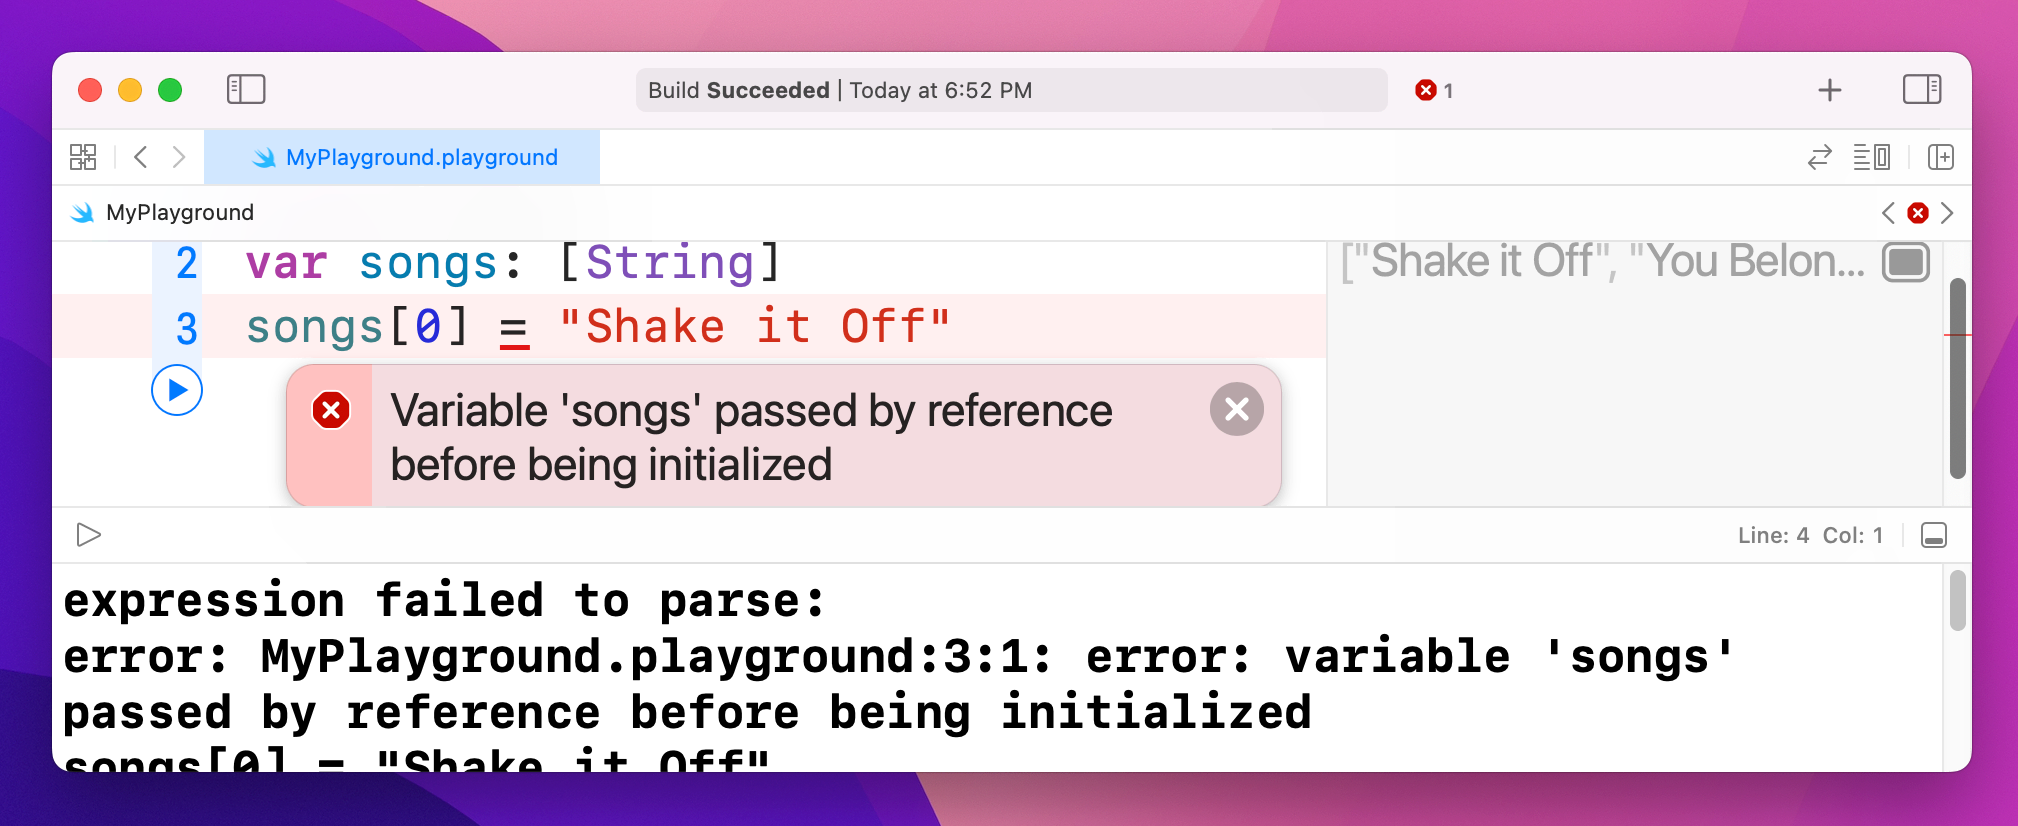
The reason is one that will seem needlessly pedantic at first, but has deep underlying performance implications so I'm afraid you're just stuck with it. Put simply, writing var songs: [String] tells Swift "the songs variable will hold an array of strings," but it doesn't actually create that array. It doesn't allocate any RAM, or do any of the work to actually create a Swift array. It just says that at some point there will be an array, and it will hold strings.
There are a few ways to express this correctly, and the one that probably makes most sense at this time is this:
var songs: [String] = []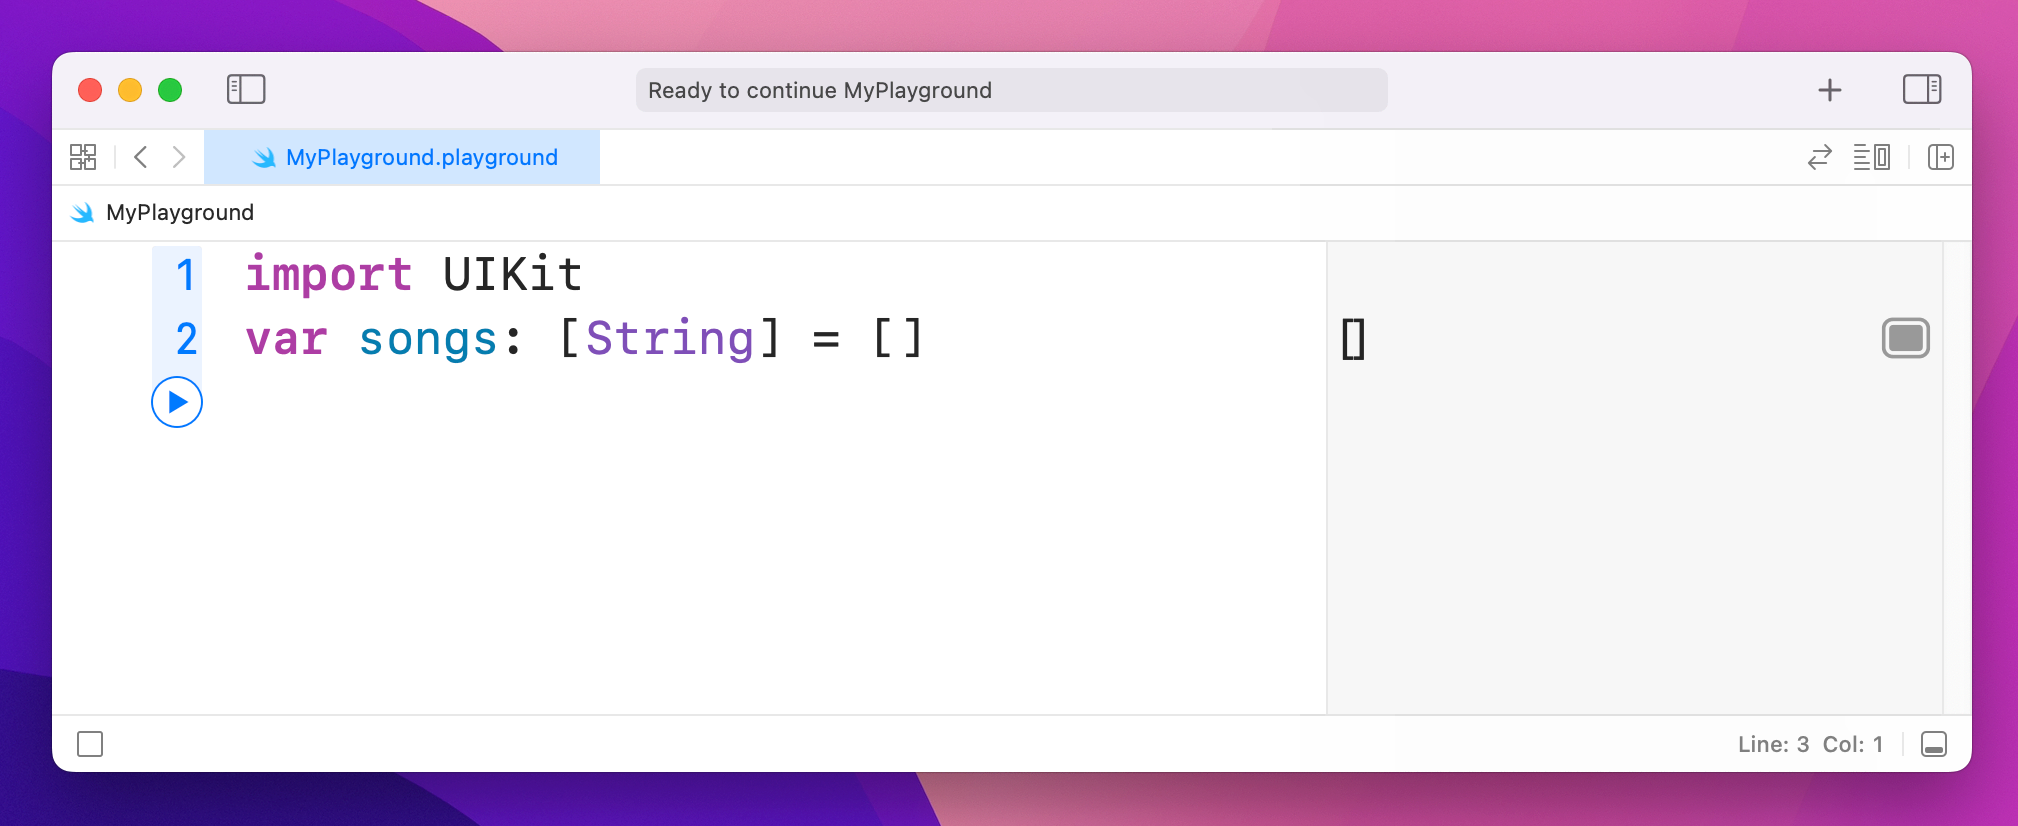
That uses a type annotation to make it clear we want an array of strings, and it assigns an empty array (that's the [] part) to it.
You'll also commonly see this construct:
var songs = [String]()
That means the same thing: the () tells Swift we want to create the array in question, which is then assigned to songs using type inference. This option is two characters shorter, so it's no surprise programmers prefer it!
You can use a limited set of operators on arrays. For example, you can merge two arrays by using the + operator, like this:
var songs = ["Shake it Off", "You Belong with Me", "Love Story"]
var songs2 = ["Today was a Fairytale", "Welcome to New York", "Fifteen"]
var both = songs + songs2
You can also use += to add and assign, like this:
both += ["Everything has Changed"]
As you've seen, Swift arrays are a collection where you access each item using a numerical index, such as songs[0]. Dictionaries are another common type of collection, but they differ from arrays because they let you access values based on a key you specify.
To give you an example, let's imagine how we might store data about a person in an array:
var person = ["Taylor", "Alison", "Swift", "December", "taylorswift.com"]To read out that person's middle name, we'd use person[1], and to read out the month they were born we'd use person[3]. This has a few problems, not least that it's difficult to remember what index number is assigned to each value in the array! And what happens if the person has no middle name? Chances are all the other values would move down one place, causing chaos in your code.
With dictionaries we can re-write this to be far more sensible, because rather than arbitrary numbers you get to read and write values using a key you specify. For example:
var person = ["first": "Taylor", "middle": "Alison", "last": "Swift", "month": "December", "website": "taylorswift.com"]
person["middle"]
person["month"]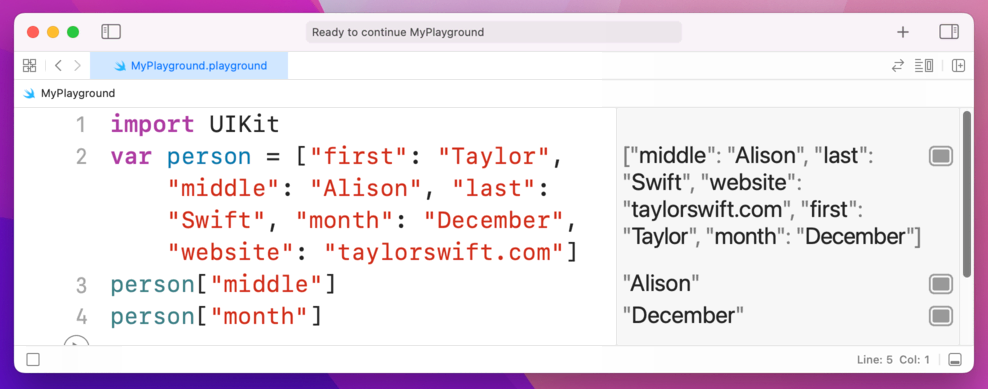
It might help if I use lots of whitespace to break up the dictionary on your screen, like this:
var person = [
                "first": "Taylor",
                "middle": "Alison",
                "last": "Swift",
                "month": "December",
                "website": "taylorswift.com"
            ]

person["middle"]
person["month"]
As you can see, when you make a dictionary you write its key, then a colon, then its value. You can then read any value from the dictionary just by knowing its key, which is much easier to work with.
As with arrays, you can store a wide variety of values inside dictionaries, although the keys are most commonly strings.
Sometimes you want code to execute only if a certain condition is true, and in Swift that is represented primarily by the if and else statements. You give Swift a condition to check, then a block of code to execute if that condition is true.
You can optionally also write else and provide a block of code to execute if the condition is false, or even else if and have more conditions. A "block" of code is just a chunk of code marked with an open brace – { – at its start and a close brace – } – at its end.
Here's a basic example:
var action: String
var person = "hater"

if person == "hater" {
    action = "hate"
}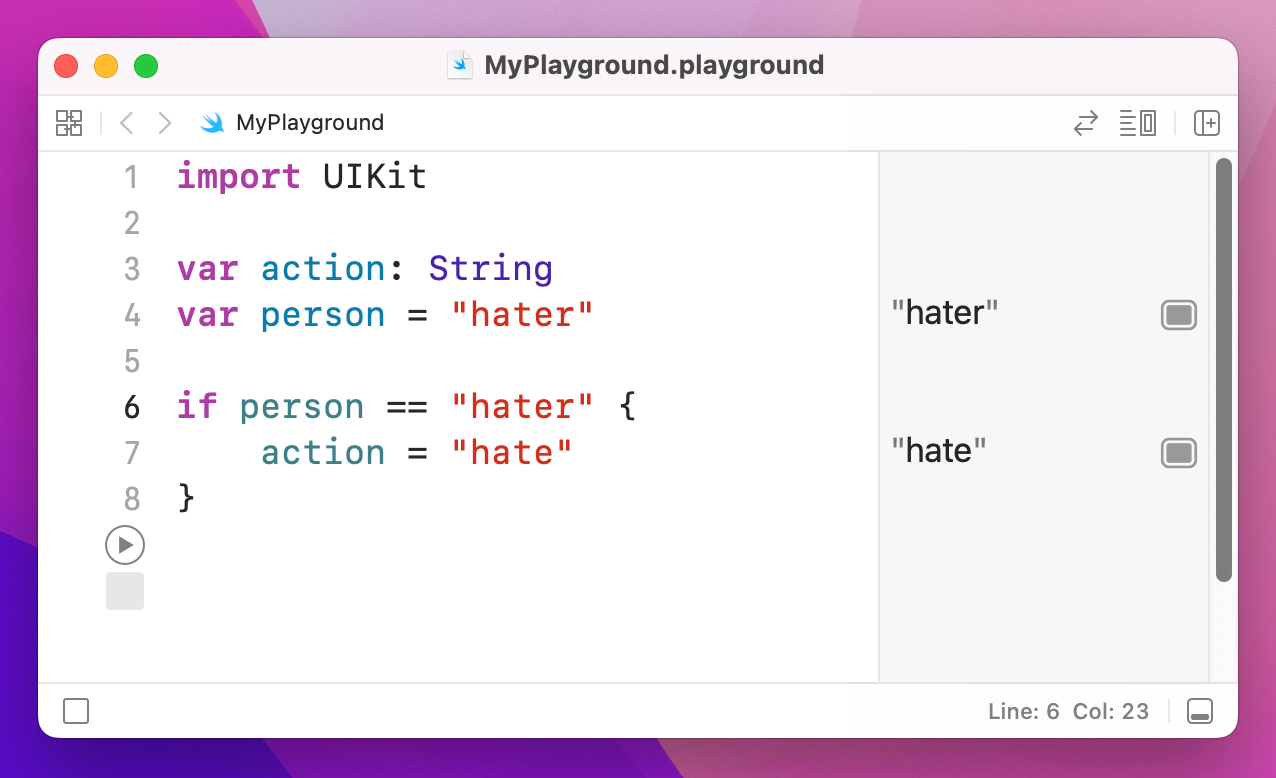
That uses the == (equality) operator introduced previously to check whether the string inside person is exactly equivalent to the string "hater". If it is, it sets the action variable to "hate". Note that open and close braces, also known by their less technical name of "curly brackets" – that marks the start and end of the code that will be executed if the condition is true.
Let's add else if and else blocks:
var action: String
var person = "hater"

if person == "hater" {
    action = "hate"
} else if person == "player" {
    action = "play"
} else {
    action = "cruise"
}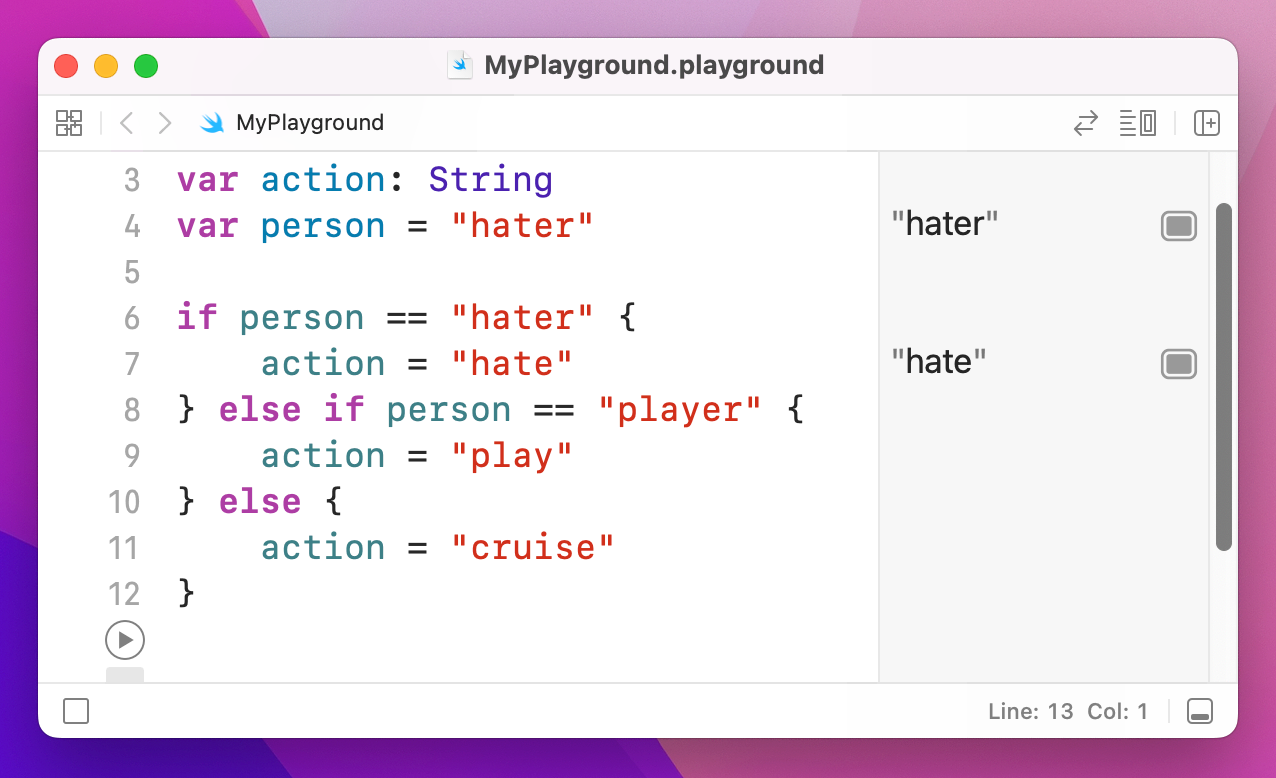
That will check each condition in order, and only one of the blocks will be executed: a person is either a hater, a player, or anything else.
You can ask Swift to evaluate as many conditions as you want, but they all need to be true in order for Swift to execute the block of code. To check multiple conditions, use the && operator – it means "and". For example:
var action: String
var stayOutTooLate = true
var nothingInBrain = true

if stayOutTooLate && nothingInBrain {
    action = "cruise"
}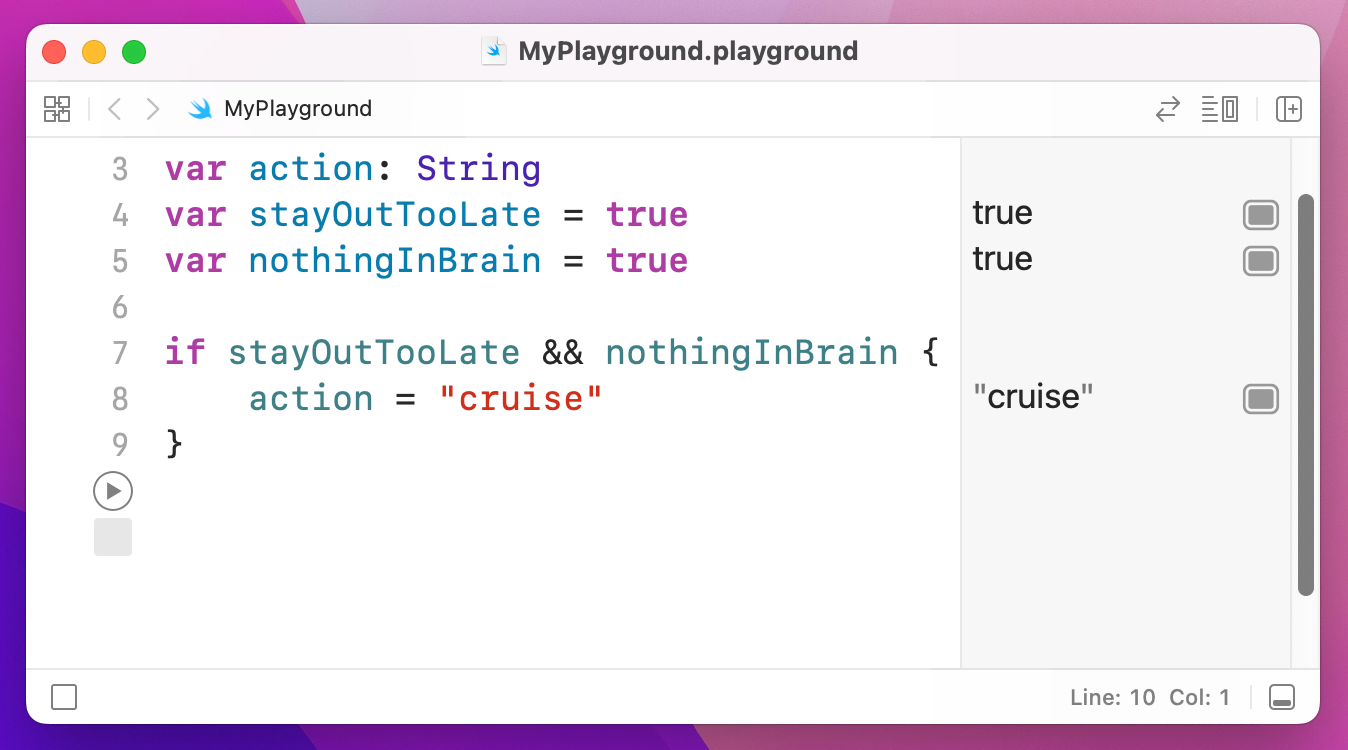
Because stayOutTooLate and nothingInBrain are both true, the whole condition is true, and action gets set to "cruise." Swift uses something called short-circuit evaluation to boost performance: if it is evaluating multiple things that all need to be true, and the first one is false, it doesn't even bother evaluating the rest.
This might sound deeply philosophical, but actually this is important: sometimes you care whether a condition is not true, i.e. is false. You can do this with the ! (not) operator that was introduced earlier. For example:
if !stayOutTooLate && !nothingInBrain {
    action = "cruise"
}
This time, the action variable will only be set if both stayOutTooLate and nothingInBrain are false – the ! has flipped them around.
Computers are great at doing boring tasks billions of times in the time it took you to read this sentence. When it comes to repeating tasks in code, you can either copy and paste your code multiple times, or you can use loops – simple programming constructs that repeat a block of code for as long as a condition is true.
To demonstrate this, I want to introduce you to a special debugging function called print(): you give it some text to print, and it will print it. If you're running in a playground like we are, you'll see your text appear in the results window. If you're running a real app in Xcode, you'll see your text appear in Xcode's log window. Either way, print() is a great way to get a sneak peek at the contents of a variable.
Take a look at this code:
print("1 x 10 is \(1 * 10)")
print("2 x 10 is \(2 * 10)")
print("3 x 10 is \(3 * 10)")
print("4 x 10 is \(4 * 10)")
print("5 x 10 is \(5 * 10)")
print("6 x 10 is \(6 * 10)")
print("7 x 10 is \(7 * 10)")
print("8 x 10 is \(8 * 10)")
print("9 x 10 is \(9 * 10)")
print("10 x 10 is \(10 * 10)")
When it has finished running, you'll have the 10 times table in your playground results pane. But it's hardly efficient code, and in fact a much cleaner way is to loop over a range of numbers using what's called the closed range operator, which is three periods in a row: ...
Using the closed range operator, we could re-write that whole thing in three lines:
for i in 1...10 {
    print("\(i) x 10 is \(i * 10)")
}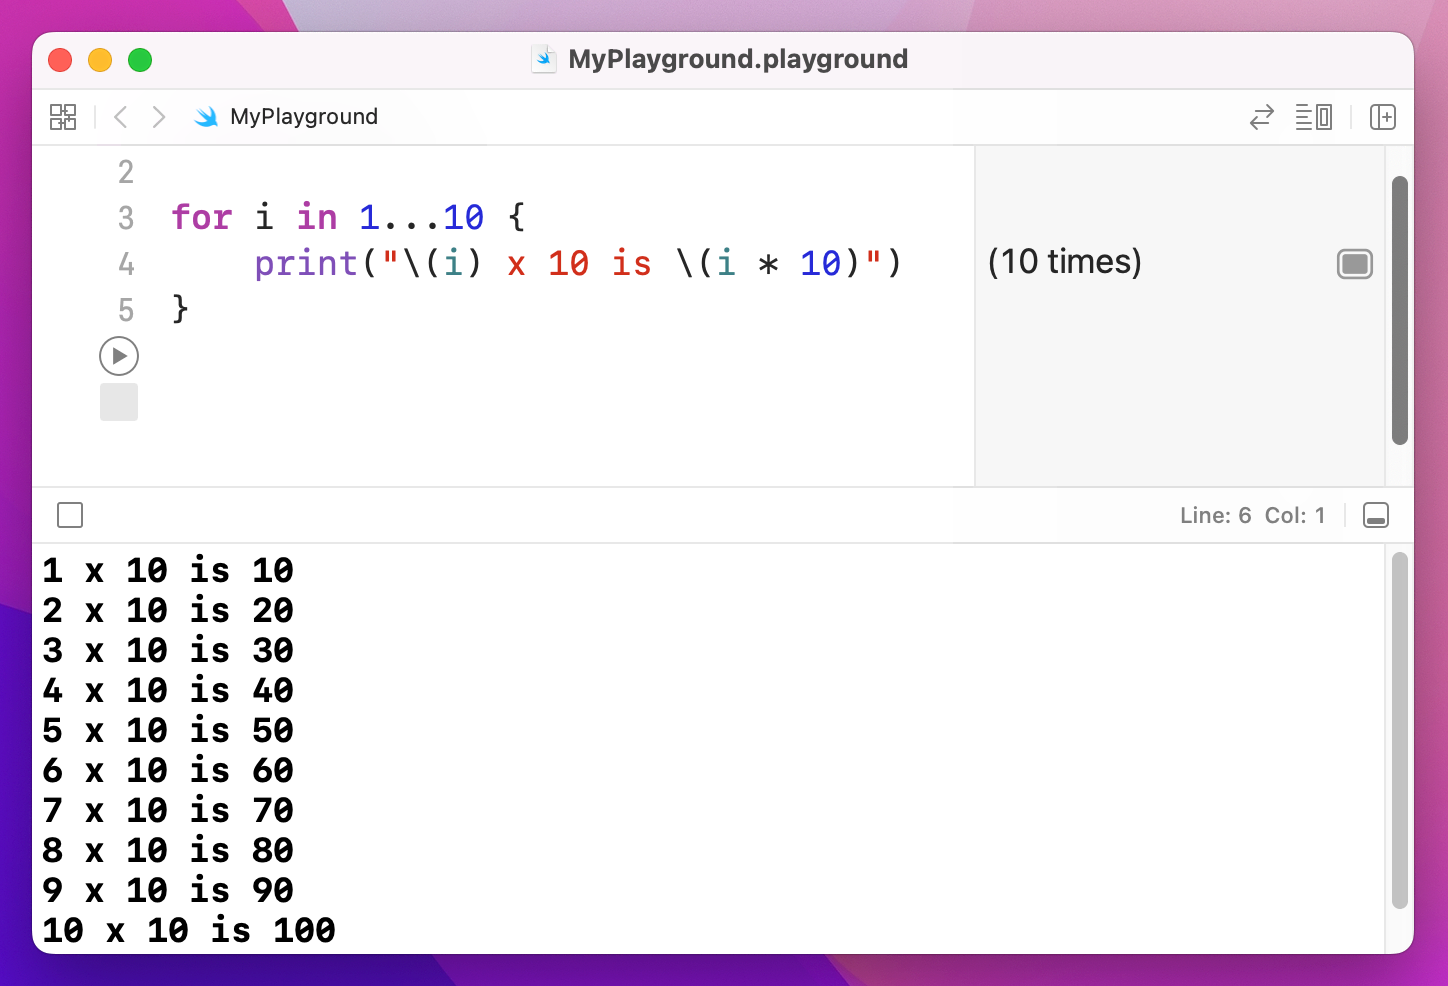
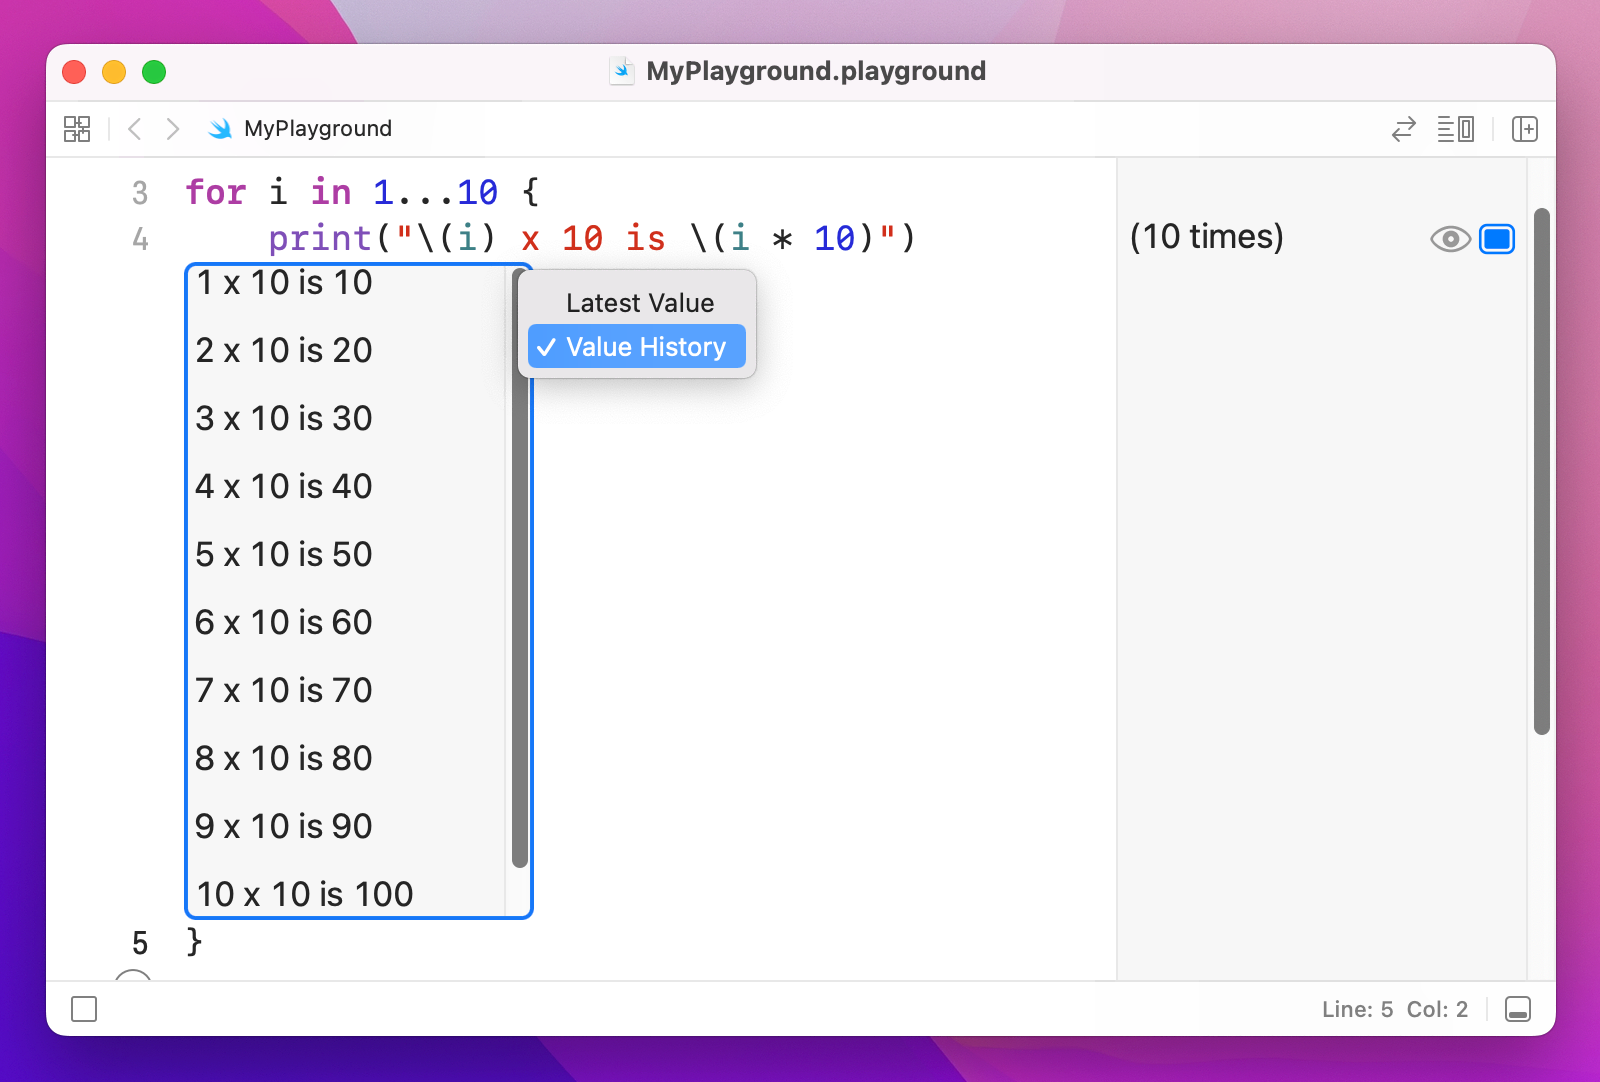
The results pane just shows "(10 times)" for our loop, meaning that the loop was run 10 times. If you want to know what the loop actually did, click the square immediately to the right of “(10 times). You'll see a box saying "10 x 10 is 100" appear inside your code, and if you right-click on that you should see the option “Value History”. Click on that now, and you should see all the printed values over time.
What the loop does is count from 1 to 10 (including 1 and 10), assigns that number to the constant i, then runs the block of code inside the braces.
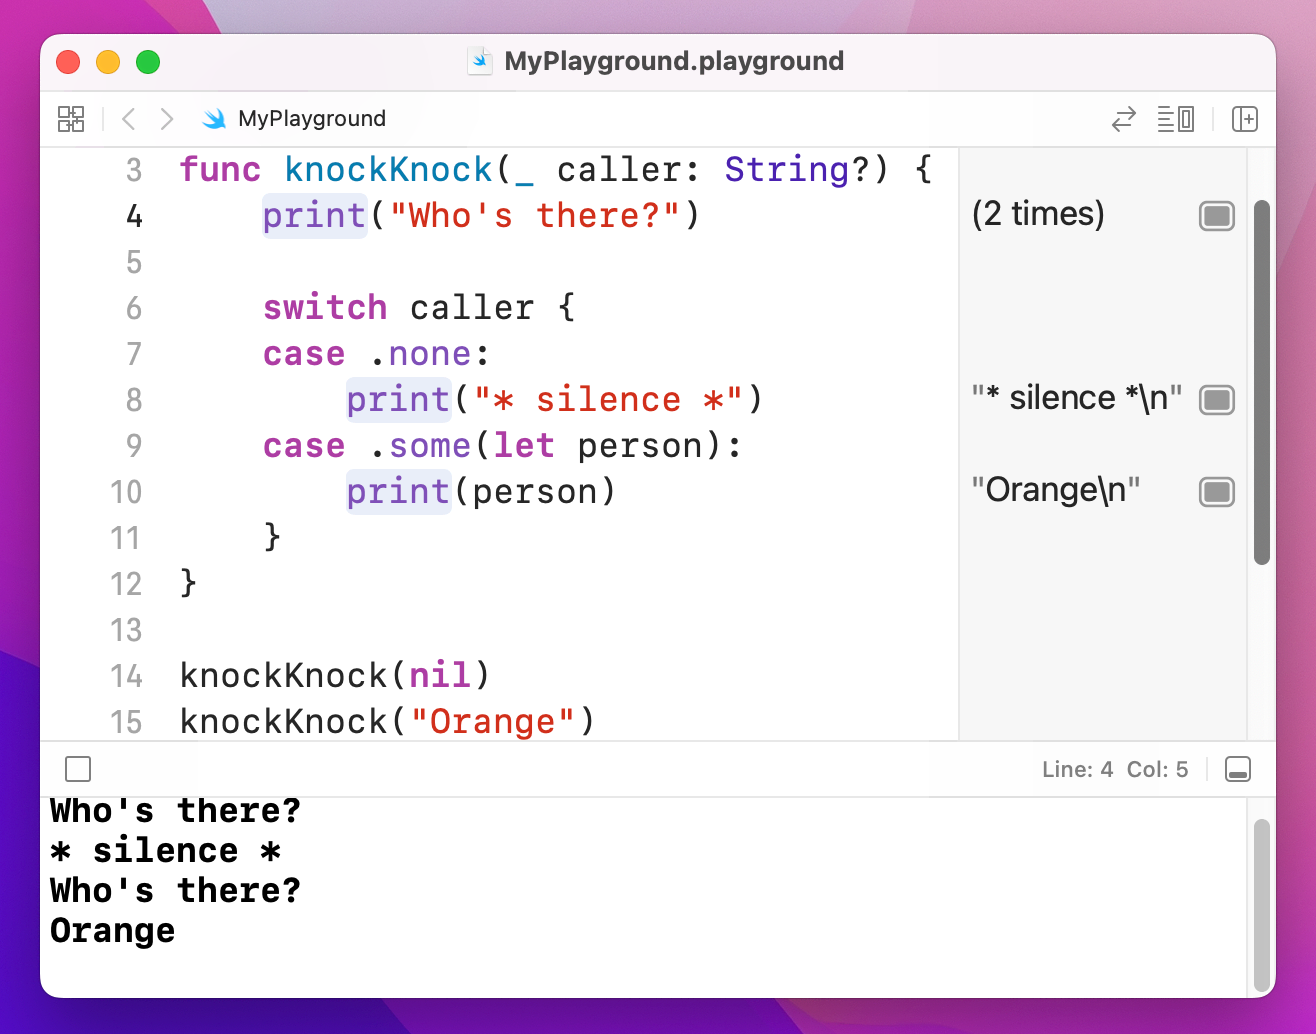
If you don't need to know what number you're on, you can use an underscore instead. For example, we could print some Taylor Swift lyrics like this:
var str = "Fakers gonna"

for _ in 1...5 {
    str += " fake"
}

print(str)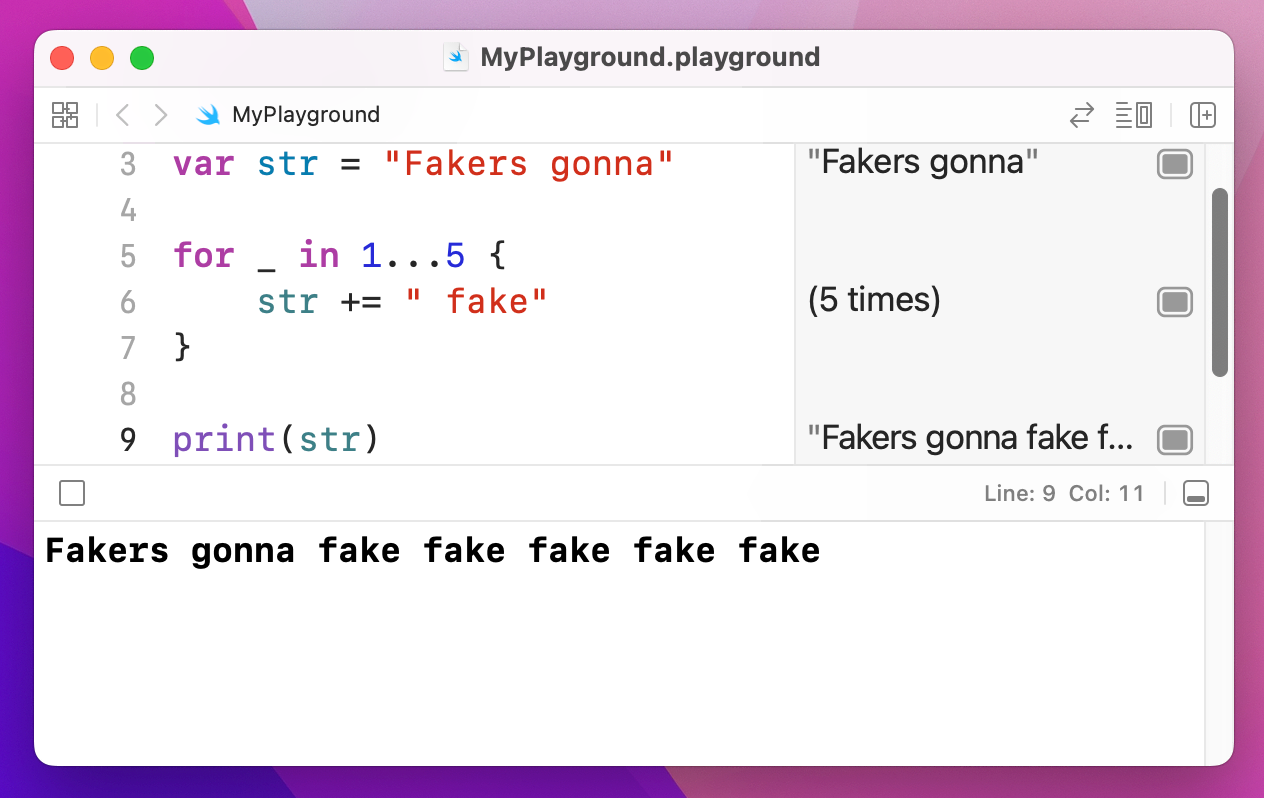
That will print "Fakers gonna fake fake fake fake fake" by adding to the string each time the loop goes around.
If Swift doesn’t have to assign each number to a variable each time the loop goes around, it can run your code a little faster. As a result, if you write for i in… then don’t use i, Xcode will suggest you change it to _.
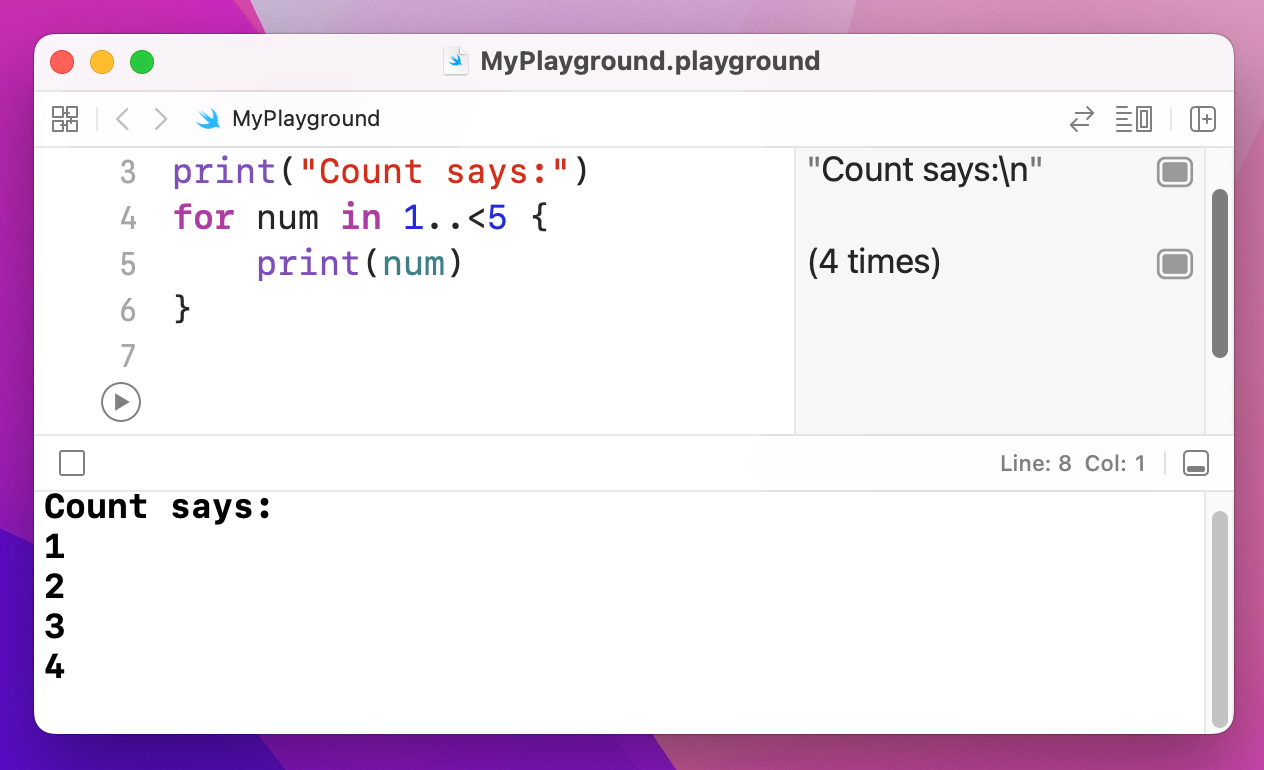
There's a variant of the closed range operator called the half open range operator, and they are easily confused. The half open range operator looks like ..< and counts from one number up to and excluding another. For example, 1..<5 will count 1, 2, 3, 4.
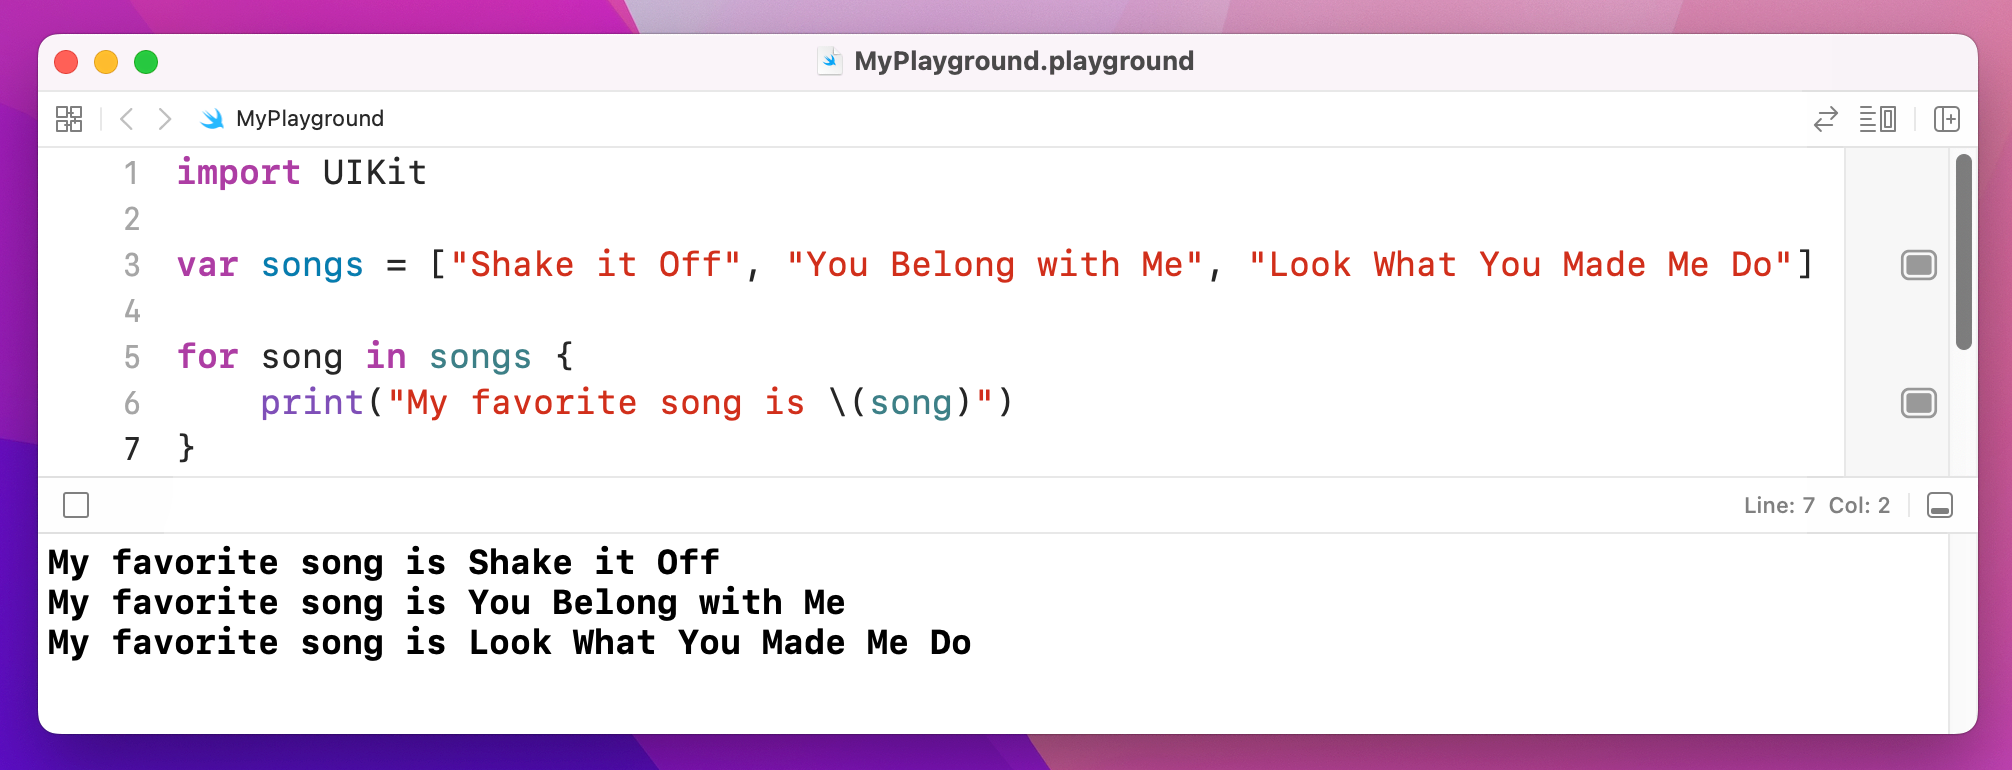
Swift provides a very simple way to loop over all the elements in an array. Because Swift already knows what kind of data your array holds, it will go through every element in the array, assign it to a constant you name, then run a block of your code. For example, we could print out a list of great songs like this:
var songs = ["Shake it Off", "You Belong with Me", "Look What You Made Me Do"]

for song in songs {
    print("My favorite song is \(song)")
}
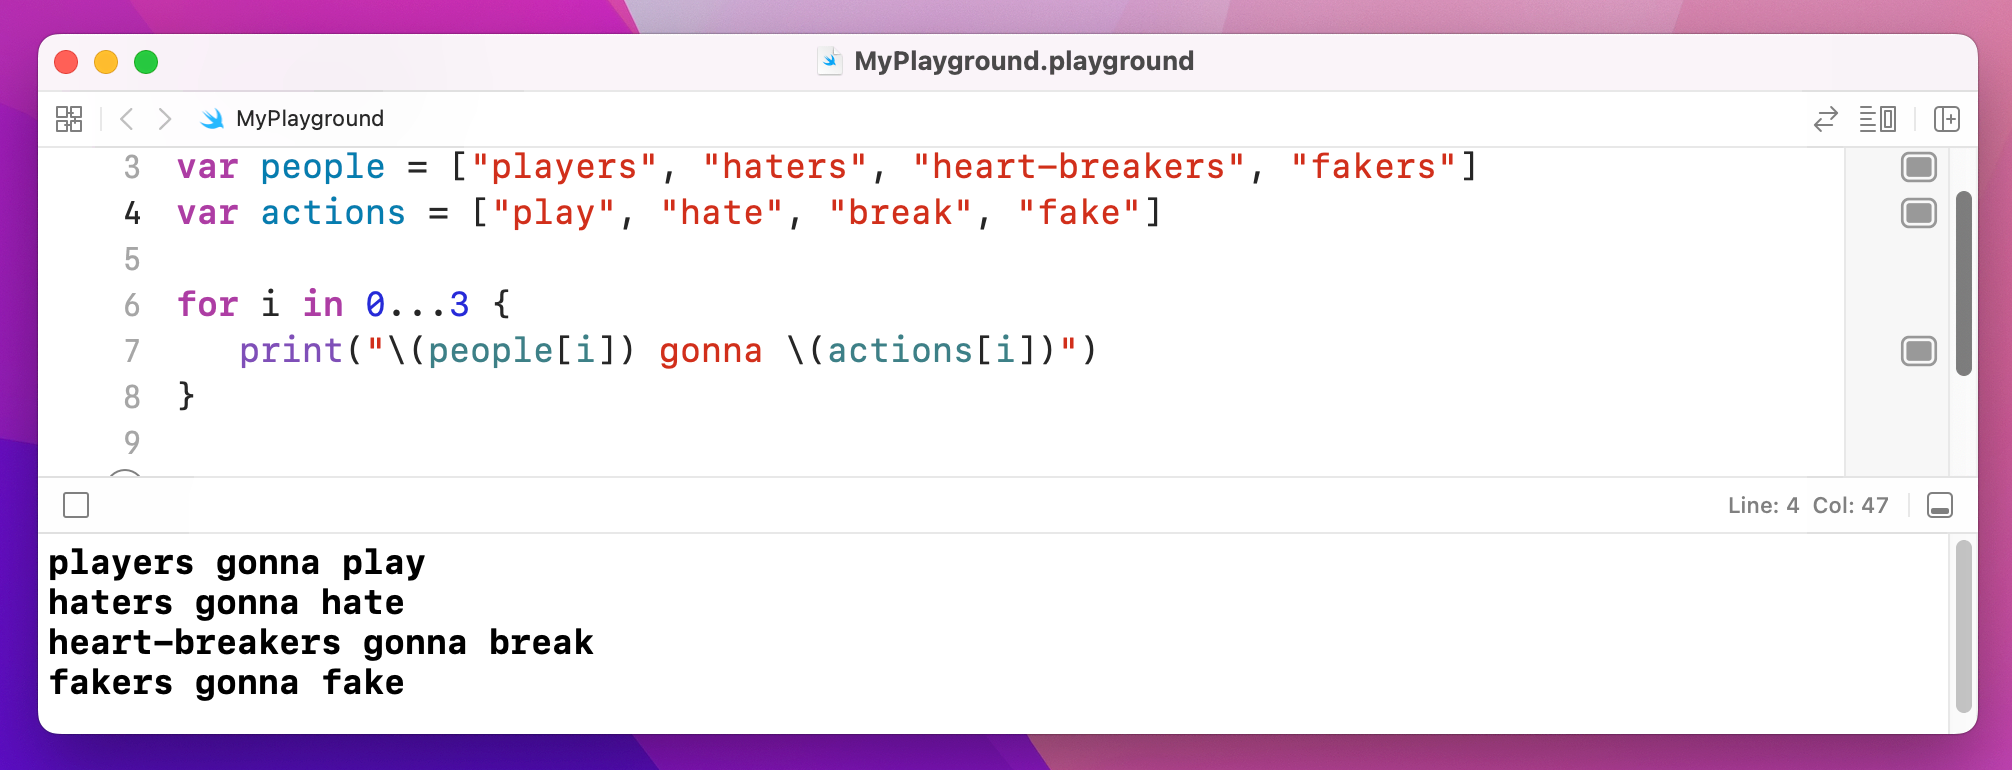
You can also use the for i in loop construct to loop through arrays, because you can use that constant to index into an array. We could even use it to index into two arrays, like this:
var people = ["players", "haters", "heart-breakers", "fakers"]
var actions = ["play", "hate", "break", "fake"]

for i in 0...3 {
    print("\(people[i]) gonna \(actions[i])")
}
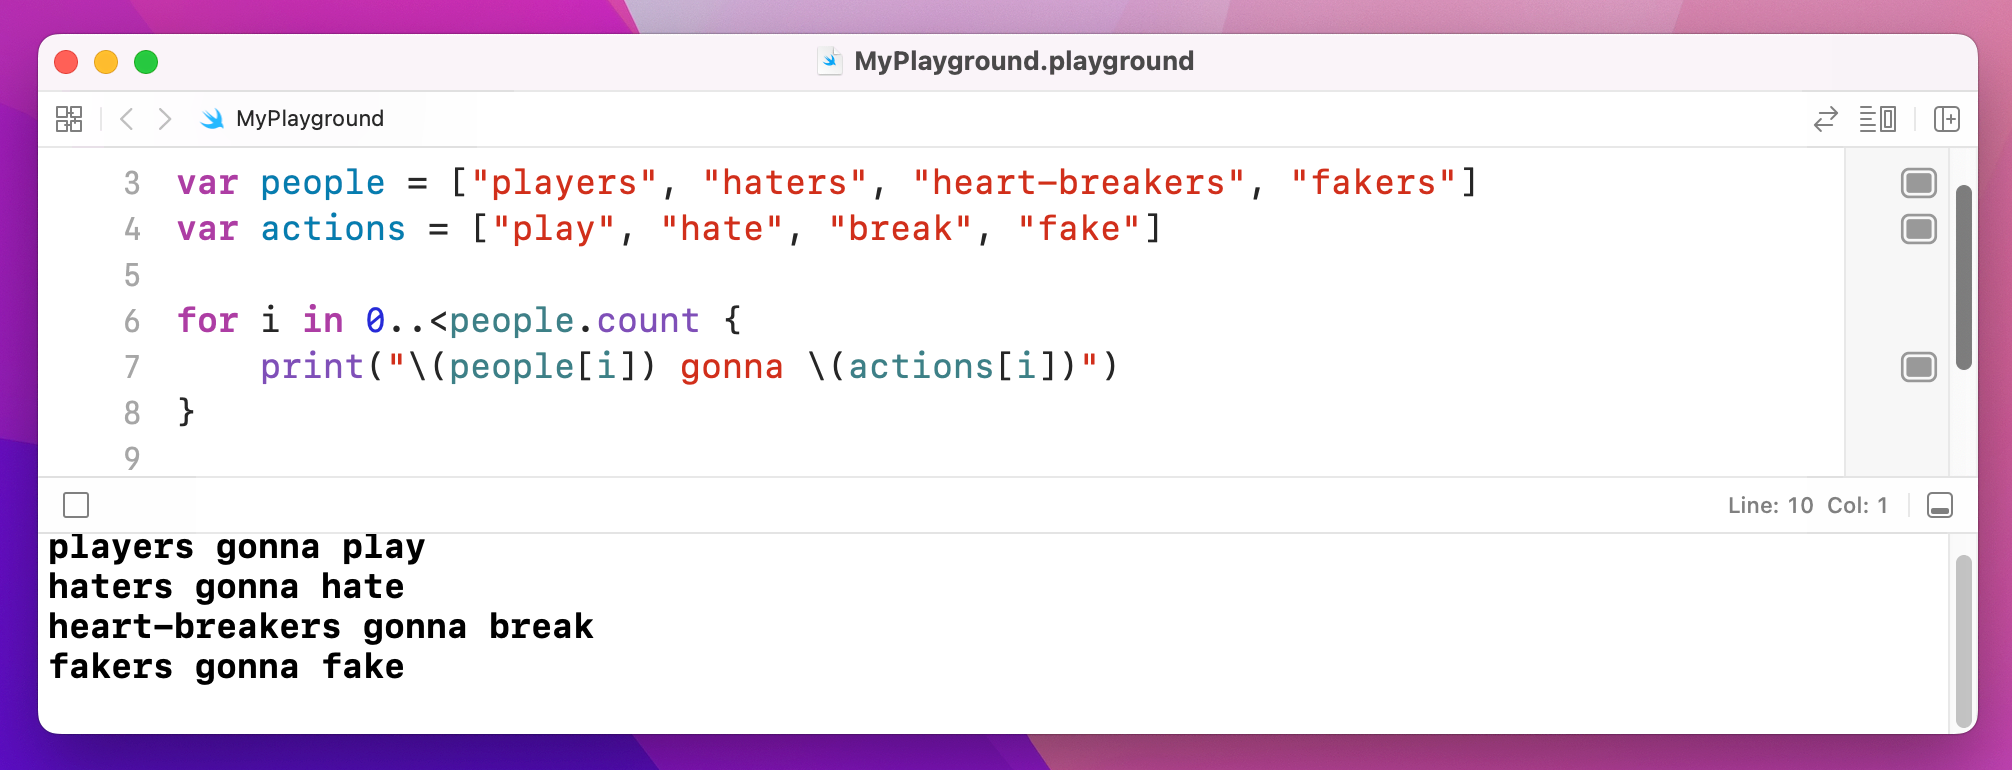
You might wonder what use the half open range operator has, but it's particularly useful for working with arrays because they count from zero. So, rather than counting from 0 up to and including 3, we could count from 0 up to and excluding the number of items in an array.
Remember: they count from zero, so if they have 4 items the maximum index is 3, which is why we need to use excluding for the loop.
To count how many items are in an array, use someArray.count. So, we could rewrite our code like this:
var people = ["players", "haters", "heart-breakers", "fakers"]
var actions = ["play", "hate", "break", "fake"]

for i in 0..<people.count {
    print("\(people[i]) gonna \(actions[i])")
}
You can put loops inside loops if you want, and even loops inside loops inside loops – although you might suddenly find you're doing something 10 million times, so be careful!
We can combine two of our previous loops to create this:
var people = ["players", "haters", "heart-breakers", "fakers"]
var actions = ["play", "hate", "break", "fake"]

for i in 0..<people.count {
    var str = "\(people[i]) gonna"

    for _ in 1...5 {
        str += " \(actions[i])"
    }

    print(str)
}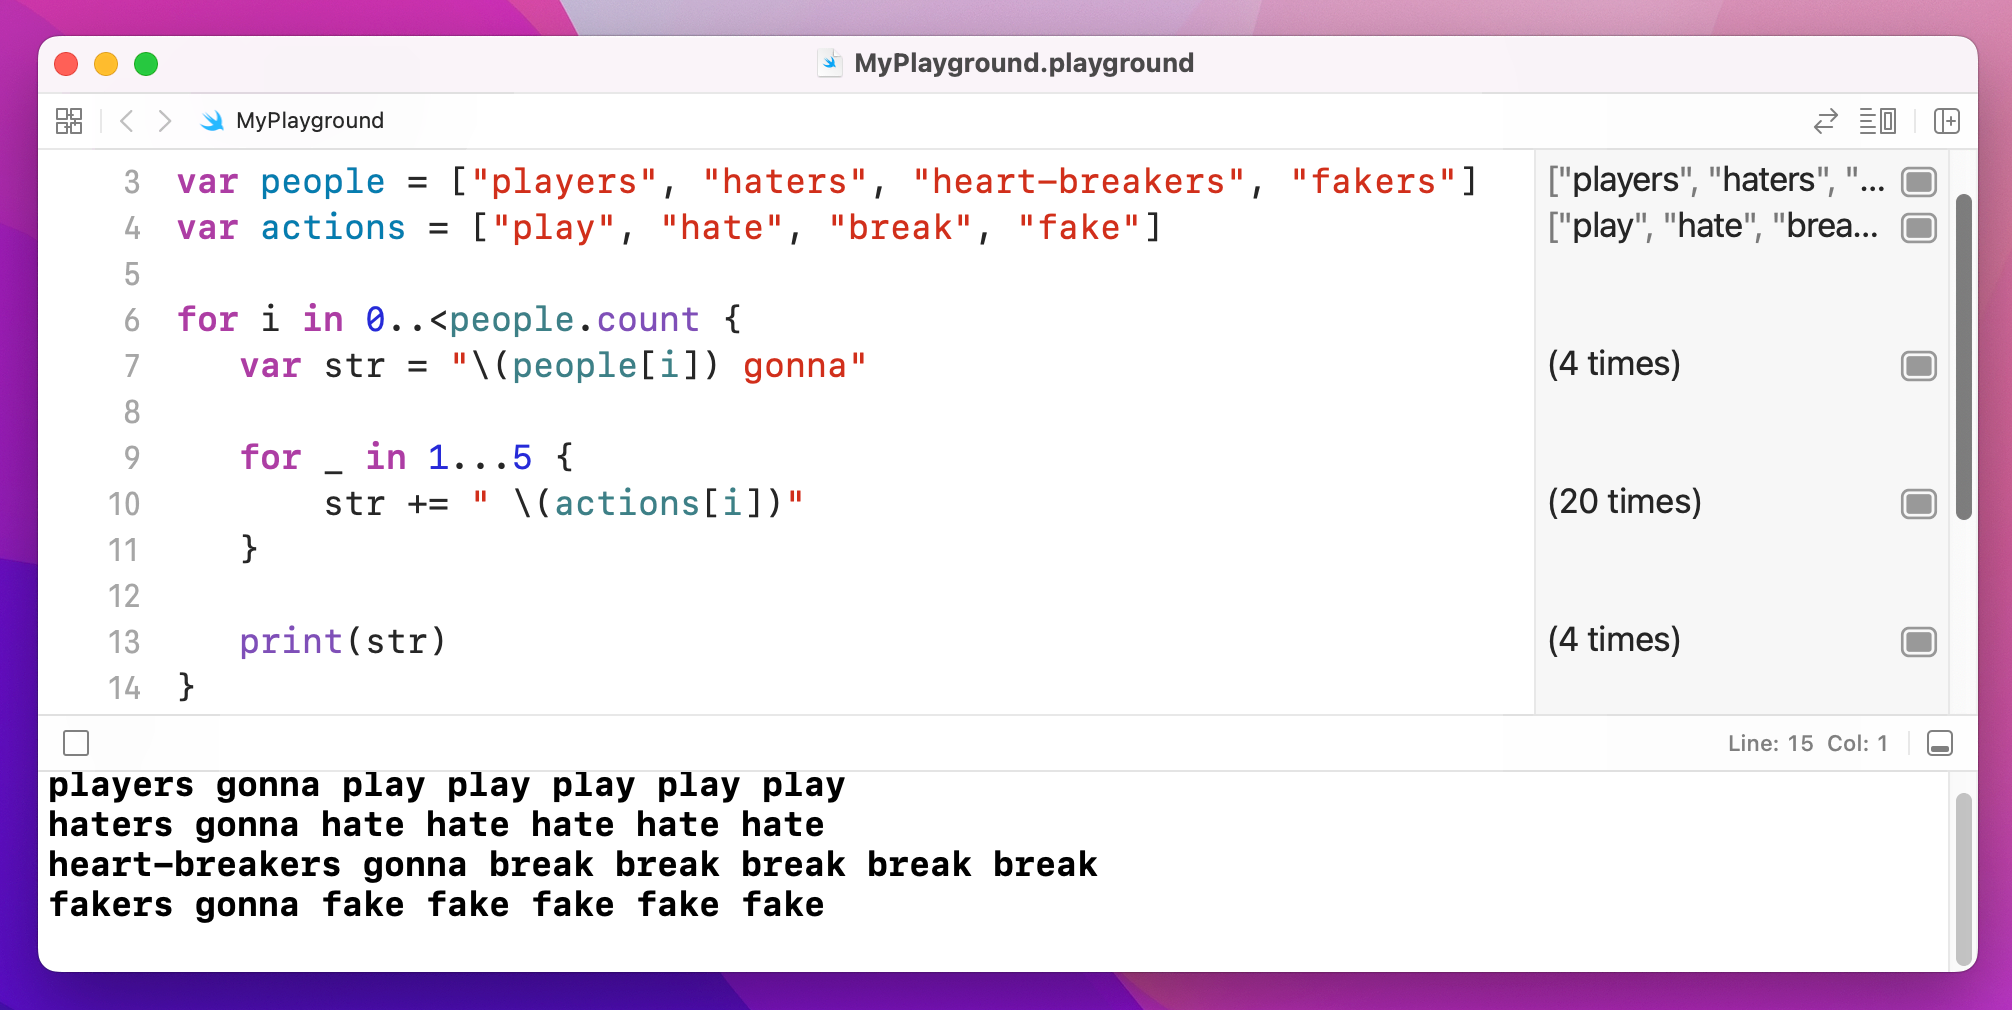
That outputs "players gonna play play play play play", then "haters gonna…" Well, you get the idea.
One important note: although programmers conventionally use i, j and even k for loop constants, you can name them whatever you please: for personNumber in 0..<people.count is perfectly valid.
There's a third kind of loop you'll see, which repeats a block of code until you tell it to stop. This is used for things like game loops where you have no idea in advance how long the game will last – you just keep repeating "check for touches, animate robots, draw screen, check for touches…" and so on, until eventually the user taps a button to exit the game and go back to the main menu.
These loops are called while loops, and they look like this:
var counter = 0

while true {
    print("Counter is now \(counter)")
    counter += 1

    if counter == 556 {
        break
    }
}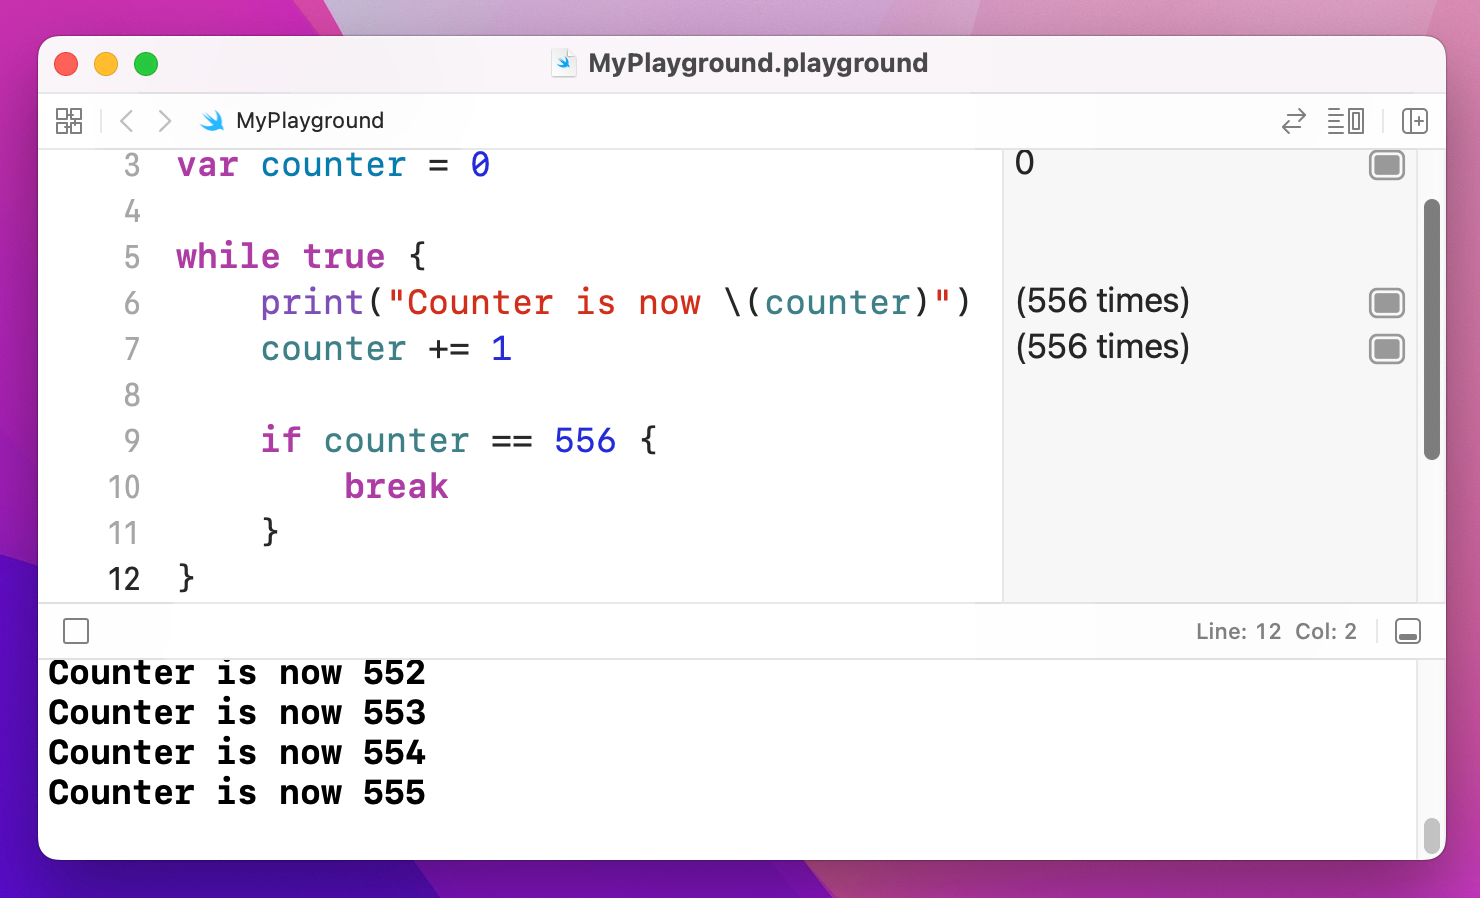
That code introduces a new keyword, called break. It's used to exit a while or for loop at a point you decide. Without it, the code above would never end because the condition to check is just "true", and true is always true. Without that break statement the loop is an infinite loop, which is A Bad Thing.
These while loops work best when you're using unknown data, such as downloading things from the internet, reading from a file such as XML, looking through user input, and so on. This is because you only know when to stop the loop after you've run it a sufficient number of times.
There is a counterpart to break called continue. Whereas breaking out of a loop stops execution immediately and continues directly after the loop, continuing a loop only exits the current iteration of the loop – it will jump back to the top of the loop and pick up from there.
As an example, consider the code below:
var songs = ["Shake it Off", "You Belong with Me", "Look What You Made Me Do"]

for song in songs {
    if song == "You Belong with Me" {
        continue
    }

    print("My favorite song is \(song)")
}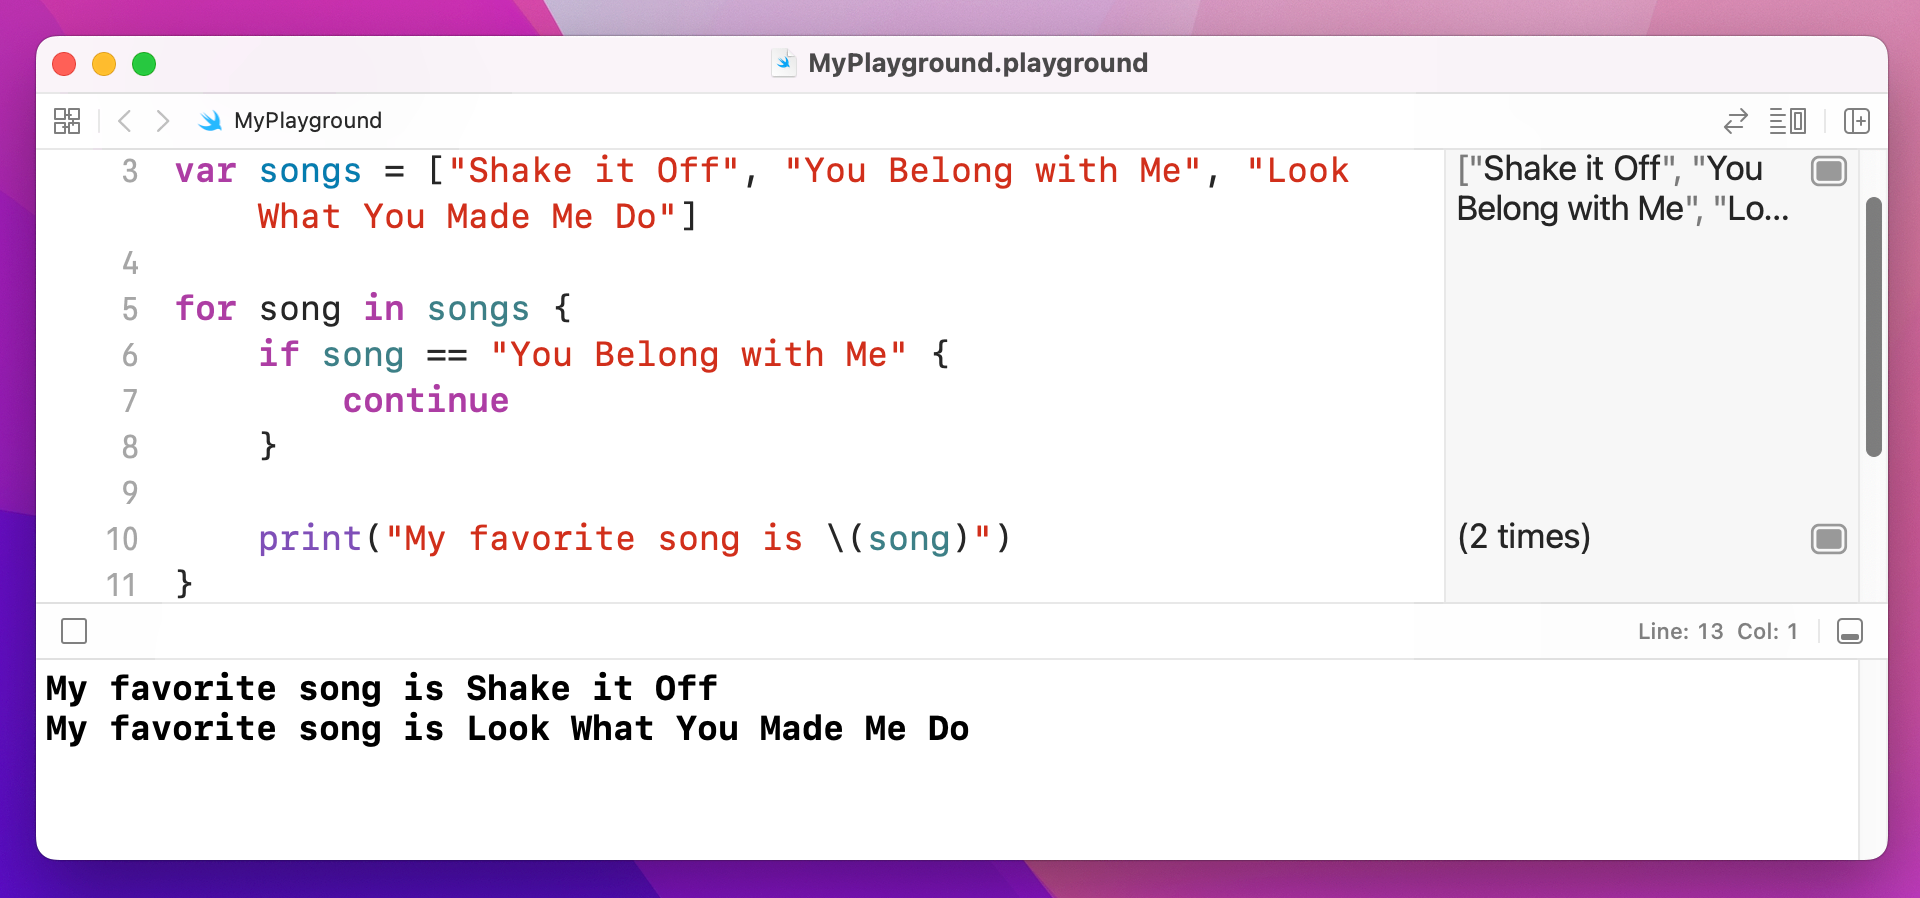
That loops through three Taylor Swift songs, but it will only print the name of two. The reason for this is the continue keyword: when the loop tries to use the song "You Belong with Me", continue gets called, which means the loop immediately jumps back to the start – the print() call is never made, and instead the loop continues straight on to “Look What You Made Me Do”.
You've seen if statements and now loops, but Swift has another type of flow control called switch/case. It's easiest to think of this as being an advanced form of if, because you can have lots of matches and Swift will execute the right one.
In the most basic form of a switch/case you tell Swift what variable you want to check, then provide a list of possible cases for that variable. Swift will find the first case that matches your variable, then run its block of code. When that block finishes, Swift exits the whole switch/case block.
Here's a basic example:
let liveAlbums = 2

switch liveAlbums {
case 0:
    print("You're just starting out")

case 1:
    print("You just released iTunes Live From SoHo")

case 2:
    print("You just released Speak Now World Tour")

default:
    print("Have you done something new?")
}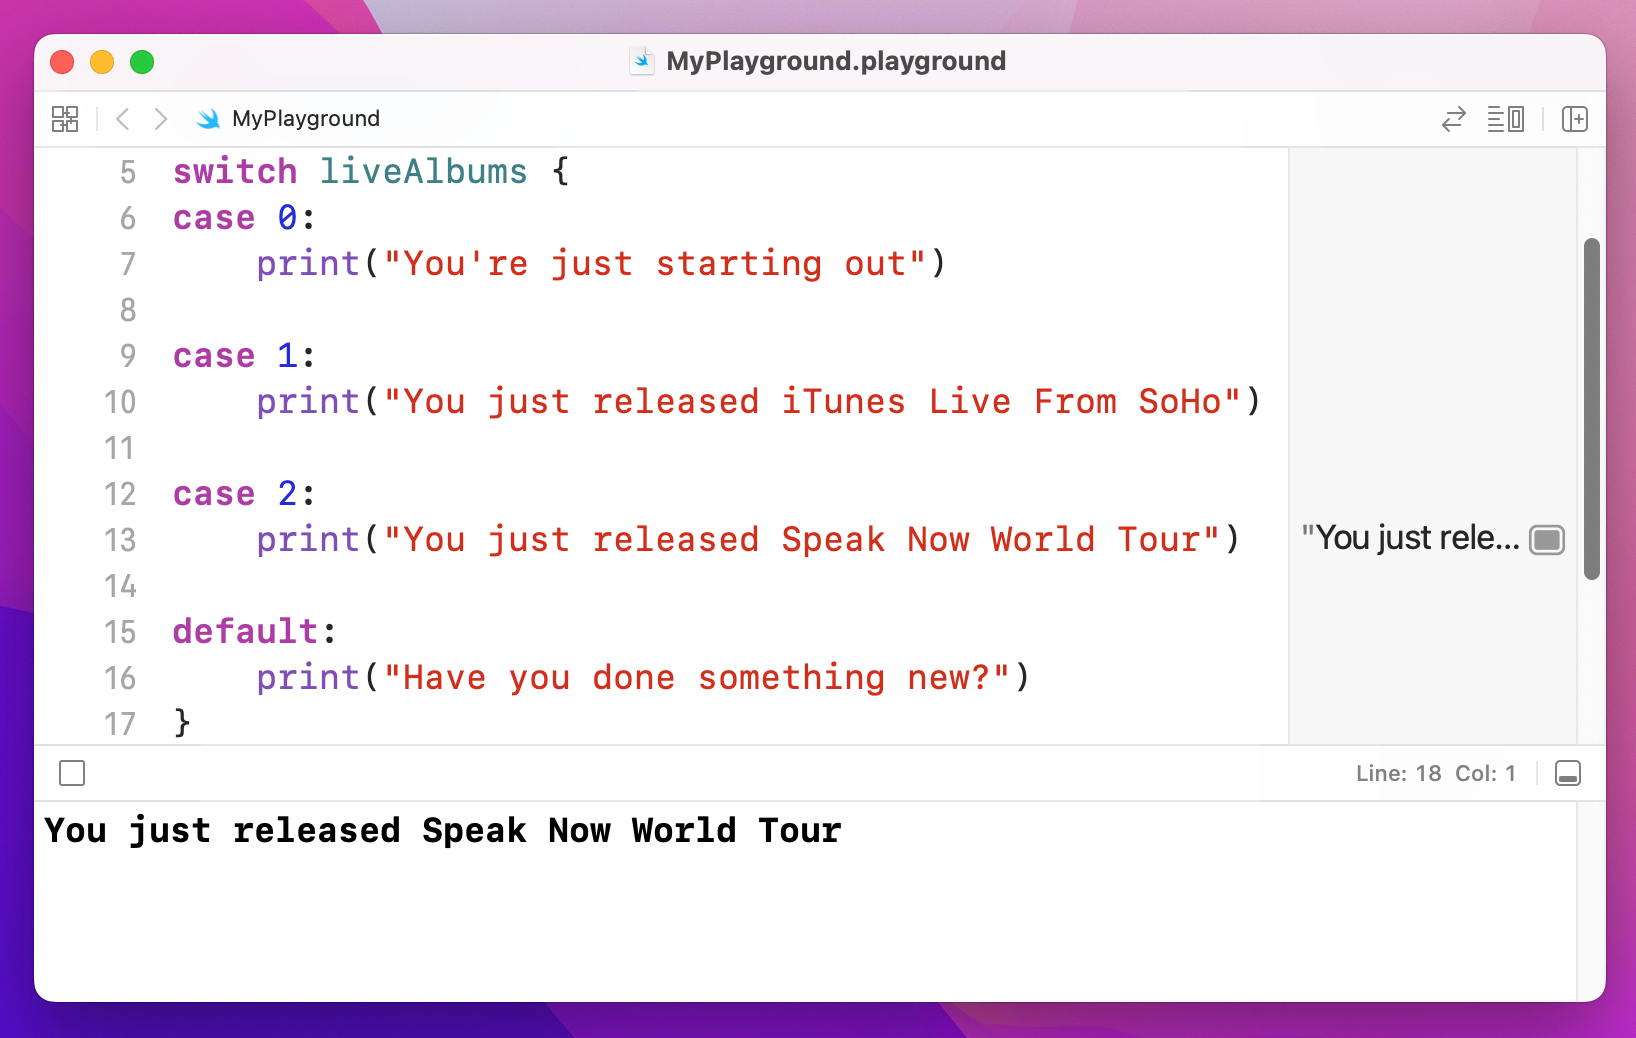
We could very well have written that using lots of if and else if blocks, but this way is clearer and that's important.
One advantage to switch/case is that Swift will ensure your cases are exhaustive. That is, if there's the possibility of your variable having a value you don't check for, Xcode will refuse to build your app.
In situations where the values are effectively open ended, like our liveAlbums integer, you need to include a default case to catch these potential values. Yes, even if you "know" your data can only fall within a certain range, Swift wants to be absolutely sure.
Swift can apply some evaluation to your case statements in order to match against variables. For example, if you wanted to check for a range of possible values, you could use the closed range operator like this:
let studioAlbums = 5

switch studioAlbums {
case 0...1:
    print("You're just starting out")

case 2...3:
    print("You're a rising star")

case 4...5:
    print("You're world famous!")

default:
    print("Have you done something new?")
}
One thing you should know is that switch/case blocks in Swift don't fall through like they do in some other languages you might have seen. If you're used to writing break in your case blocks, you should know this isn't needed in Swift.
Instead, you use the fallthrough keyword to make one case fall into the next – it's effectively the opposite. Of course, if you have no idea what any of this means, that's even better: don't worry about it!
Functions let you define re-usable pieces of code that perform specific pieces of functionality. Usually functions are able to receive some values to modify the way they work, but it's not required.
Let's start with a simple function:
func favoriteAlbum() {
    print("My favorite is Fearless")
}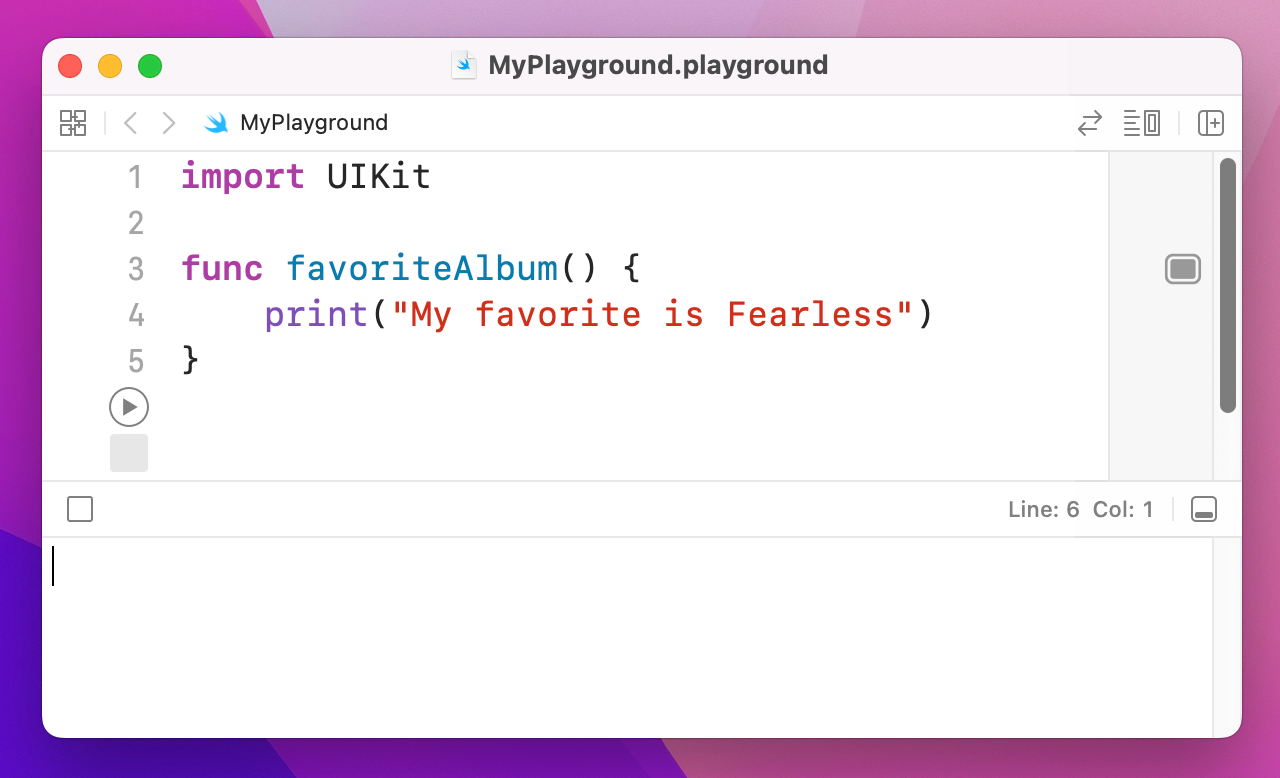
If you put that code into your playground, nothing will be printed. And yes, it is correct. The reason nothing is printed is that we've placed the "My favorite is Fearless" message into a function called favoriteAlbum(), and that code won't be called until we ask Swift to run the favoriteAlbum() function. To do that, add this line of code:
favoriteAlbum()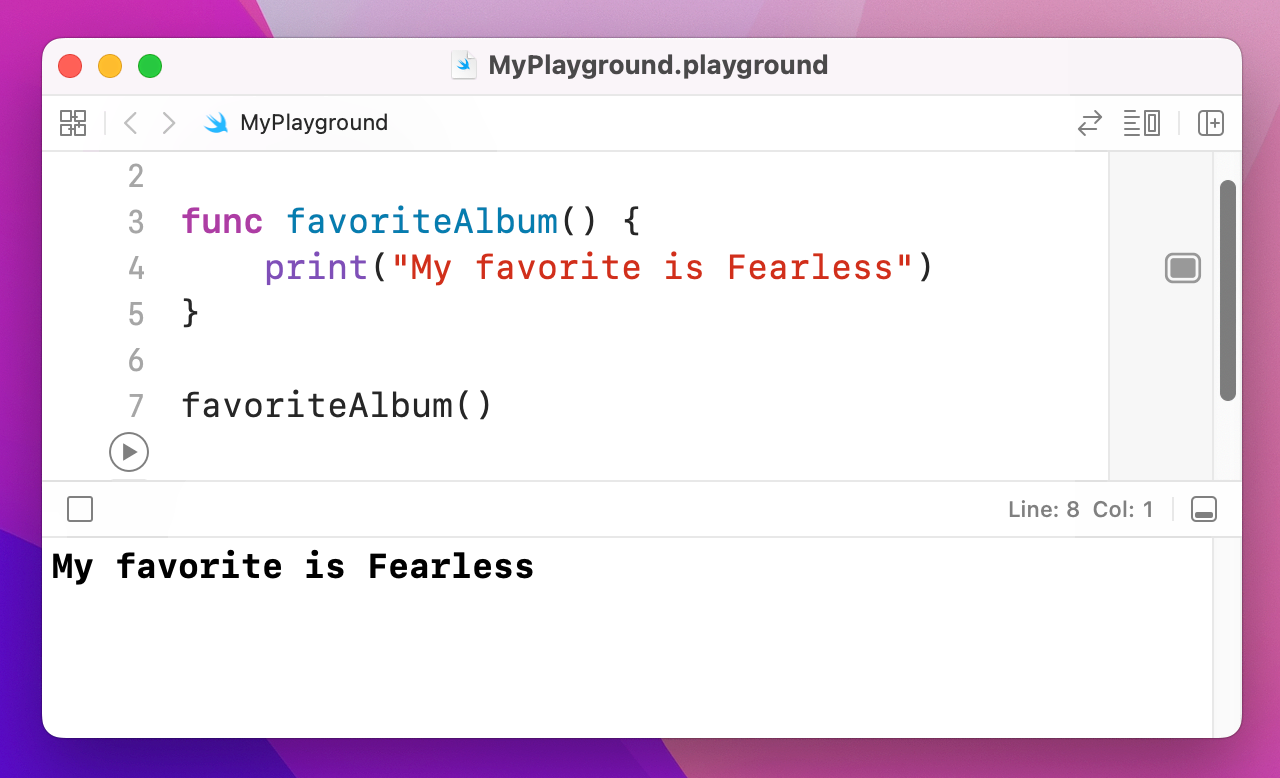
That runs the function (or "calls" it), so now you'll see "My favorite is Fearless" printed out.
As you can see, you define a function by writing func, then your function name, then open and close parentheses, then a block of code marked by open and close braces. You then call that function by writing its name followed by an open and close parentheses.
Of course, that's a silly example – that function does the same thing no matter what, so there's no point in it existing. But what if we wanted to print a different album each time? In that case, we could tell Swift we want our function to accept a value when it's called, then use that value inside it.
Let's do that now:
func favoriteAlbum(name: String) {
    print("My favorite is \(name)")
}
That tells Swift we want the function to accept one value (called a "parameter"), named "name", that should be a string. We then use string interpolation to write that favorite album name directly into our output message. To call the function now, you’d write this:
favoriteAlbum(name: "Fearless")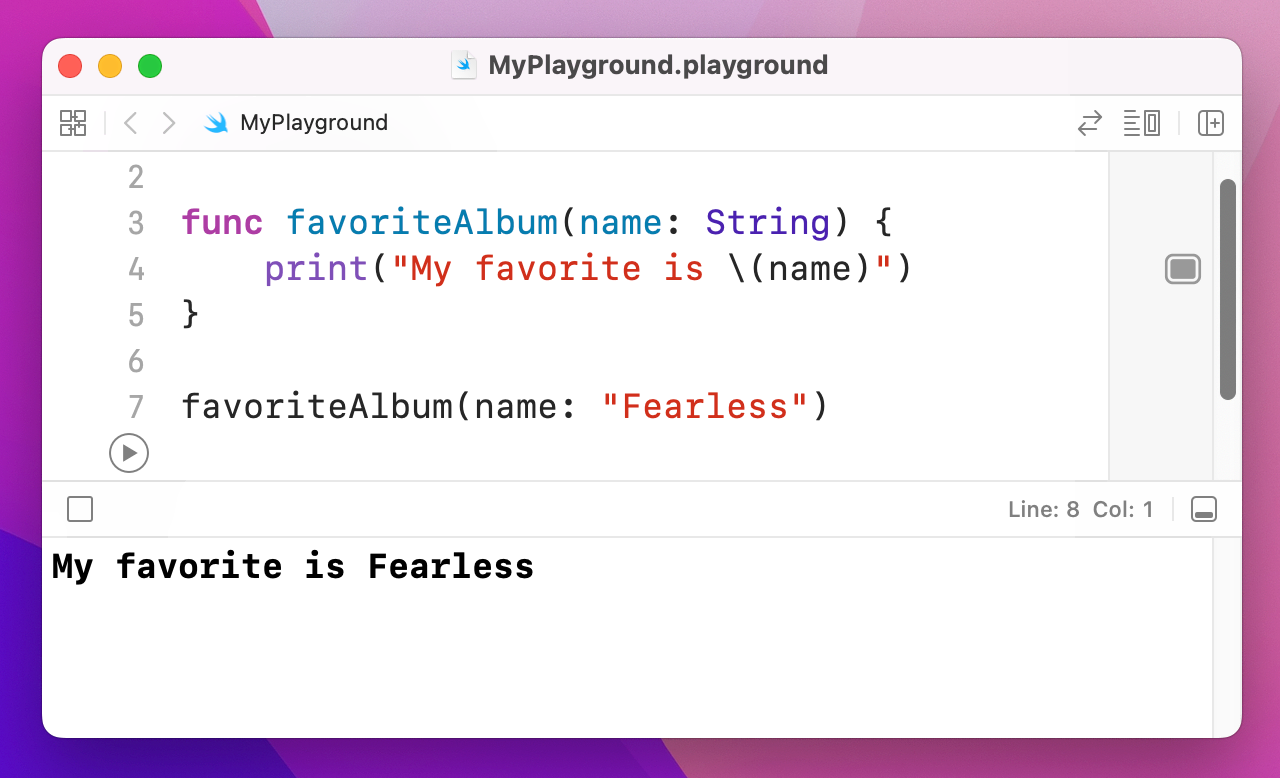
You might still be wondering what the point is, given that it's still just one line of code. Well, imagine we used that function in 20 different places around a big app, then your head designer comes along and tells you to change the message to "I love Fearless so much – it's my favorite!" Do you really want to find and change all 20 instances in your code? Probably not. With a function you change it once, and everything updates.
You can make your functions accept as many parameters as you want, so let's make it accept a name and a year:
func printAlbumRelease(name: String, year: Int) {
    print("\(name) was released in \(year)")
}

printAlbumRelease(name: "Fearless", year: 2008)
printAlbumRelease(name: "Speak Now", year: 2010)
printAlbumRelease(name: "Red", year: 2012)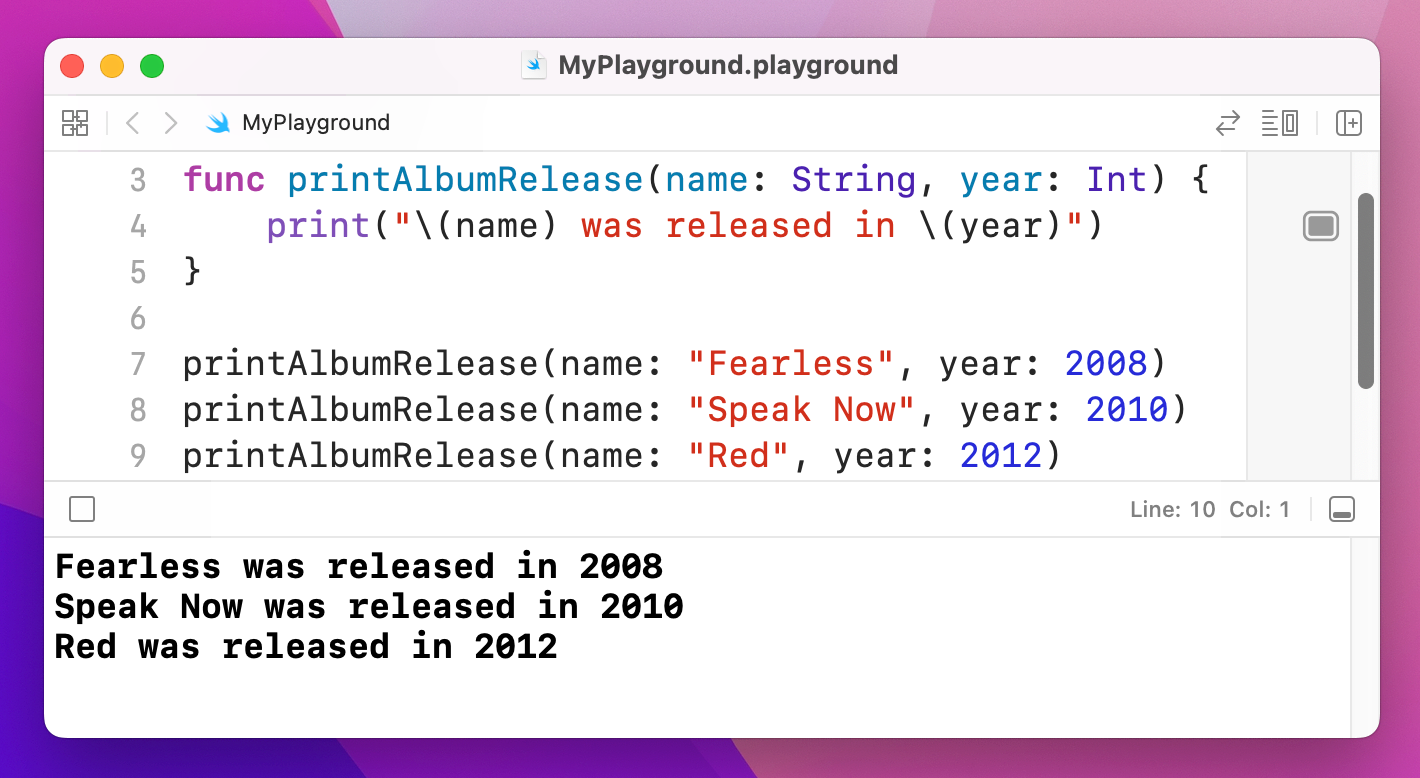
These function parameter names are important, and actually form part of the function itself. Sometimes you’ll see several functions with the same name, e.g. handle(), but with different parameter names to distinguish the different actions.
Sometimes you want parameters to be named one way when a function is called, but another way inside the function itself. This means that when you call a function it uses almost natural English, but inside the function the parameters have sensible names. This technique is employed very frequently in Swift, so it’s worth understanding now.
To demonstrate this, let’s write a function that prints the number of letters in a string. This is available using the count property of strings, so we could write this:
func countLettersInString(string: String) {
    print("The string \(string) has \(string.count) letters.")
}
With that function in place, we could call it like this:
countLettersInString(string: "Hello")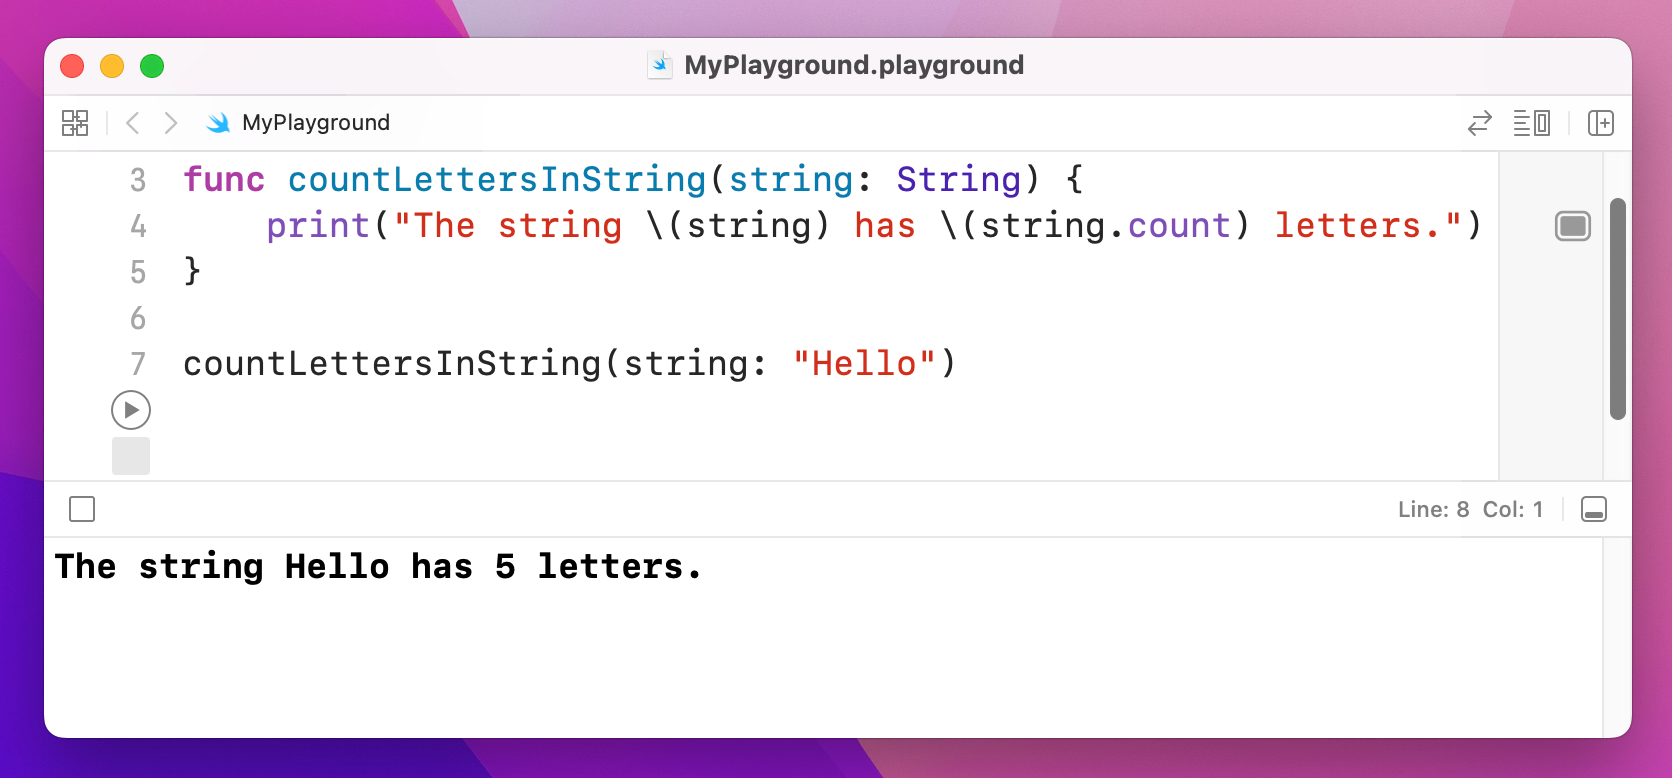
While that certainly works, it’s a bit wordy. Plus it’s not the kind of thing you would say aloud: “count letters in string string hello”.
Swift’s solution is to let you specify one name for the parameter when it’s being called, and another inside the method. To use this, just write the parameter name twice – once for external, one for internal.
For example, we could name the parameter myString when it’s being called, and str inside the method, like this:
func countLettersInString(myString str: String) {
    print("The string \(str) has \(str.count) letters.")
}

countLettersInString(myString: "Hello") 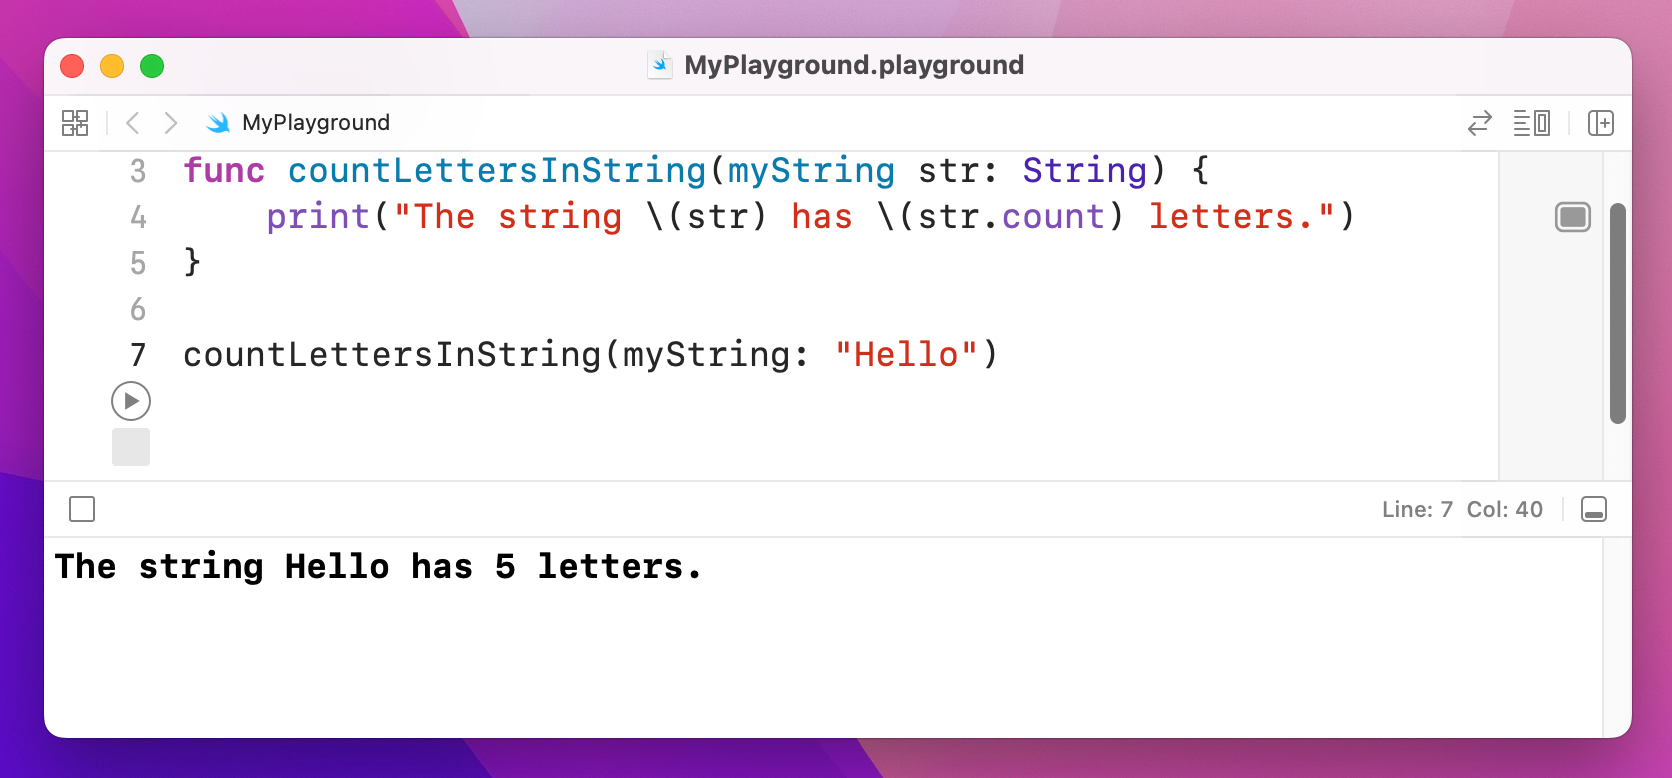
You can also specify an underscore, _, as the external parameter name, which tells Swift that it shouldn’t have any external name at all. For example:
func countLettersInString(_ str: String) {
    print("The string \(str) has \(str.count) letters.")
}

countLettersInString("Hello")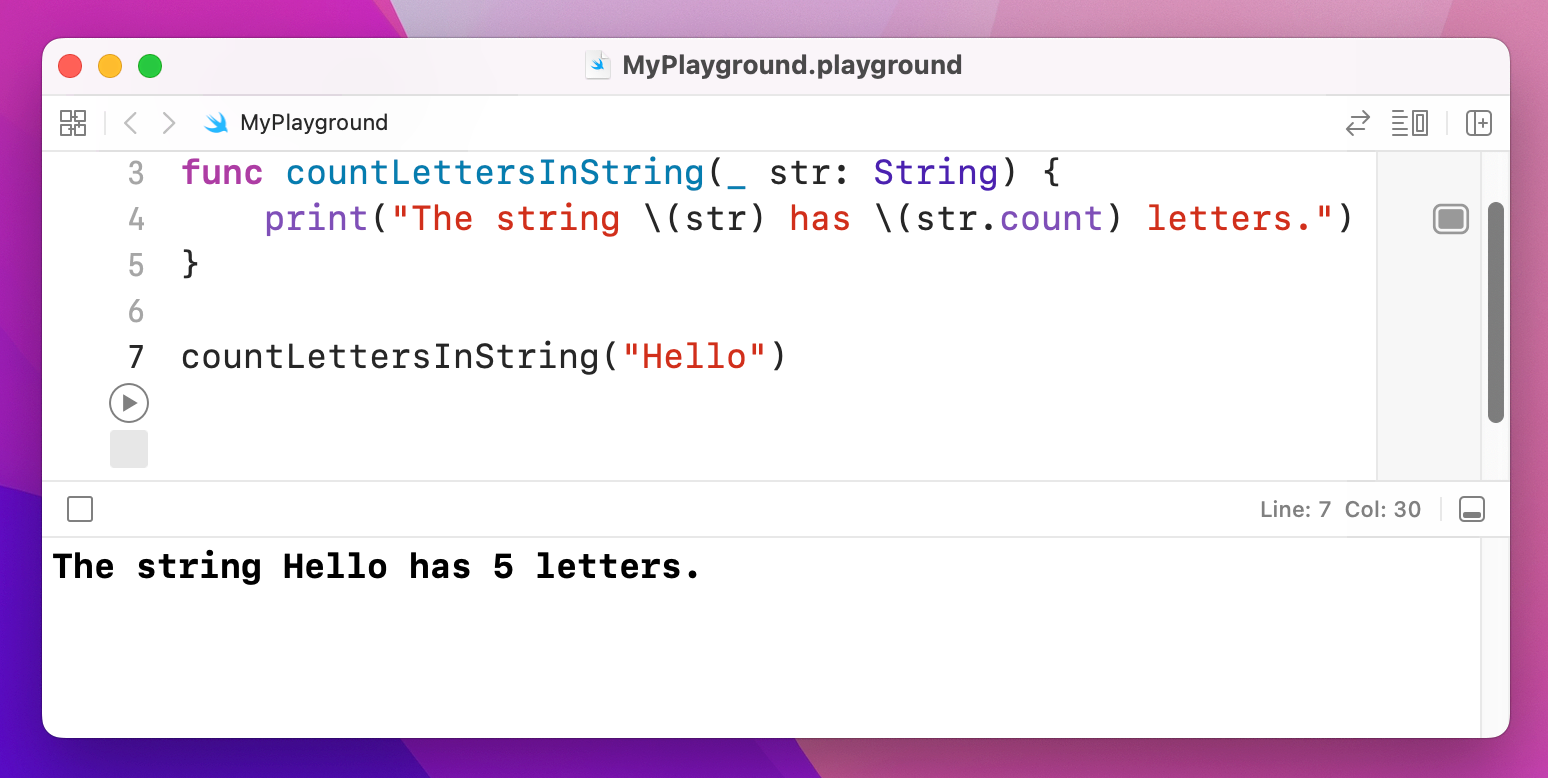
As you can see, that makes the line of code read like an English sentence: “count letters in string hello”.
While there are many cases when using _ is the right choice, Swift programmers generally prefer to name all their parameters. And think about it: why do we need the word “String” in the function – what else would we want to count letters on?
So, what you’ll commonly see is external parameter names like “in”, “for”, and “with”, and more meaningful internal names. So, the “Swifty” way of writing this function is like so:
func countLetters(in string: String) {
    print("The string \(string) has \(string.count) letters.")
}
That means you call the function with the parameter name “in”, which would be meaningless inside the function. However, inside the function the same parameter is called “string”, which is more useful. So, the function can be called like this:
countLetters(in: "Hello")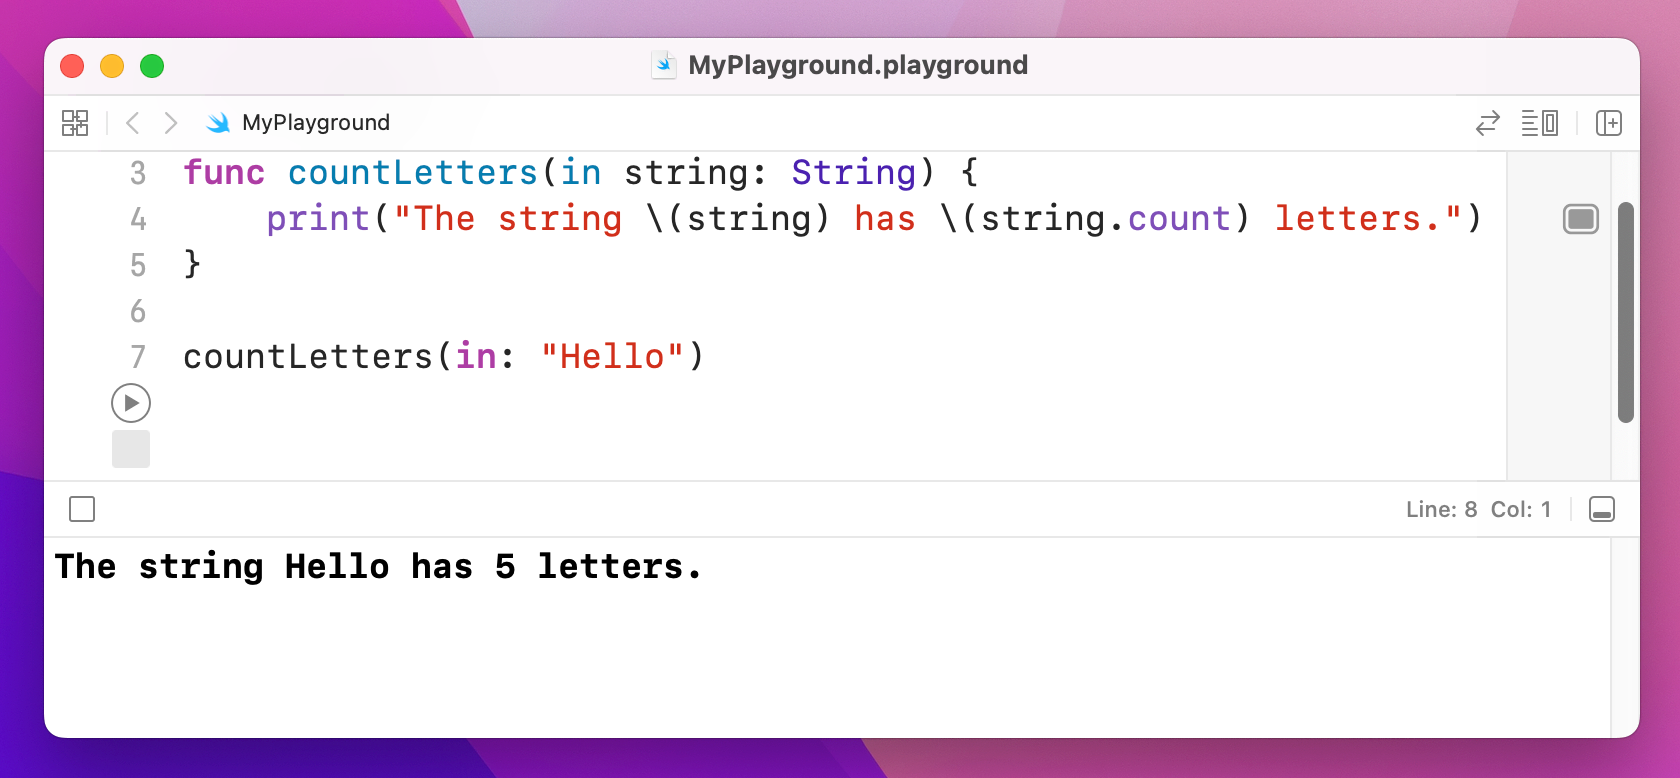
And that is truly Swifty code: “count letters in hello” reads like natural English, but the code is also clear and concise.
Swift functions can return a value by writing -> then a data type after their parameter list. Once you do this, Swift will ensure that your function will return a value no matter what, so again this is you making a promise about what your code does.
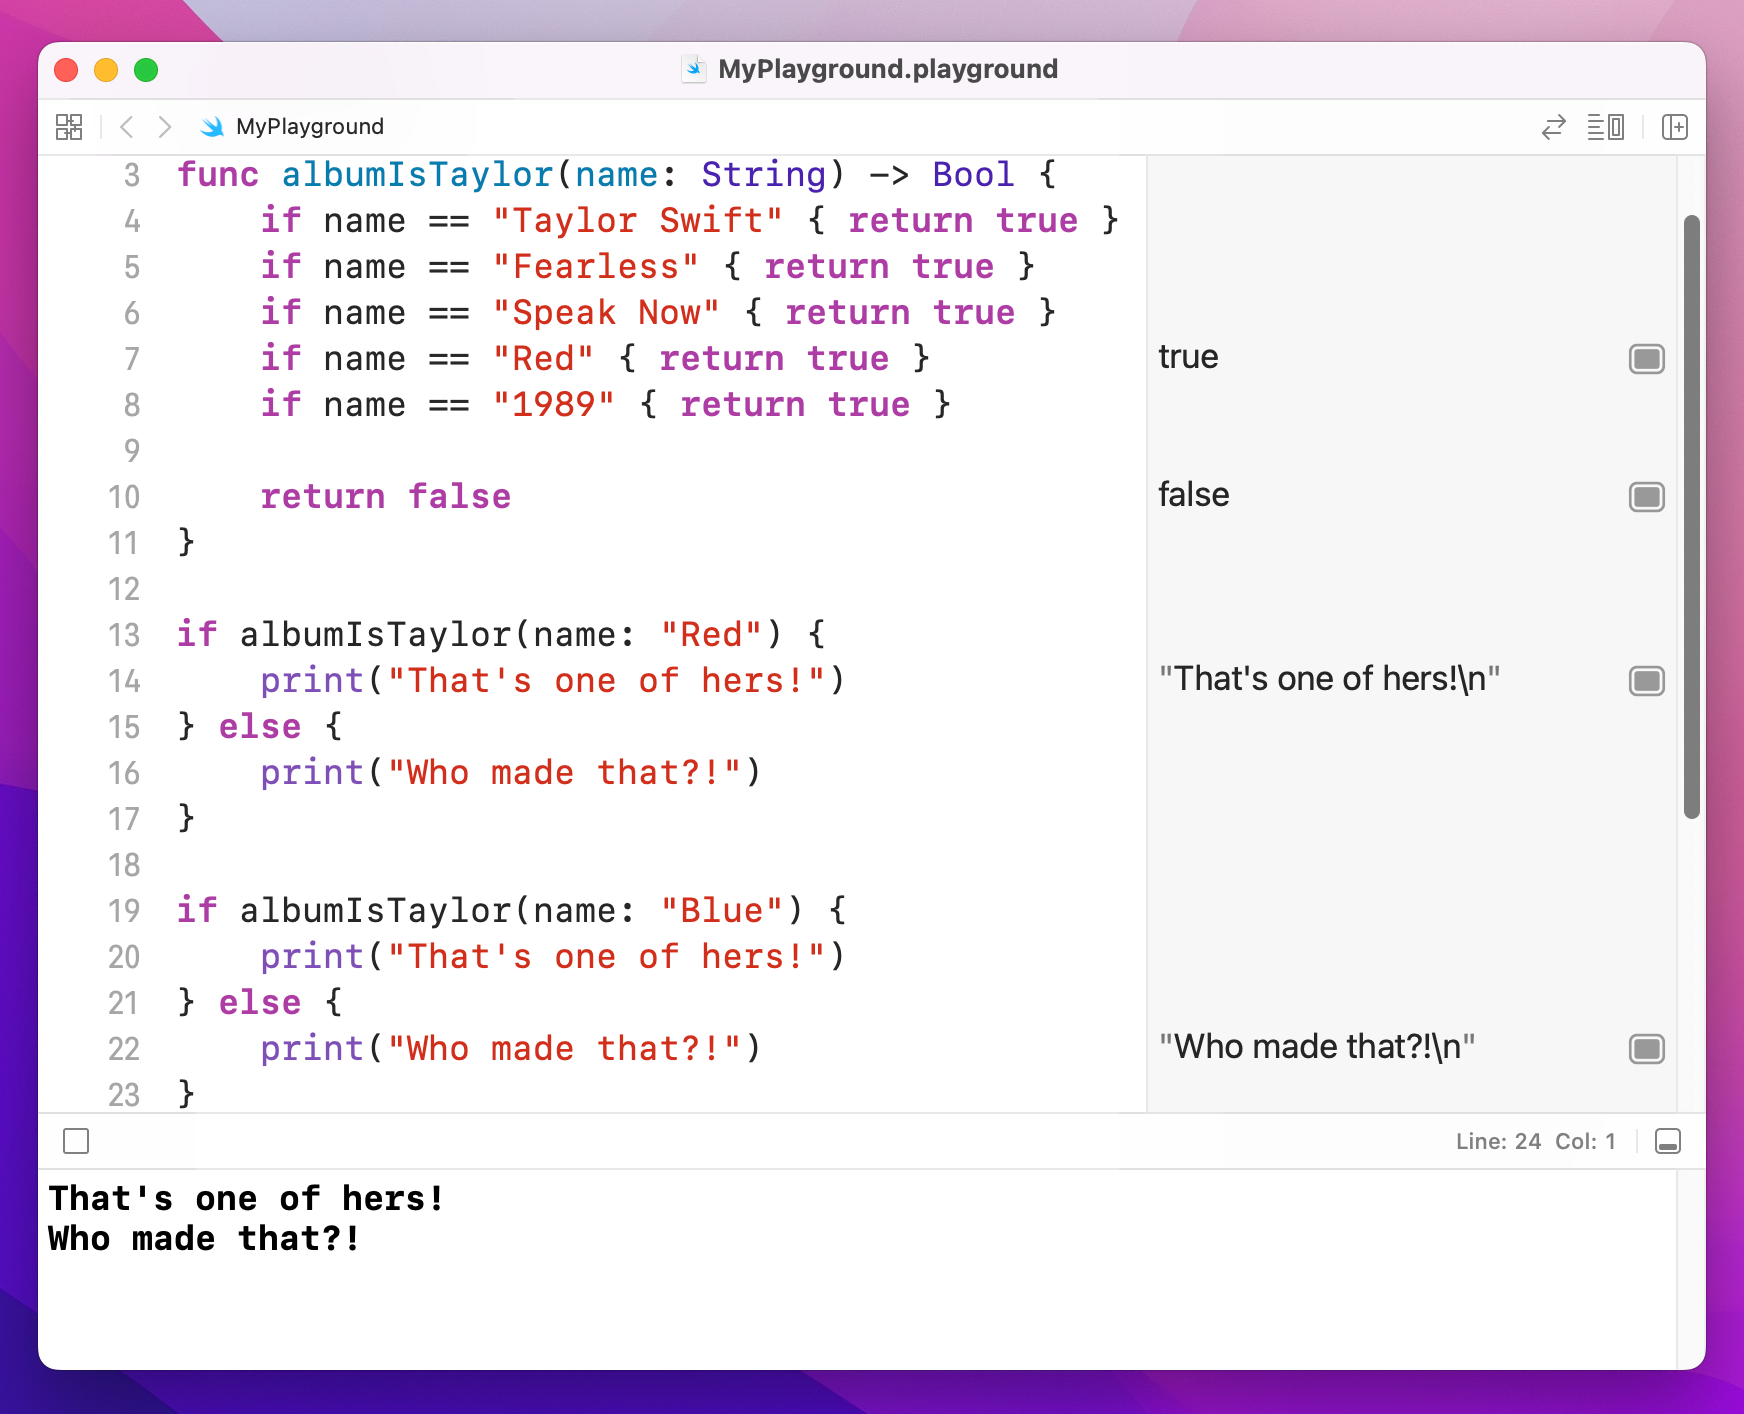
As an example, let's write a function that returns true if an album is one of Taylor Swift's, or false otherwise. This needs to accept one parameter (the name of the album to check) and will return a Boolean. Here's the code:
func albumIsTaylor(name: String) -> Bool {
    if name == "Taylor Swift" { return true }
    if name == "Fearless" { return true }
    if name == "Speak Now" { return true }
    if name == "Red" { return true }
    if name == "1989" { return true }

    return false
}
If you wanted to try your new switch/case knowledge, this function is a place where it would work well.
You can now call that by passing the album name in and acting on the result:
if albumIsTaylor(name: "Red") {
    print("That's one of hers!")
} else {
    print("Who made that?!")
}

if albumIsTaylor(name: "Blue") {
    print("That's one of hers!")
} else {
    print("Who made that?!")
}
If your function returns a value and has only one line of code inside it, you can omit the return keyword entirely – Swift knows a value must be sent back, and because there is only one line that must be the one that sends back a value.
For example, we could write this:
func getMeaningOfLife() -> Int {
    return 42
}
Or we could just write this:
func getMeaningOfLife() -> Int {
    42
}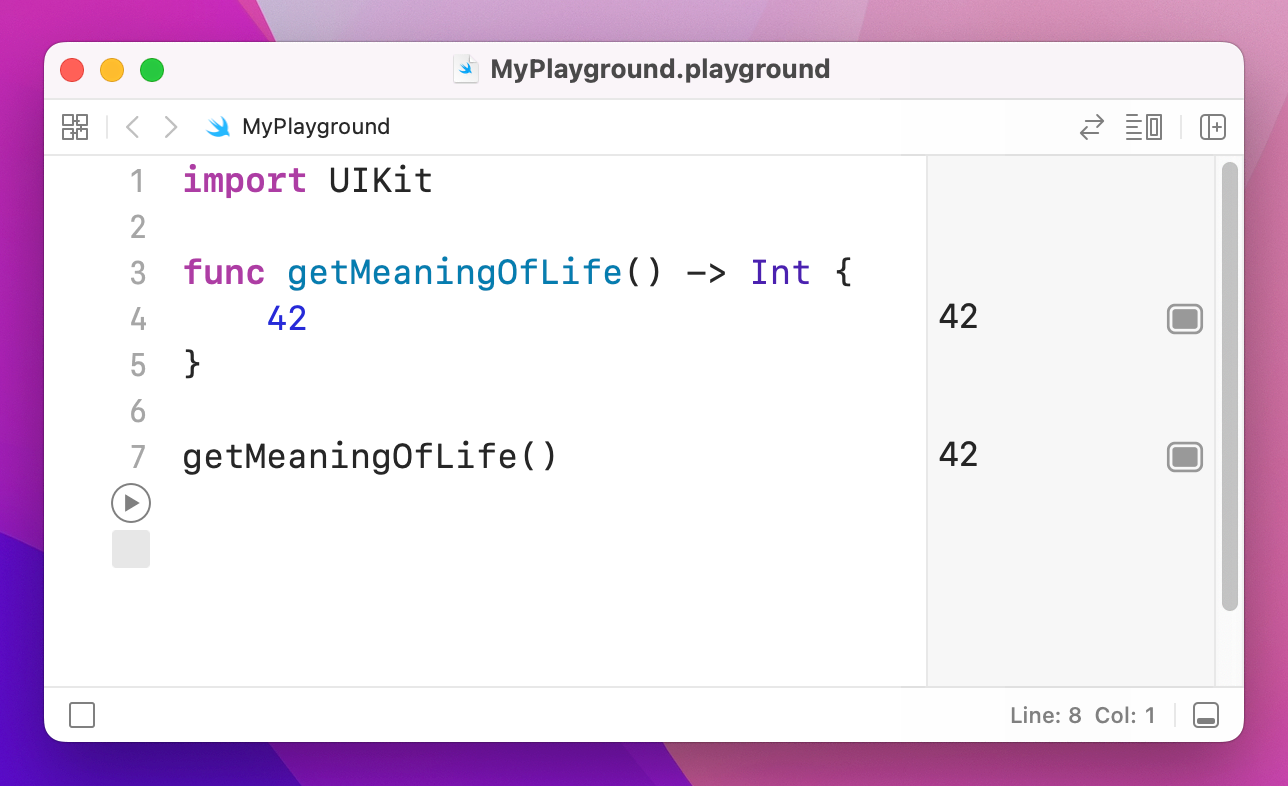
This is used very commonly in SwiftUI code.
Swift is a very safe language, by which I mean it works hard to ensure your code never fails in surprising ways.
One of the most common ways that code fails is when it tries to use data that is bad or missing. For example, imagine a function like this:
func getHaterStatus() -> String {
    return "Hate"
}
That function doesn't accept any parameters, and it returns a string: "Hate". But what if today is a particularly sunny day, and those haters don't feel like hating – what then? Well, maybe we want to return nothing: this hater is doing no hating today.
Now, when it comes to a string you might think an empty string is a great way to communicate nothing, and that might be true sometimes. But how about numbers – is 0 an "empty number"? Or -1?
Before you start trying to create imaginary rules for yourself, Swift has a solution: optionals. An optional value is one that might have a value or might not. Most people find optionals hard to understand, and that’s OK – I’m going to try explaining it in several ways, so hopefully one will work.
For now, imagine a survey where you ask someone, “On a scale of 1 to 5 how awesome is Taylor Swift?” – what would someone answer if they had somehow never heard of her? 1 would be unfairly slating her, and 5 would be praising her when they had no idea who Taylor Swift was. The solution is optionals: “I don’t want to provide a number at all.”
When we used -> String it means "this will definitely return a string," which means this function cannot return no value, and thus can be called safe in the knowledge that you'll always get a value back that you can use as a string. If we wanted to tell Swift that this function might return a value or it might not, we need to use this instead:
func getHaterStatus() -> String? {
    return "Hate"
}
Note the extra question mark: String? means “optional string.” Now, in our case we're still returning “Hate” no matter what, but let's go ahead and modify that function further: if the weather is sunny, the haters have turned over a new leaf and have given up their life of hating, so we want to return no value. In Swift, this "no value" has a special name: nil.
Change the function to this:
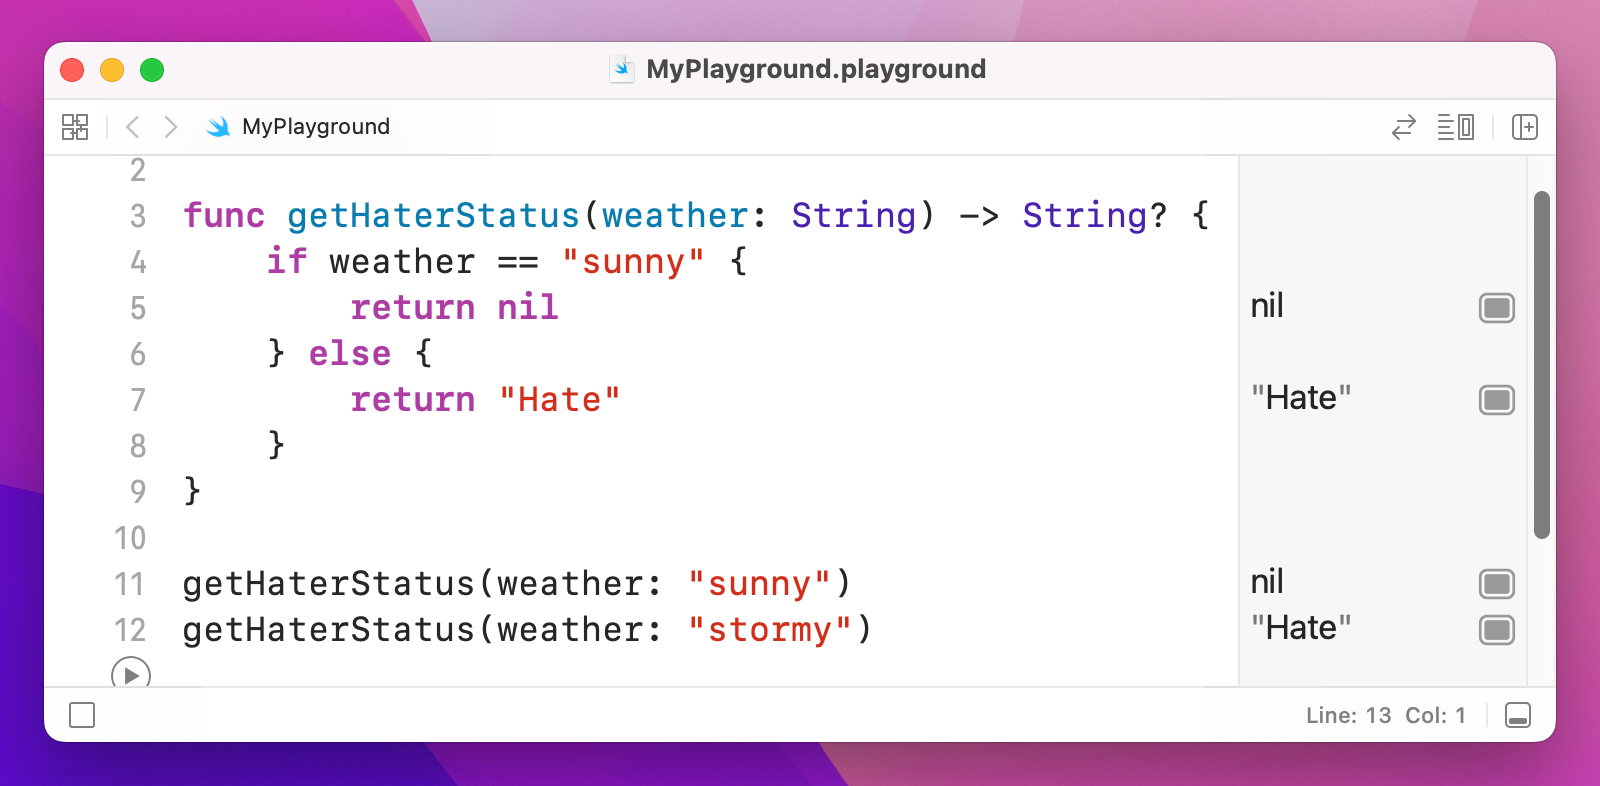
func getHaterStatus(weather: String) -> String? {
    if weather == "sunny" {
        return nil
    } else {
        return "Hate"
    }
}
That accepts one string parameter (the weather) and returns one string (hating status), but that return value might be there or it might not – it's nil. In this case, it means we might get a string, or we might get nil.
Now for the important stuff: Swift wants your code to be really safe, and trying to use a nil value is a bad idea. It might crash your code, it might screw up your app logic, or it might make your user interface show the wrong thing. As a result, when you declare a value as being optional, Swift will make sure you handle it safely.
Let's try this now: add these lines of code to your playground:
var status: String
status = getHaterStatus(weather: "rainy")
The first line creates a string variable, and the second assigns to it the value from getHaterStatus() – and today the weather is rainy, so those haters are hating for sure.
That code will not run, because we said that status is of type String, which requires a value, but getHaterStatus() might not provide one because it returns an optional string. That is, we said there would definitely be a string in status, but getHaterStatus() might return nothing at all. Swift simply will not let you make this mistake, which is extremely helpful because it effectively stops a whole class of common bugs.
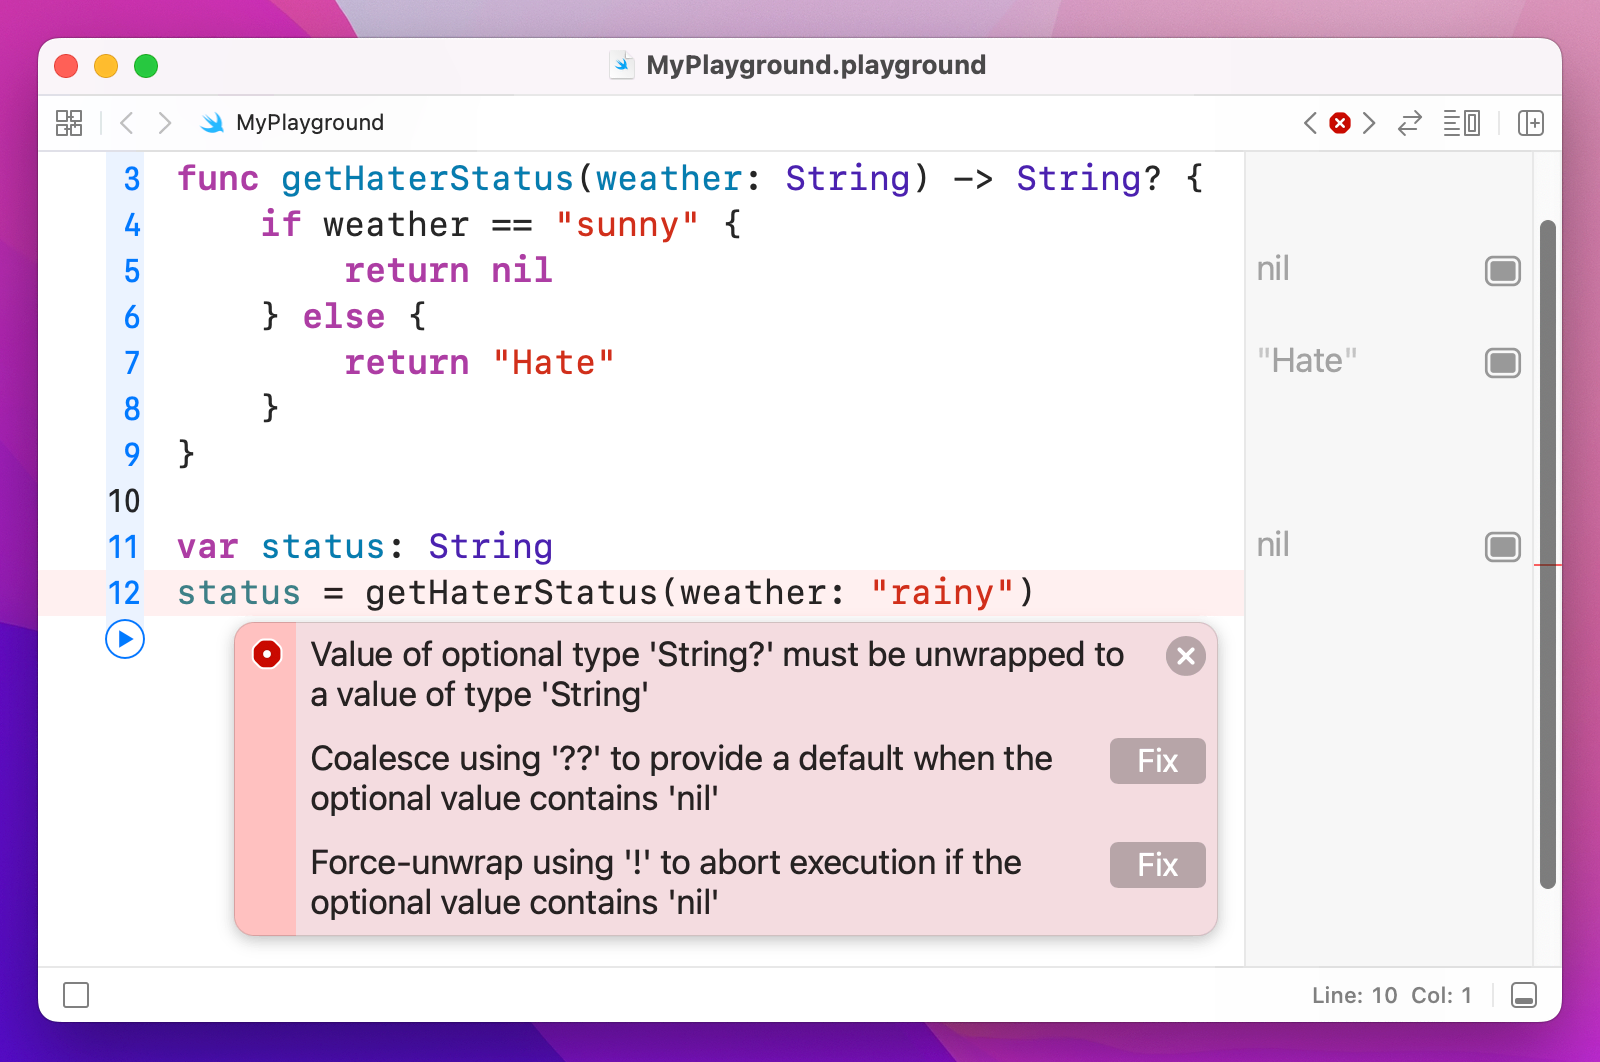
To fix the problem, we need to make the status variable a String?, or just remove the type annotation entirely and let Swift use type inference. The first option looks like this:
var status: String?
status = getHaterStatus(weather: "rainy")
And the second like this:
var status = getHaterStatus(weather: "rainy")Regardless of which you choose, that value might be there or might not, and by default Swift won't let you use it dangerously. As an example, imagine a function like this:
func takeHaterAction(status: String) {
    if status == "Hate" {
        print("Hating")
    }
}
That takes a string and prints a message depending on its contents. This function takes a String value, and not a String? value – you can't pass in an optional here, it wants a real string, which means we can't call it using the status variable we made.
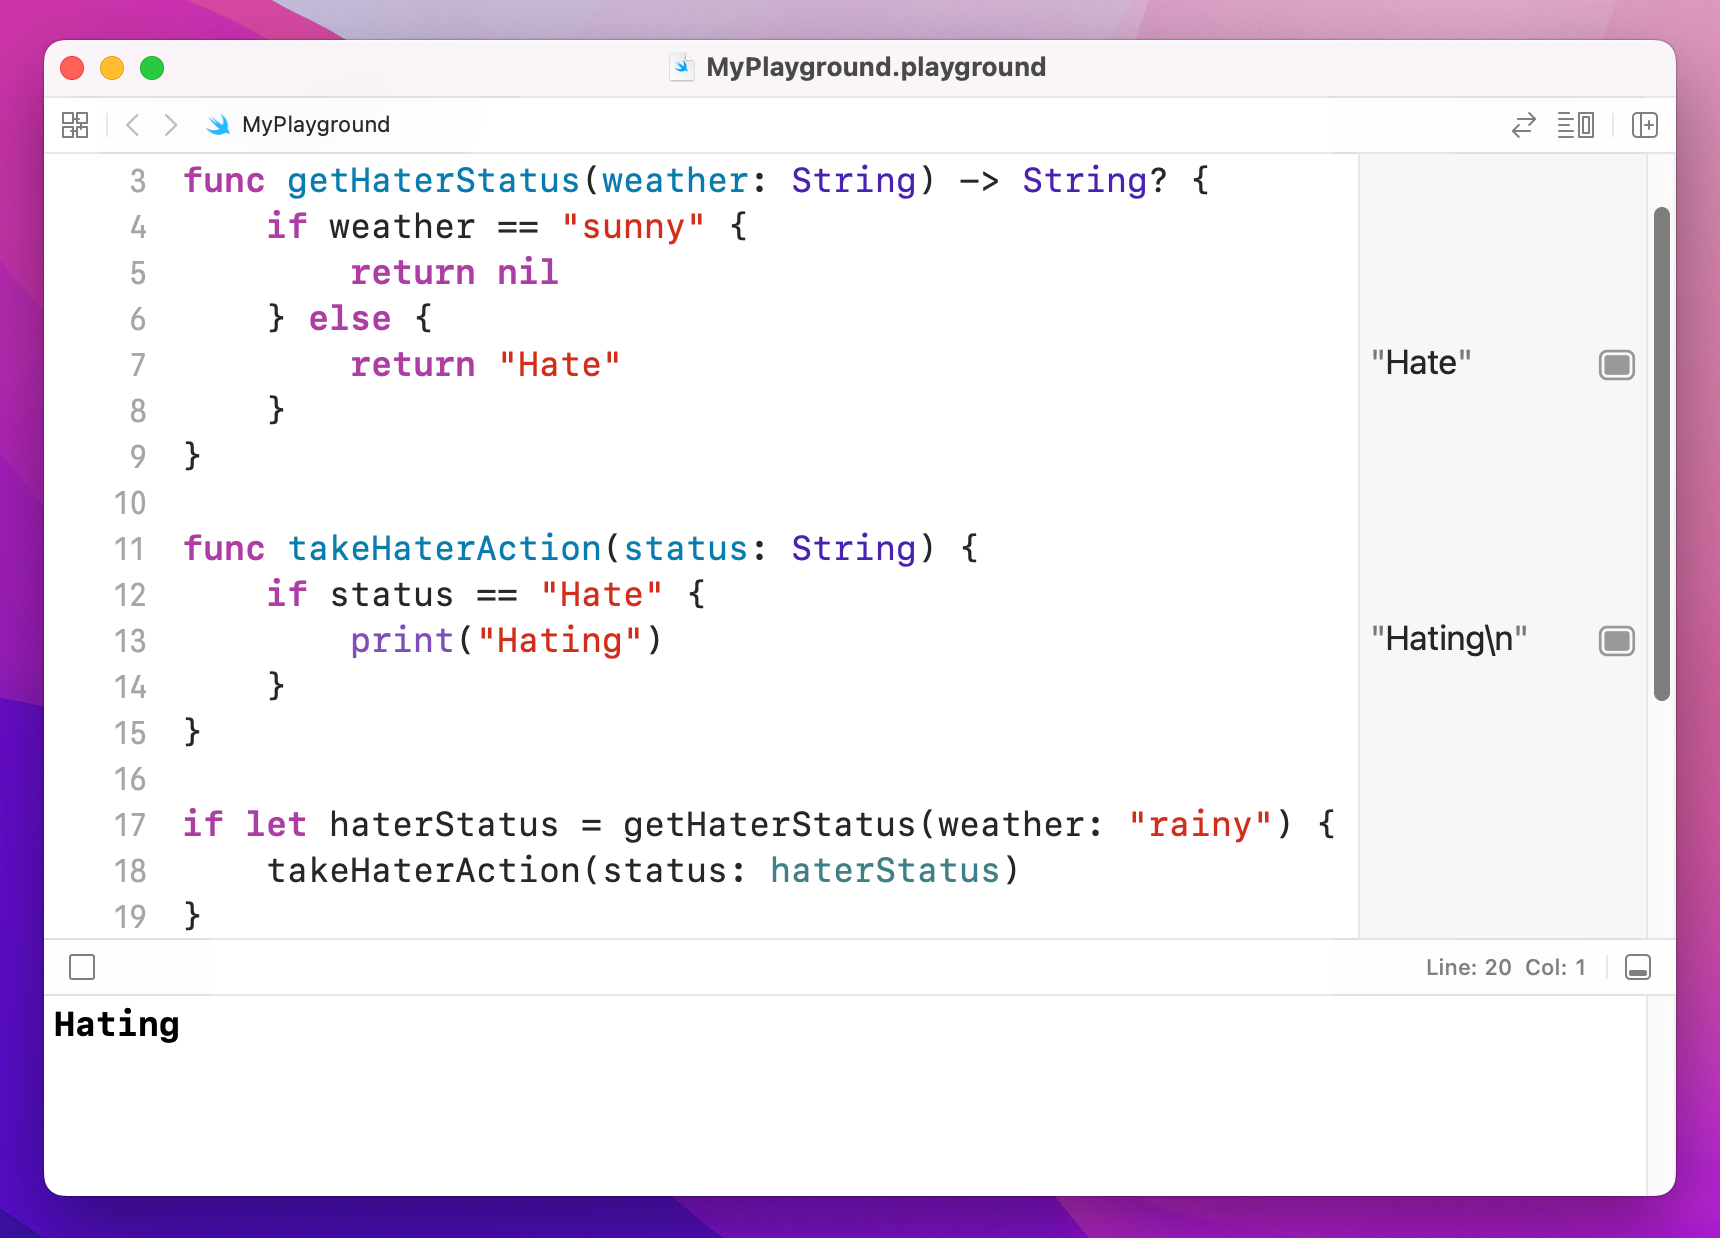
Swift has two solutions. Both are used, but one is definitely preferred over the other. The first solution is called optional unwrapping, and it's done inside a conditional statement using special syntax. It does two things at the same time: checks whether an optional has a value, and if so unwraps it into a non-optional type then runs a code block.
The syntax looks like this:
if let unwrappedStatus = status {
    // unwrappedStatus contains a non-optional value!
} else {
    // in case you want an else block, here you go…
}
These if let statements check and unwrap in one succinct line of code, which makes them very common. Using this method, we can safely unwrap the return value of getHaterStatus() and be sure that we only call takeHaterAction() with a valid, non-optional string. Here's the complete code:
func getHaterStatus(weather: String) -> String? {
    if weather == "sunny" {
        return nil
    } else {
        return "Hate"
    }
}

func takeHaterAction(status: String) {
    if status == "Hate" {
        print("Hating")
    }
}

if let haterStatus = getHaterStatus(weather: "rainy") {
    takeHaterAction(status: haterStatus)
}
If you understand this concept, you're welcome to skip down to the title that says "Force unwrapping optionals". If you're still not quite sure about optionals, carry on reading.
Okay, if you're still here it means the explanation above either made no sense, or you sort of understood but could probably use some clarification. Optionals are used extensively in Swift, so you really do need to understand them. I'm going to try explaining again, in a different way, and hopefully that will help!
Here's a new function:
func yearAlbumReleased(name: String) -> Int {
    if name == "Taylor Swift" { return 2006 }
    if name == "Fearless" { return 2008 }
    if name == "Speak Now" { return 2010 }
    if name == "Red" { return 2012 }
    if name == "1989" { return 2014 }

    return 0
}
That takes the name of a Taylor Swift album, and returns the year it was released. But if we call it with the album name "Lantern" because we mixed up Taylor Swift with Hudson Mohawke (an easy mistake to make, right?) then it returns 0 because it's not one of Taylor's albums.
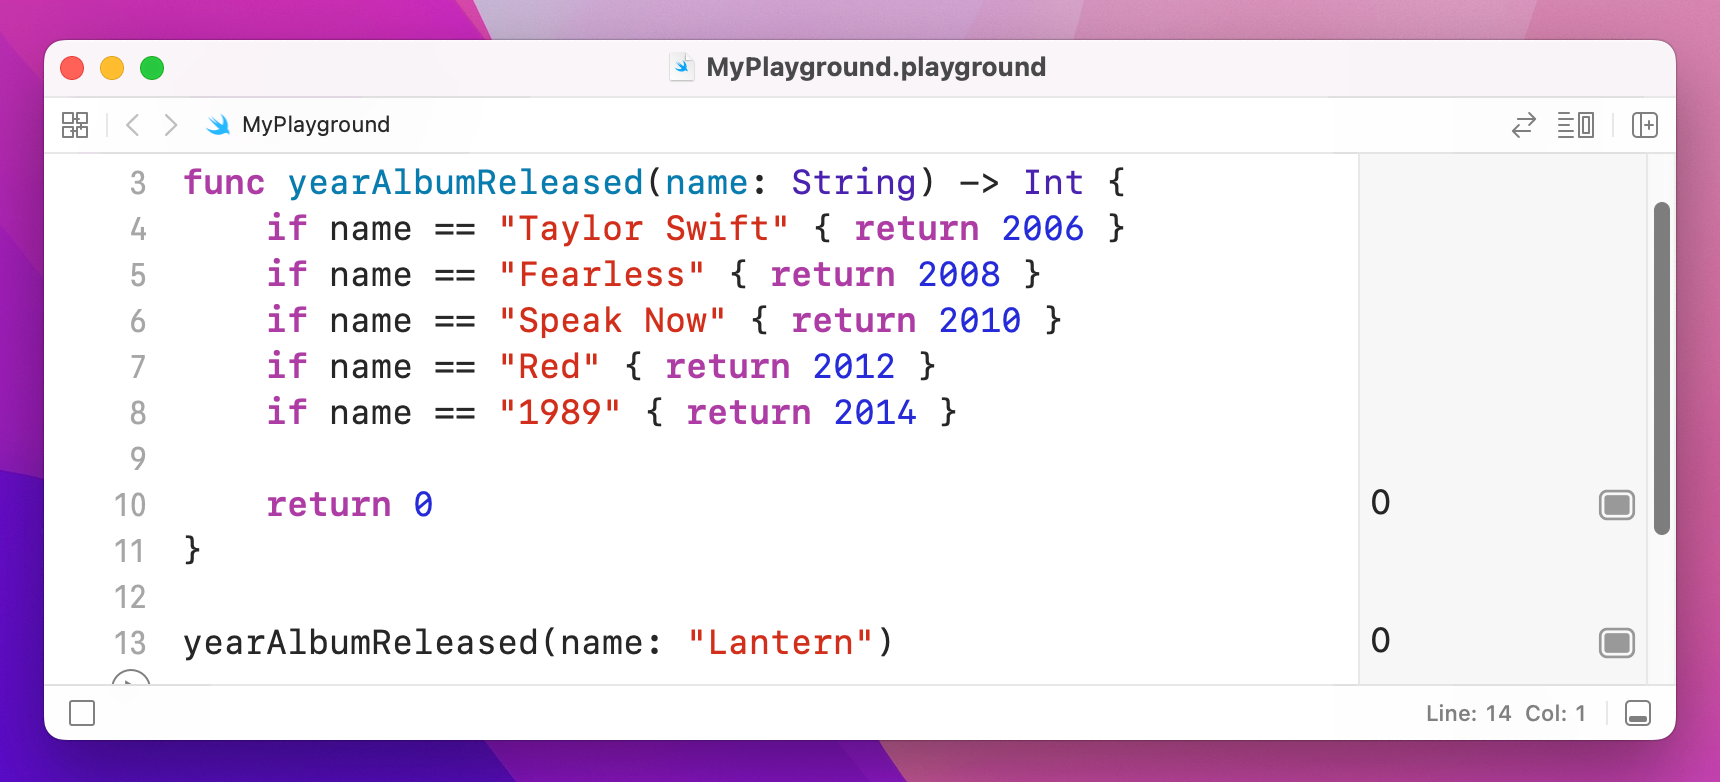
But does 0 make sense here? Sure, if the album was released back in 0 AD when Caesar Augustus was emperor of Rome, 0 might make sense, but here it's just confusing – people need to know ahead of time that 0 means “not recognized.”
A much better idea is to rewrite that function so that it either returns an integer (when a year was found) or nil (when nothing was found), which is easy thanks to optionals. Here's the new function:
func yearAlbumReleased(name: String) -> Int? {
    if name == "Taylor Swift" { return 2006 }
    if name == "Fearless" { return 2008 }
    if name == "Speak Now" { return 2010 }
    if name == "Red" { return 2012 }
    if name == "1989" { return 2014 }

    return nil
}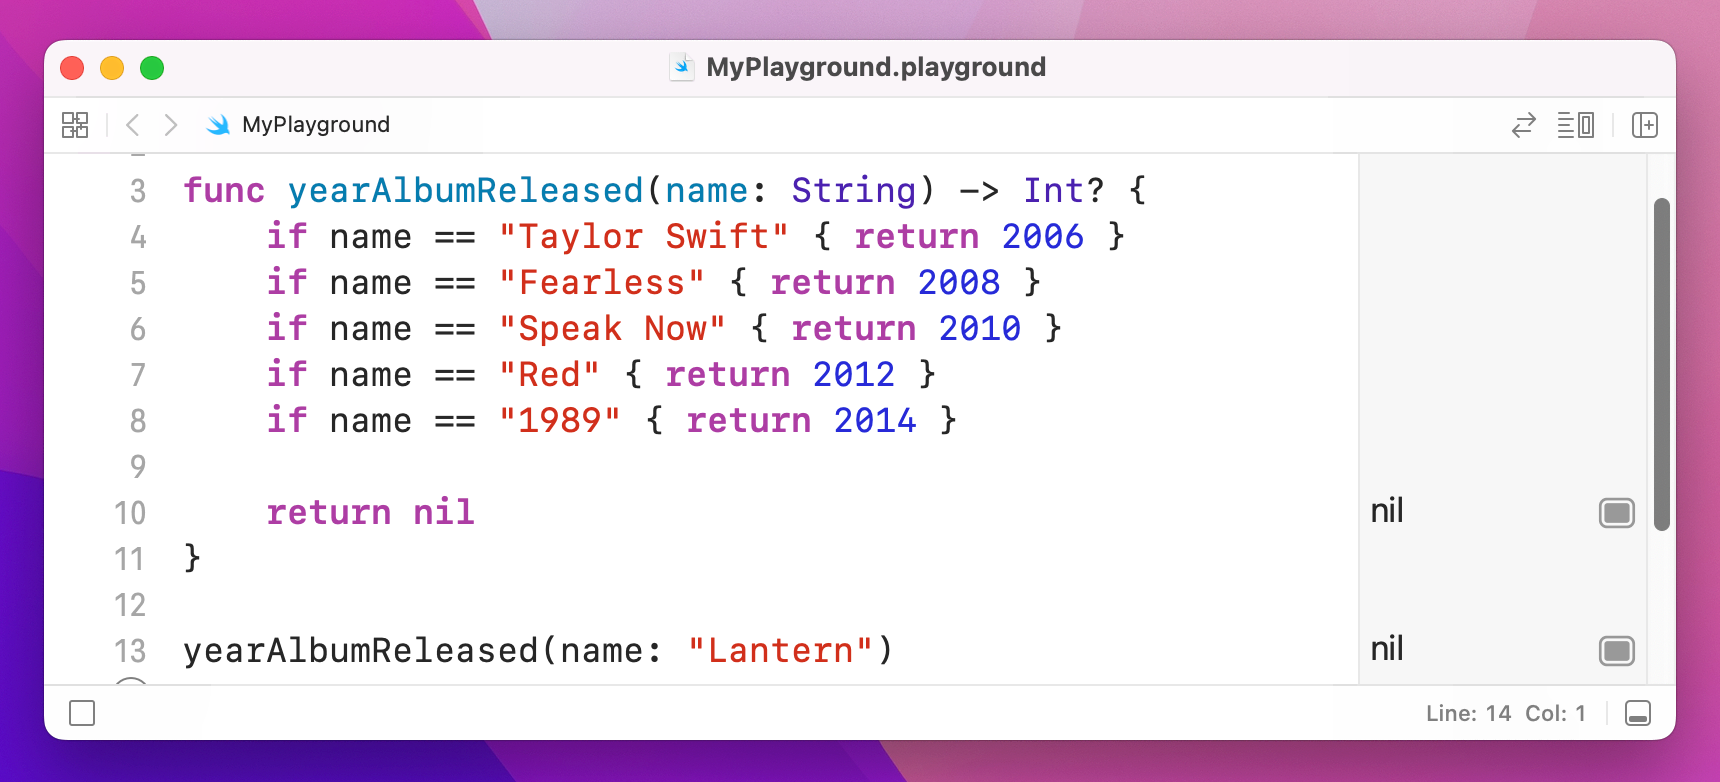
Now that it returns nil, we need to unwrap the result using if let because we need to check whether a value exists or not.
If you understand the concept now, you're welcome to skip down to the title that says “Force unwrapping optionals”. If you're still not quite sure about optionals, carry on reading.
Okay, if you're still here it means you're really struggling with optionals, so I'm going to have one last go at explaining them.
Here's an array of names:
var items = ["James", "John", "Sally"]If we wanted to write a function that looked in that array and told us the index of a particular name, we might write something like this:
func position(of string: String, in array: [String]) -> Int {
    for i in 0..<array.count {
        if array[i] == string {
            return i
        }
    }

    return 0
}
That loops through all the items in the array, returning its position if it finds a match, otherwise returning 0.
Now try running these four lines of code:
let jamesPosition = position(of: "James", in: items)
let johnPosition = position(of: "John", in: items)
let sallyPosition = position(of: "Sally", in: items)
let bobPosition = position(of: "Bob", in: items)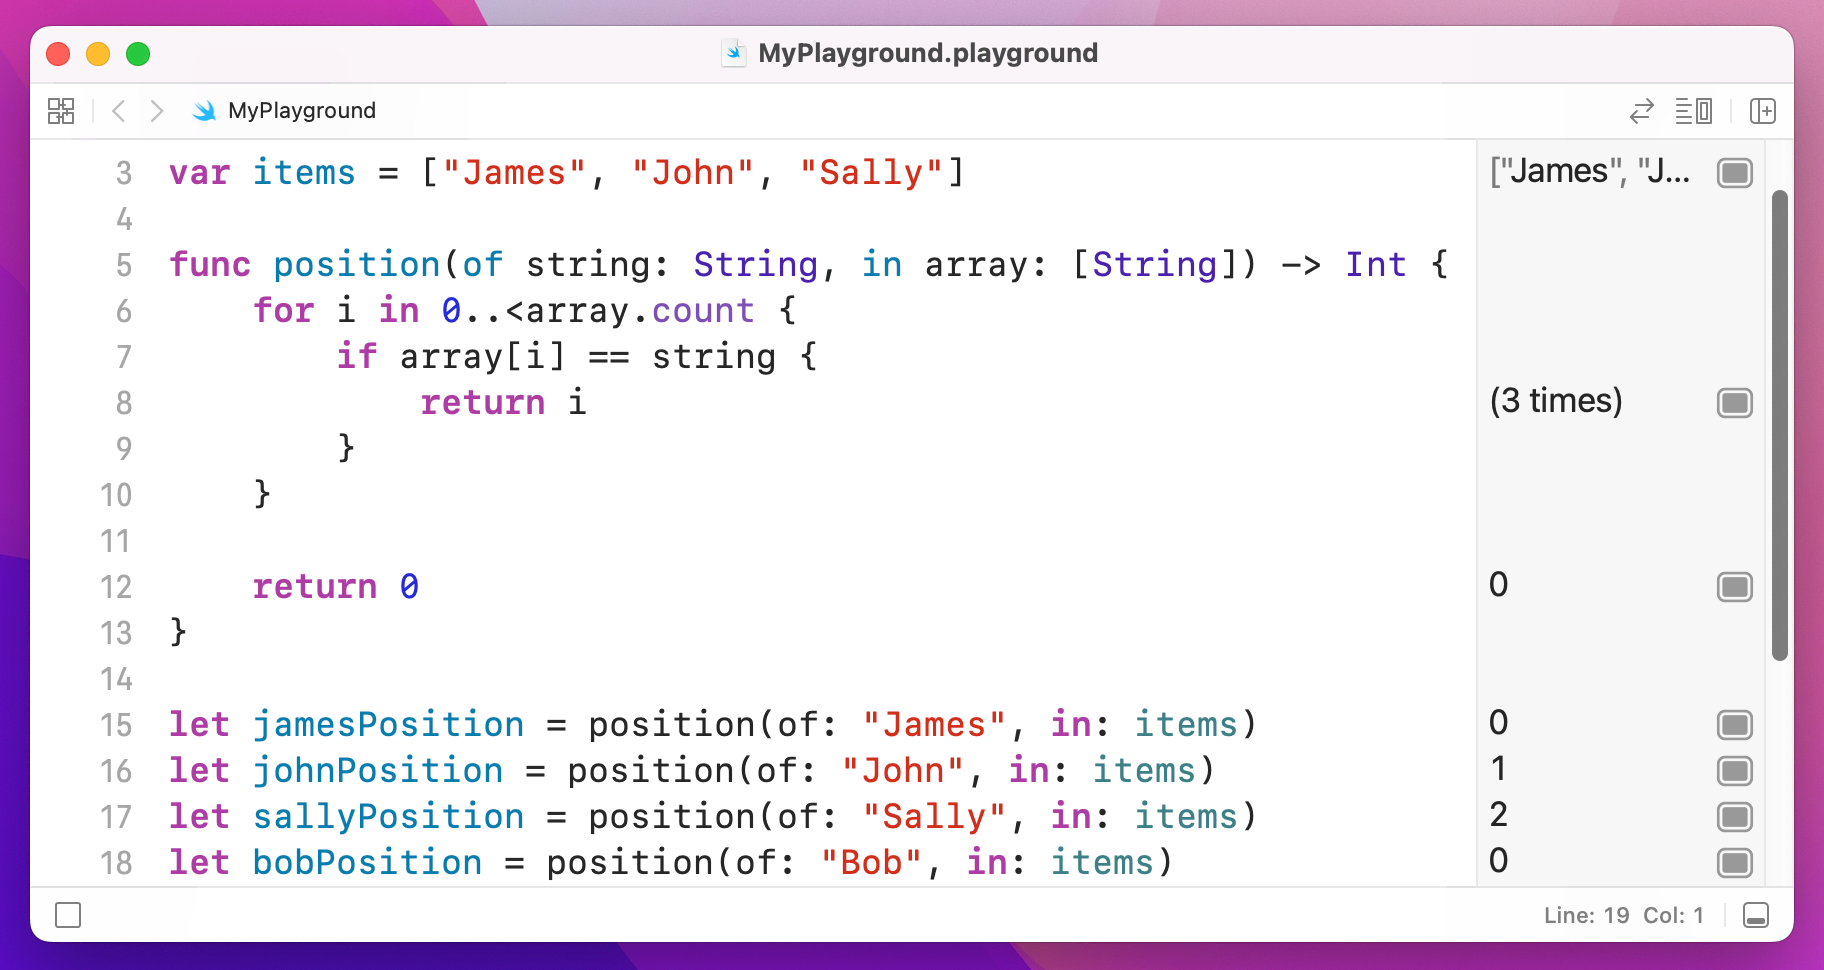
That will output 0, 1, 2, 0 – the positions of James and Bob are the same, even though one exists and one doesn't. This is because I used 0 to mean "not found." The easy fix might be to make -1 not found, but whether it's 0 or -1 you still have a problem because you have to remember that specific number means “not found.”
The solution is optionals: return an integer if you found the match, or nil otherwise. In fact, this is exactly the approach the built-in "find in array" methods use: someArray.firstIndex(of: someValue).
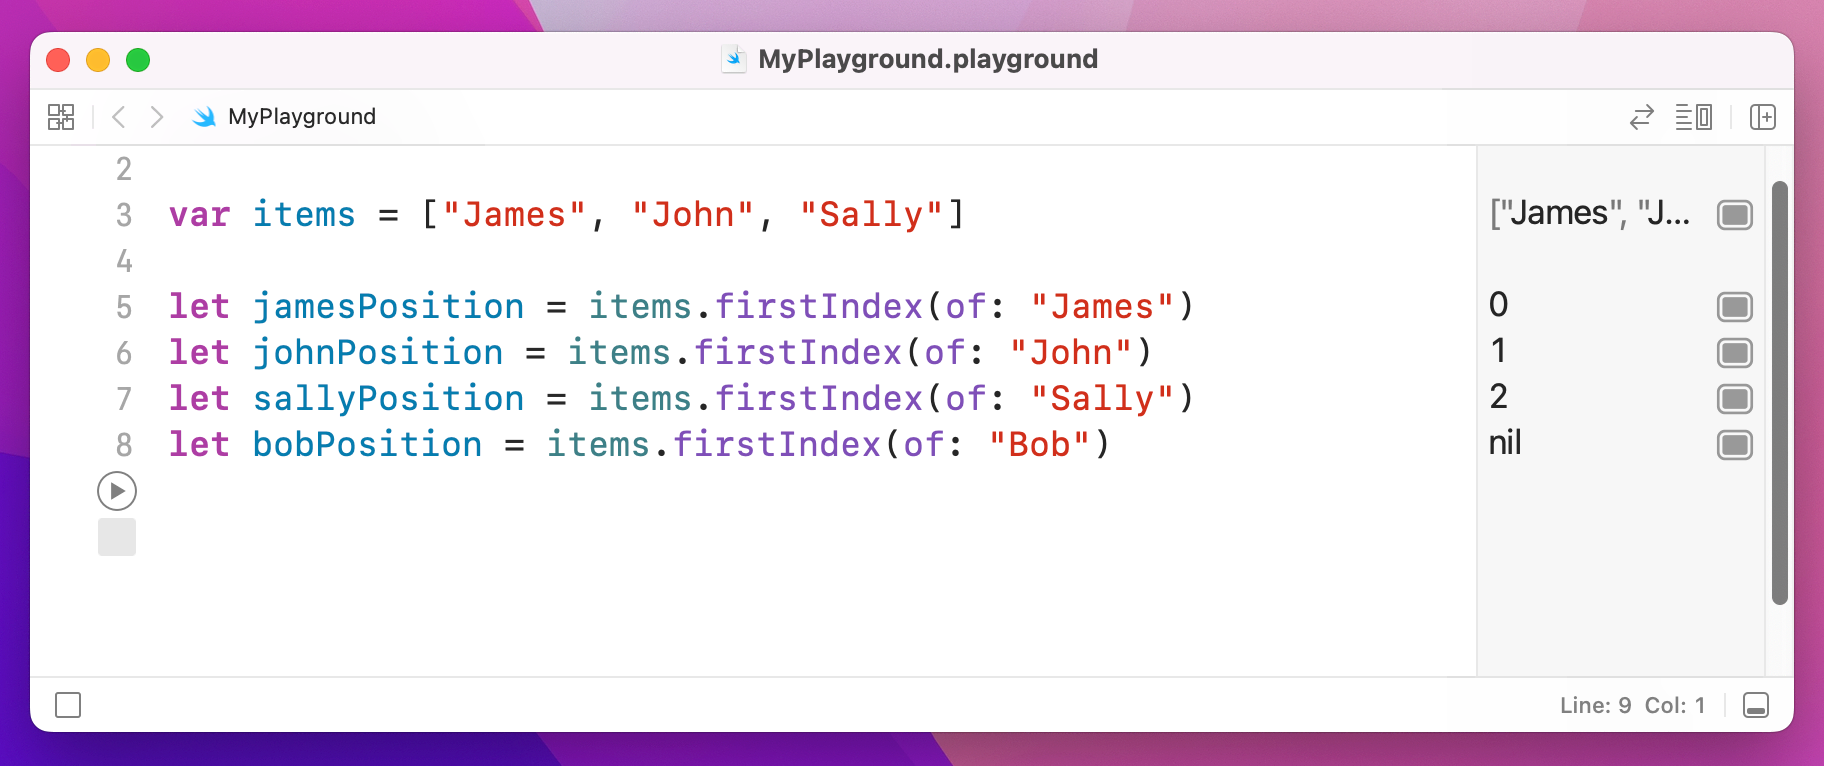
When you work with these "might be there, might not be" values, Swift forces you to unwrap them before using them, thus acknowledging that there might not be a value. That's what if let syntax does: if the optional has a value then unwrap it and use it, otherwise don't use it at all. You can’t use a possibly-empty value by accident, because Swift won’t let you.
If you're still not sure how optionals work, then the best thing to do is ask me on Twitter and I'll try to help: you can find me @twostraws.
Swift lets you override its safety by using the exclamation mark character: !. If you know that an optional definitely has a value, you can force unwrap it by placing this exclamation mark after it.
Please be careful, though: if you try this on a variable that does not have a value, your code will crash.
To put together a working example, here's some foundation code:
func yearAlbumReleased(name: String) -> Int? {
if name == "Taylor Swift" { return 2006 }
if name == "Fearless" { return 2008 }
if name == "Speak Now" { return 2010 }
if name == "Red" { return 2012 }
if name == "1989" { return 2014 }
return nil
}
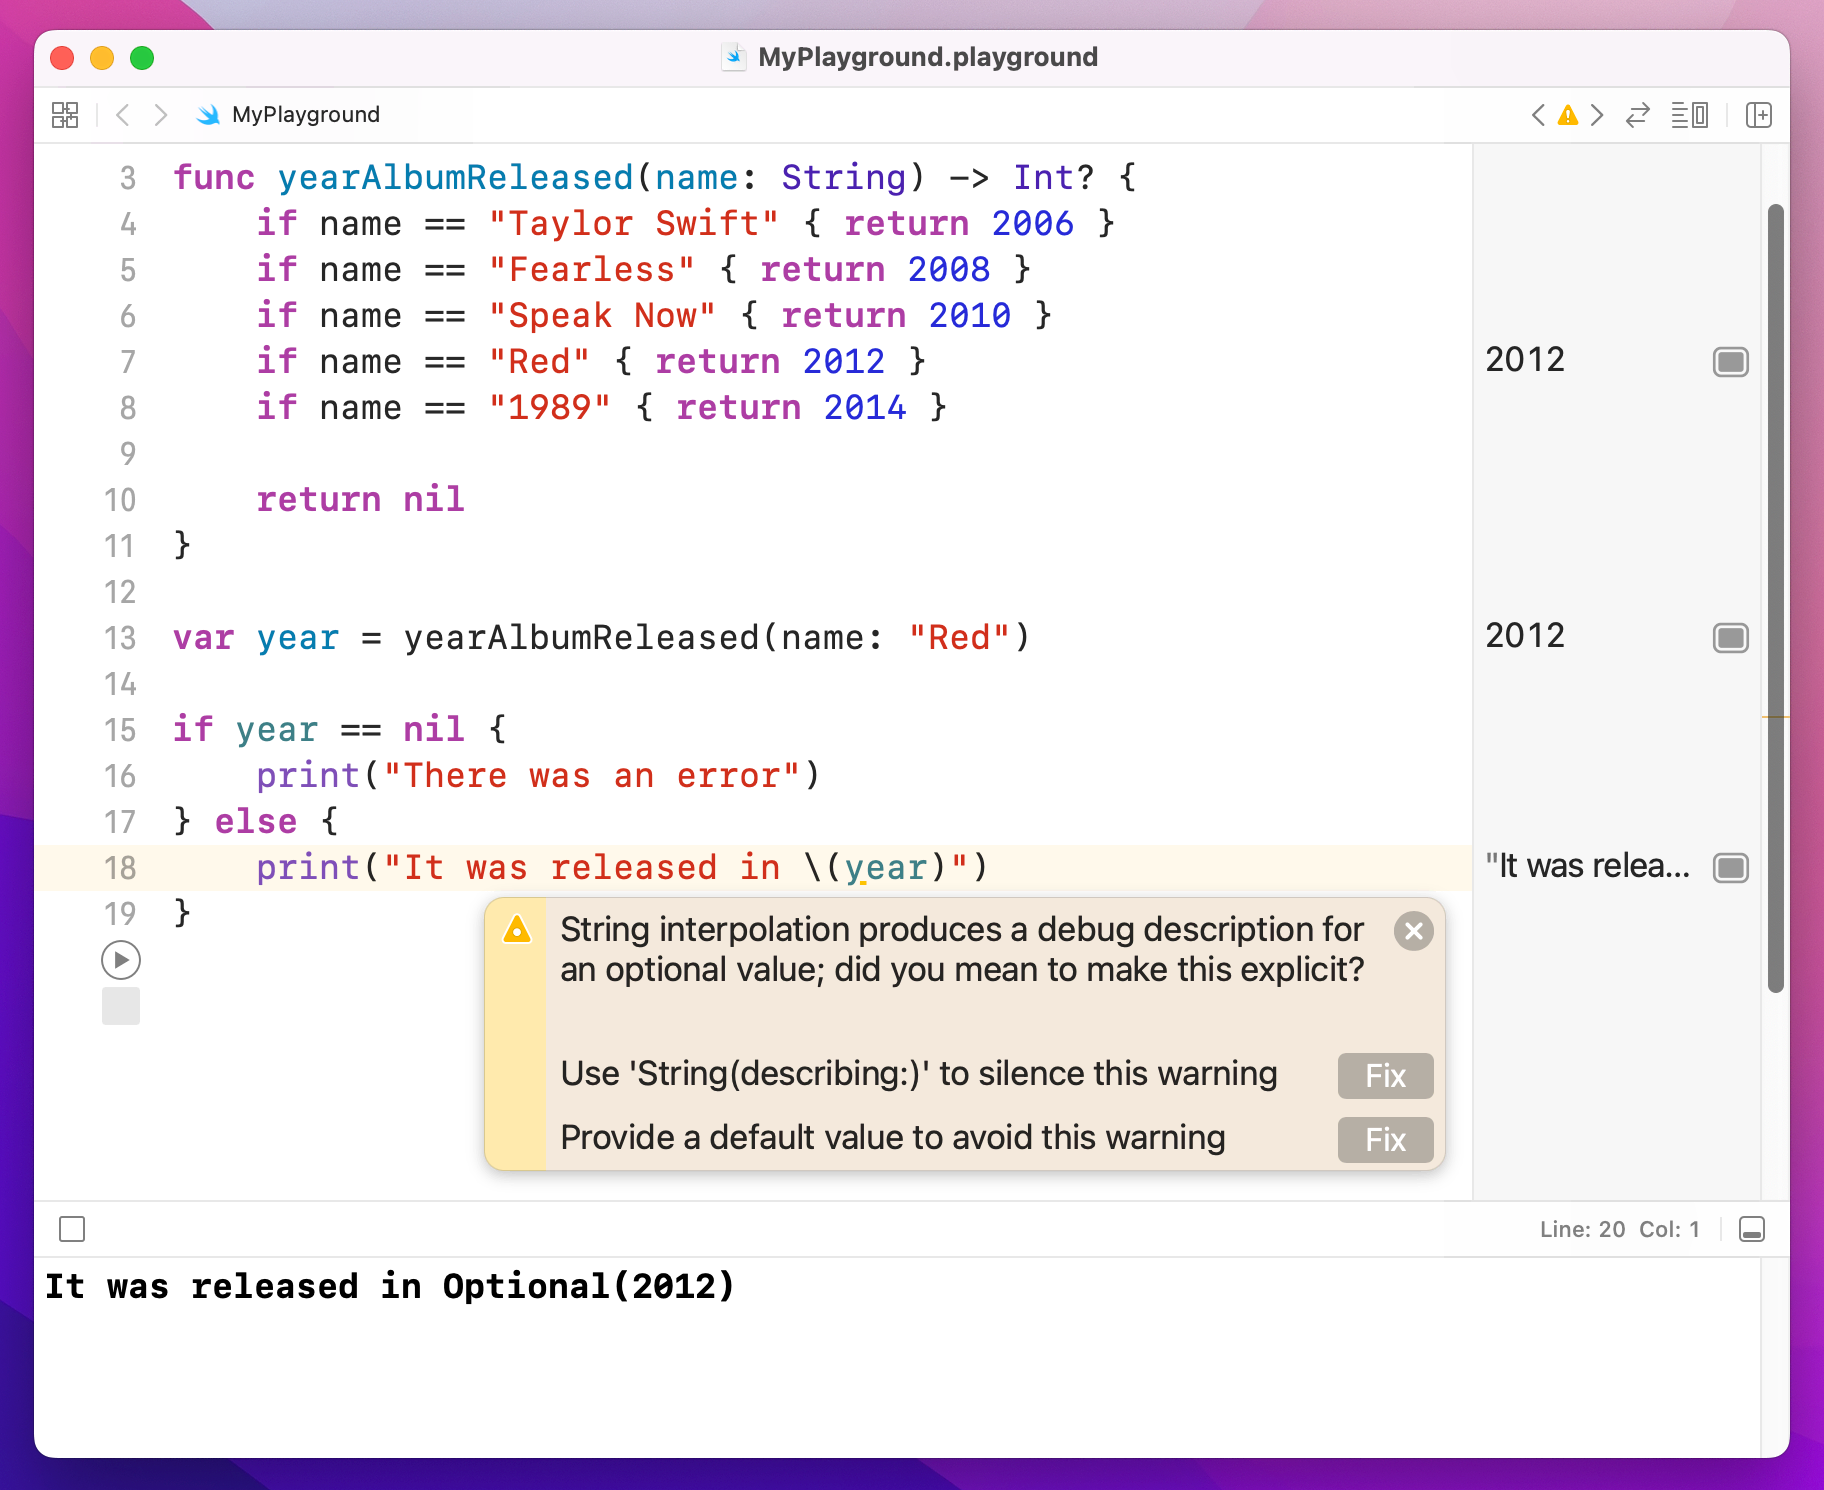
var year = yearAlbumReleased(name: "Red")
if year == nil {
print("There was an error")
} else {
print("It was released in \(year)")
}That gets the year an album was released. If the album couldn't be found, year will be set to nil, and an error message will be printed. Otherwise, the year will be printed.
Or will it? Well, yearAlbumReleased() returns an optional integer, and this code doesn't use if let to unwrap that optional. As a result, it will print out the following: "It was released in Optional(2012)" – probably not what we wanted!
At this point in the code, we have already checked that we have a valid value, so it's a bit pointless to have another if let in there to safely unwrap the optional. So, Swift provides a solution – change the second print() call to this:
print("It was released in \(year!)")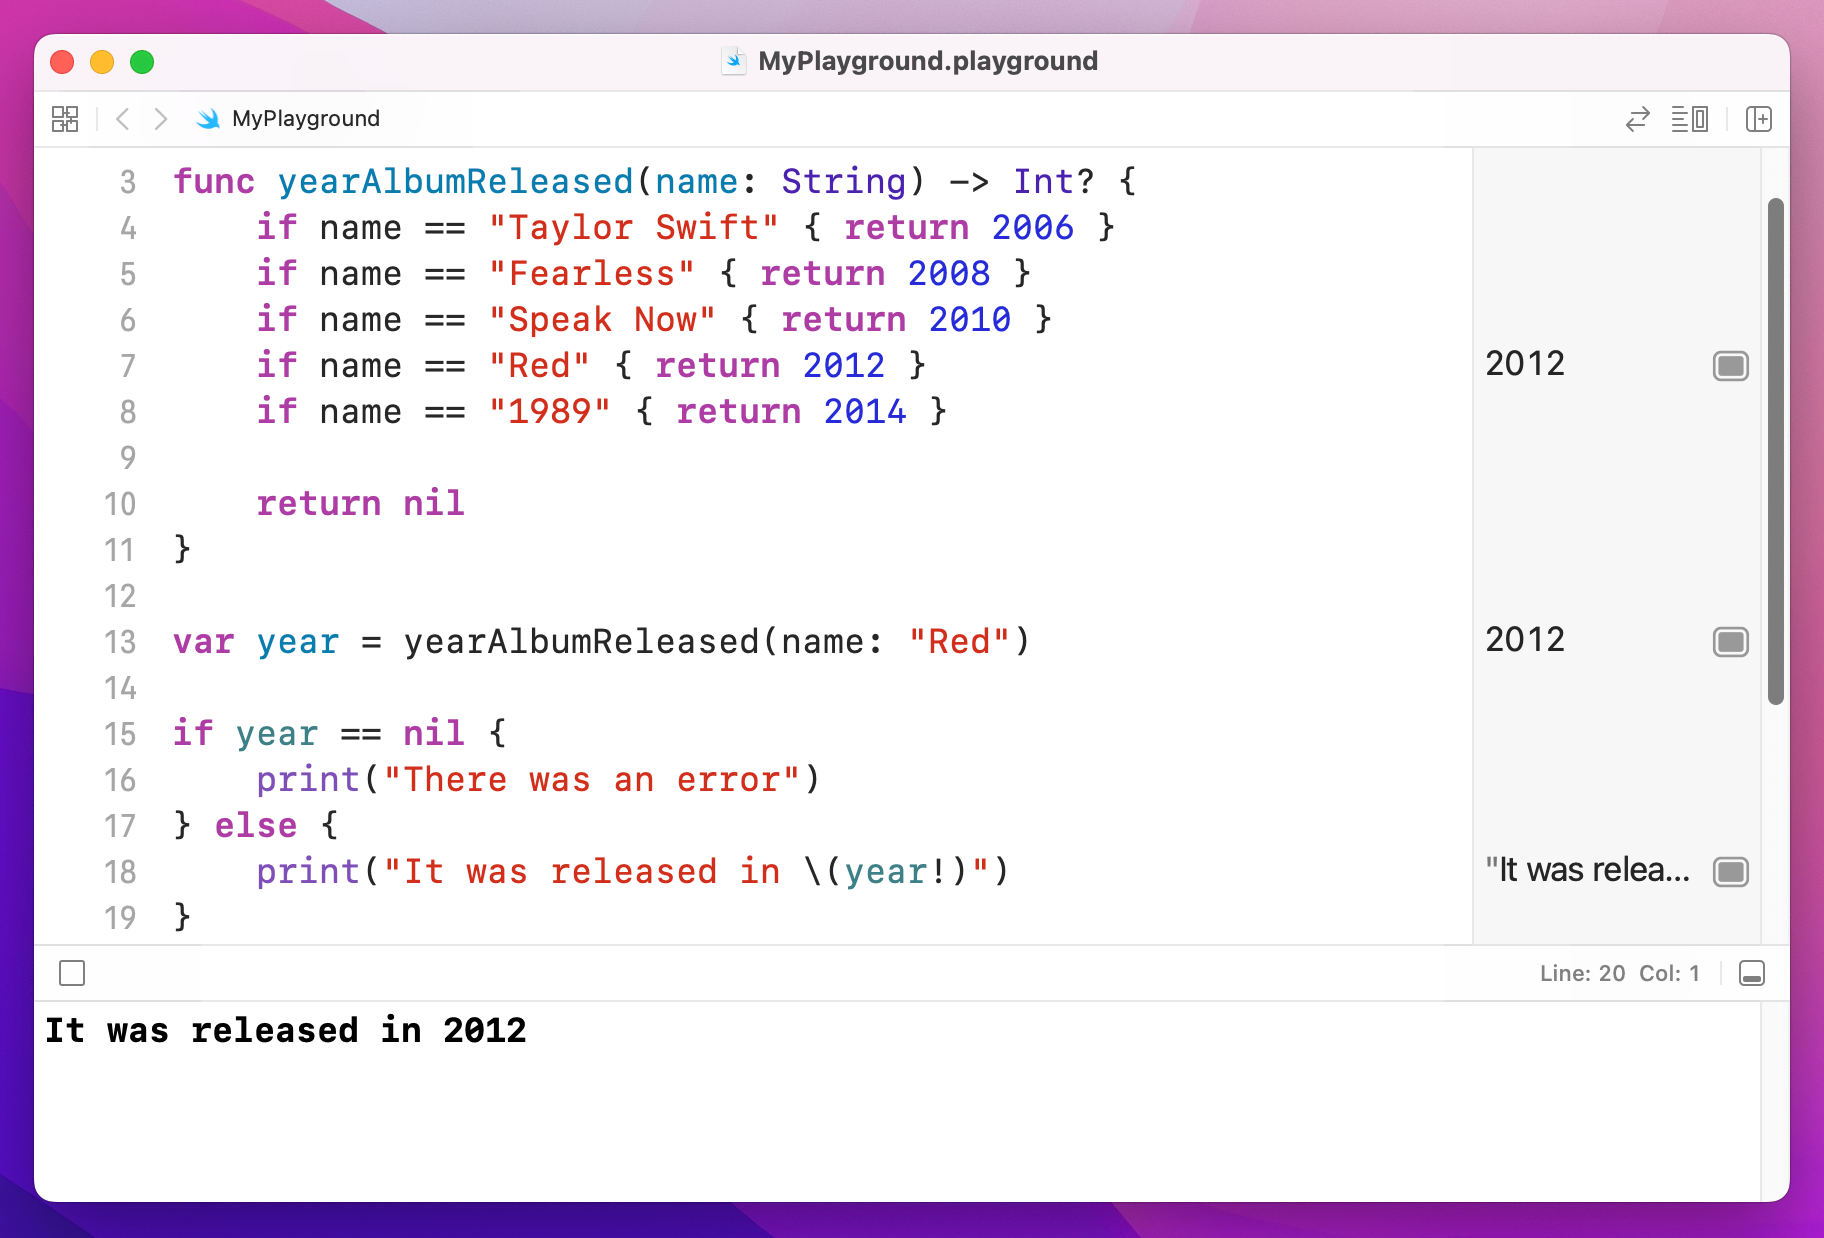
Note the exclamation mark: it means "I'm certain this contains a value, so force unwrap it now."
Broadly speaking force unwrapping optionals is frowned upon – if you find yourself doing it frequently you might want to rethink your approach.
You can also use this exclamation mark syntax to create implicitly unwrapped optionals, which is where some people really start to get confused. So, please read this carefully!
String must contain a string, even if that string is empty, i.e. "". It cannot be nil.String? might contain a string, or it might contain nil. The only way to find out is to unwrap it.String! might contain a string, or it might contain nil – and it's down to you to use it appropriately. It’s like a regular optional, but Swift lets you access the value directly without the unwrapping safety. If you try to do it, it means you know there’s a value there – but if you’re wrong your app will crash.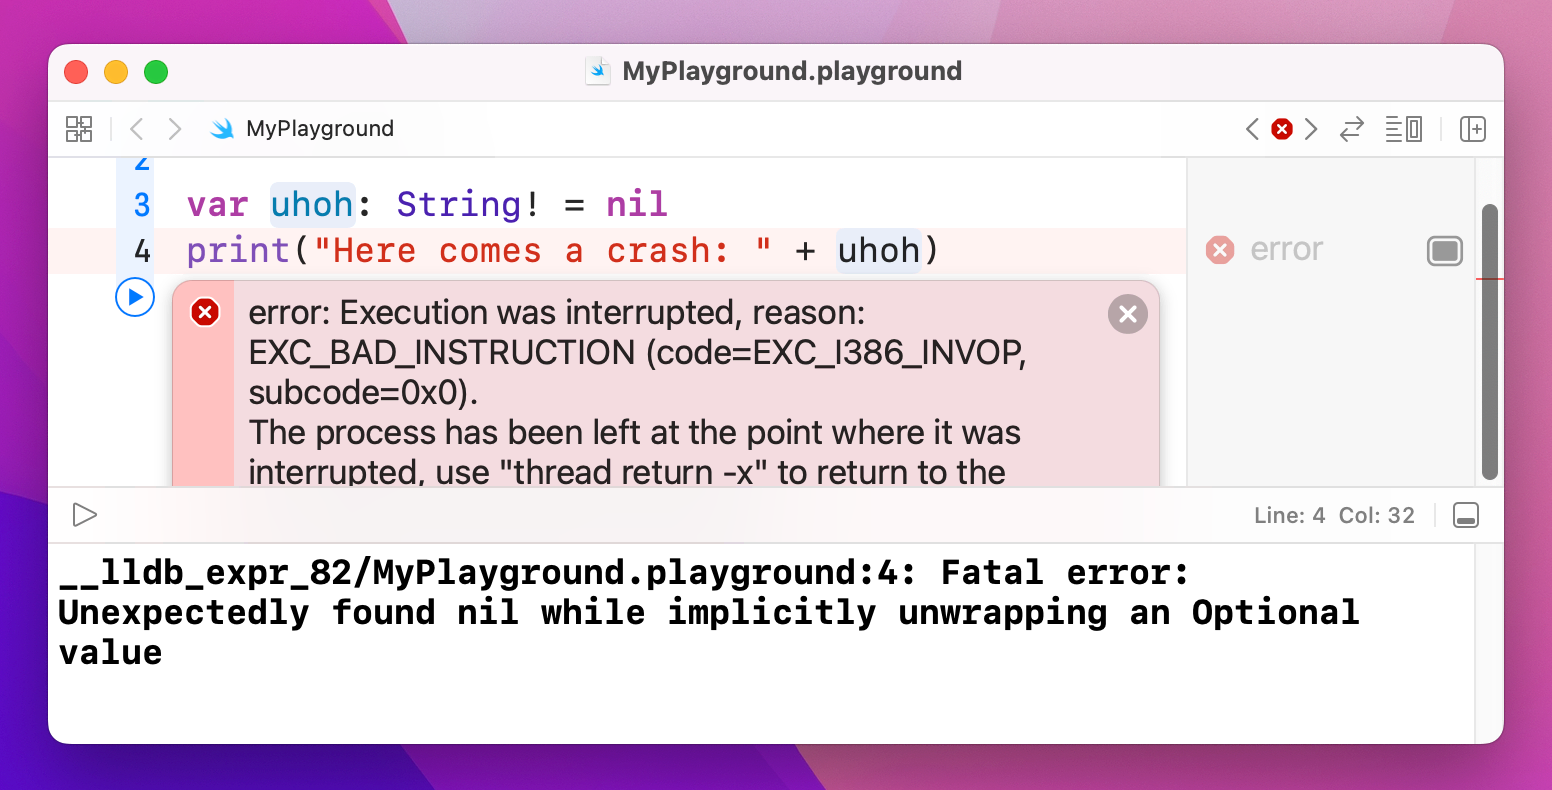
The main times you're going to meet implicitly unwrapped optionals is when you're working with user interface elements in UIKit on iOS or AppKit on macOS. These need to be declared up front, but you can't use them until they have been created – and Apple likes to create user interface elements at the last possible moment to avoid any unnecessary work. Having to continually unwrap values you definitely know will be there is annoying, so these are made implicitly unwrapped.
Don't worry if you find implicitly unwrapped optionals a bit hard to grasp – it will become clear as you work with the language, and you’ll be pleased to know they are rare in SwiftUI projects.
Working with optionals can feel a bit clumsy sometimes, and all the unwrapping and checking can become so onerous that you might be tempted to throw some exclamation marks to force unwrap stuff so you can get on with work. Be careful, though: if you force unwrap an optional that doesn't have a value, your code will crash.
Swift has two techniques to help make your code less complicated. The first is called optional chaining, which lets you run code only if your optional has a value. Put the below code into your playground to get us started:
func albumReleased(year: Int) -> String? {
    switch year {
    case 2006: return "Taylor Swift"
    case 2008: return "Fearless"
    case 2010: return "Speak Now"
    case 2012: return "Red"
    case 2014: return "1989"
    default: return nil
    }
}

let album = albumReleased(year: 2006)
print("The album is \(album)")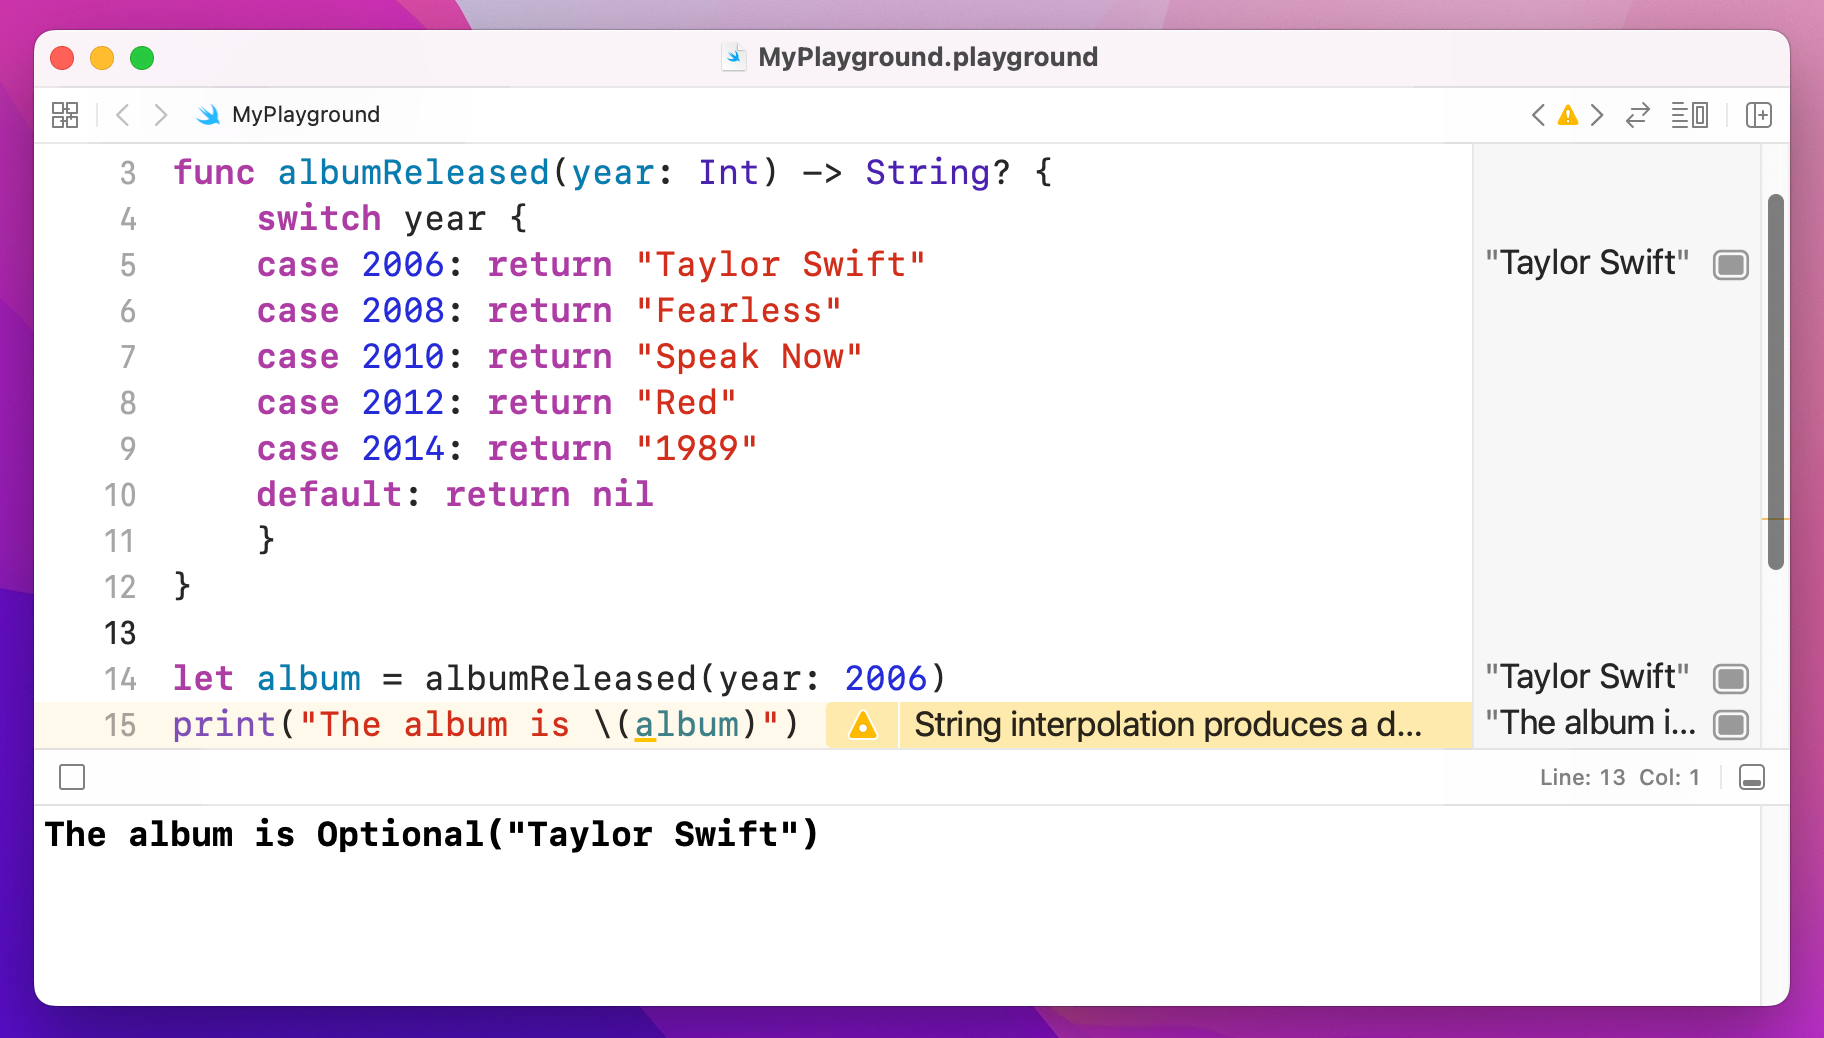
That will output "The album is Optional("Taylor Swift")" into the results pane.
If we wanted to convert the return value of albumReleased() to be uppercase letters (that is, "TAYLOR SWIFT" rather than "Taylor Swift") we could call the uppercased() method of that string. For example:
let str = "Hello world"
print(str.uppercased())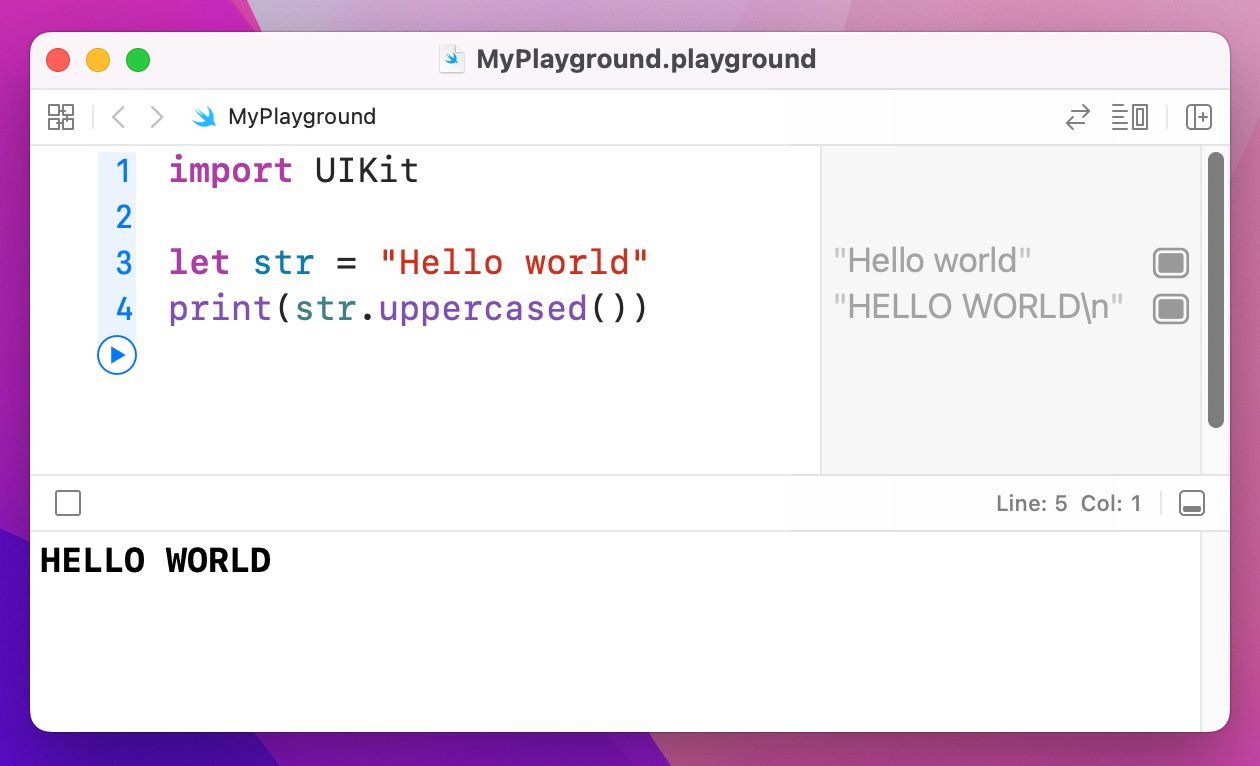
The problem is, albumReleased() returns an optional string: it might return a string or it might return nothing at all. So, what we really mean is, "if we got a string back make it uppercase, otherwise do nothing." And that's where optional chaining comes in, because it provides exactly that behavior.
Try changing the last two lines of code to this:
let album = albumReleased(year: 2006)?.uppercased()
print("The album is \(album)")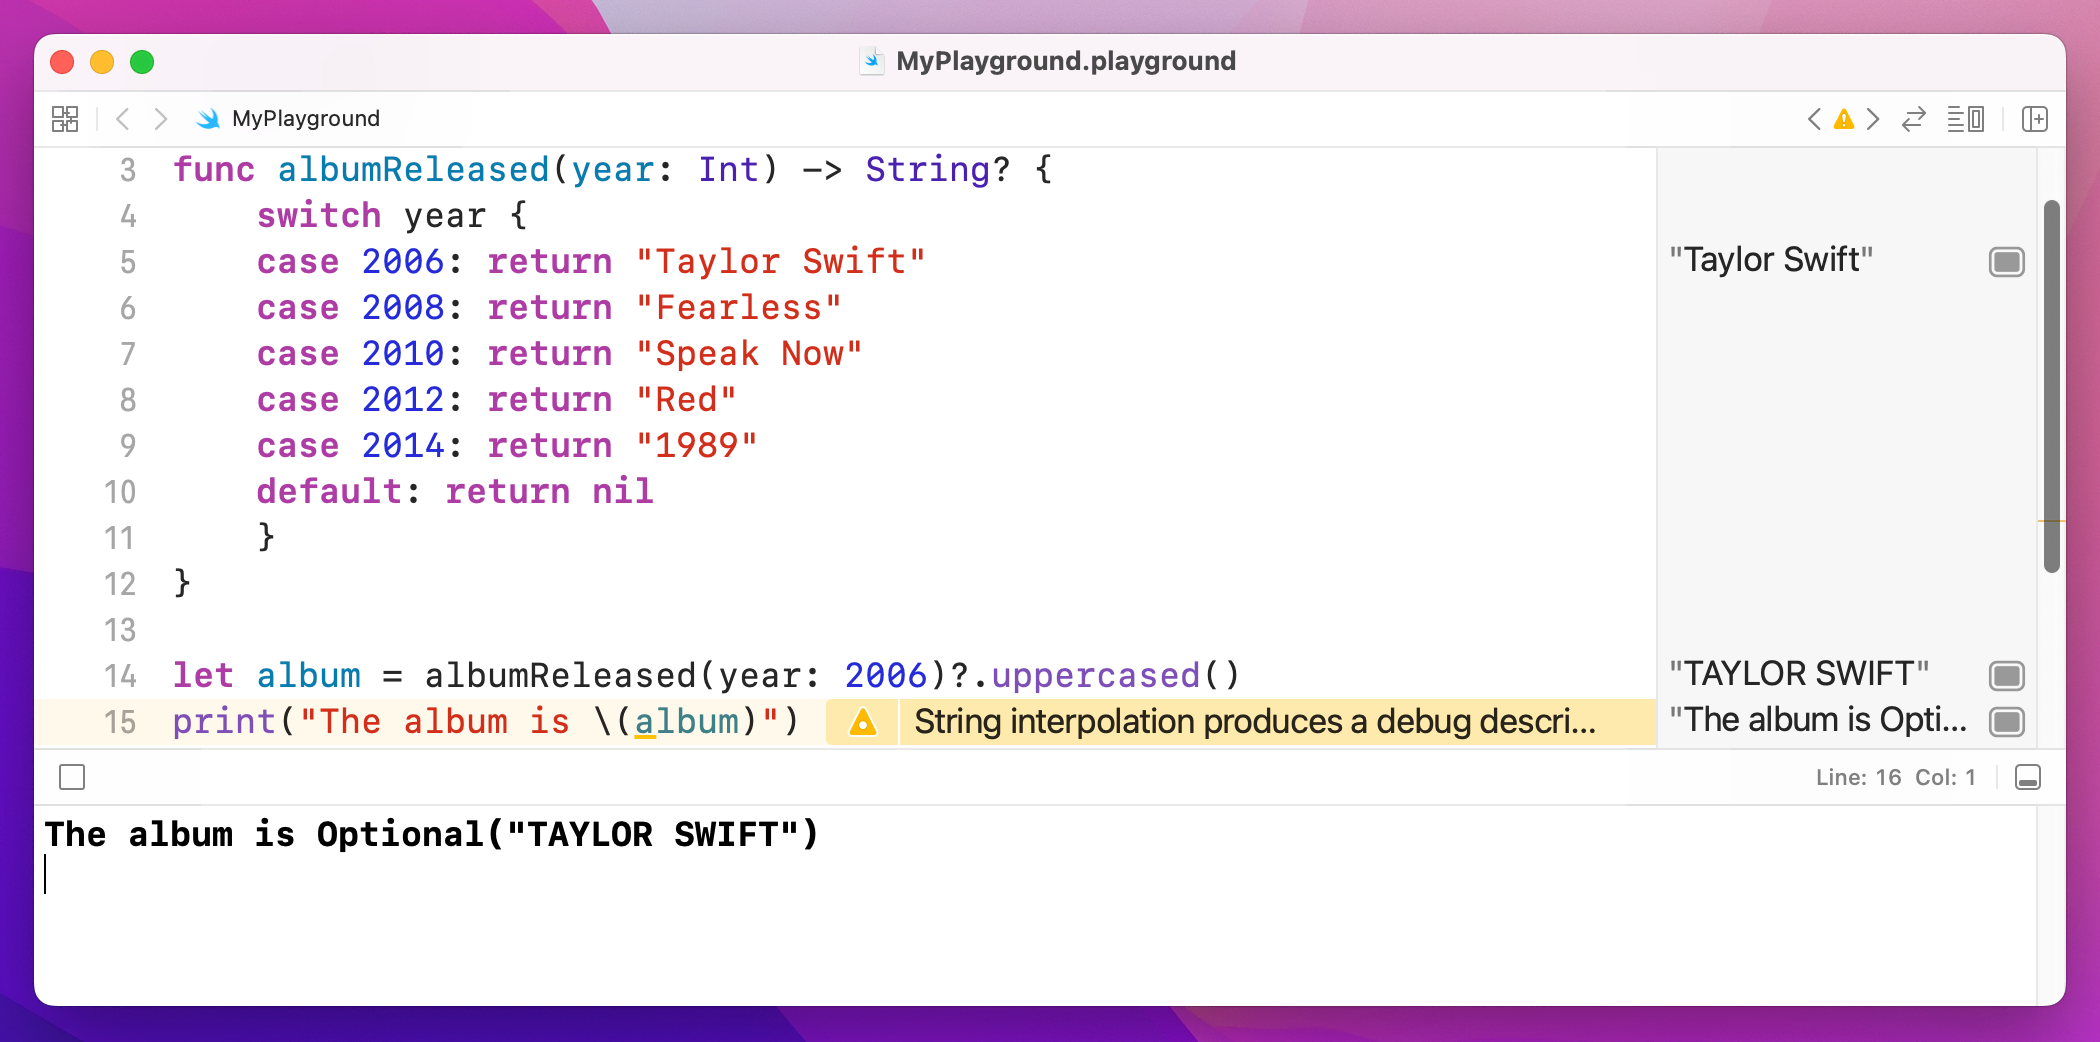
Note that there's a question mark in there, which is the optional chaining: everything after the question mark will only be run if everything before the question mark has a value. This doesn't affect the underlying data type of album, because that line of code will now either return nil or will return the uppercase album name – it's still an optional string.
Your optional chains can be as long as you need, for example:
let album = albumReleased(year: 2006)?.someOptionalValue?.someOtherOptionalValue?.whateverSwift will check them from left to right until it finds nil, at which point it stops.
Nil coalescing makes your code much simpler and safer, and yet has such a grandiose name that many people are scared of it. This is a shame, because the nil coalescing operator will make your life easier if you take the time to figure it out!
What it does is let you say "use value A if you can, but if value A is nil then use value B." That's it. It's particularly helpful with optionals, because it effectively stops them from being optional because you provide a non-optional value B. So, if A is optional and has a value, it gets used (we have a value.) If A is present and has no value, B gets used (so we still have a value). Either way, we definitely have a value.
To give you a real context, try using this code in your playground:
let album = albumReleased(year: 2006) ?? "unknown"
print("The album is \(album)")
That double question mark is the nil coalescing operator, and in this situation it means "if albumReleased() returned a value then put it into the album variable, but if albumReleased() returned nil then use 'unknown' instead."
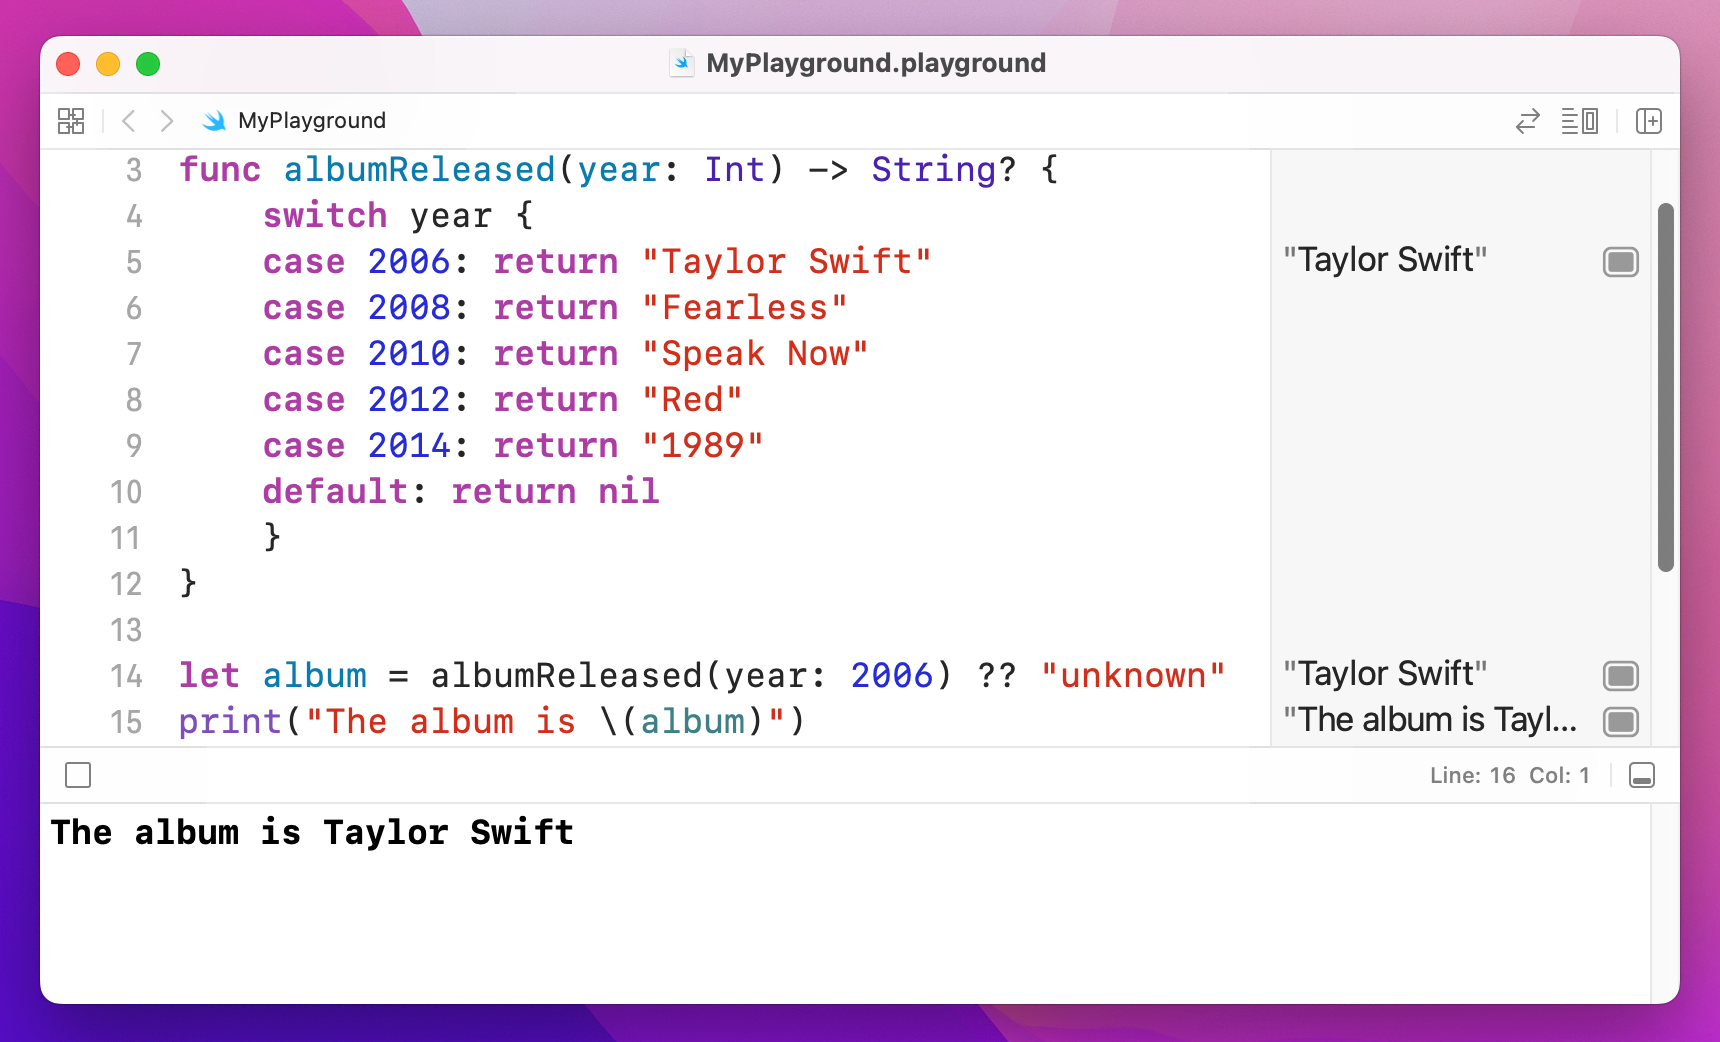
If you look in the results pane now, you'll see "The album is Taylor Swift" printed in there – no more optionals. This is because Swift can now be sure it will get a real value back, either because the function returned one or because you're providing "unknown". This in turn means you don't need to unwrap anything or risk crashes: you're guaranteed to have real data to work with, which makes your code safer and easier to work with.
Enumerations – usually just called “enum” and pronounced “ee-num” - are a way for you to define your own kind of value in Swift. In some programming languages they are simple little things, but Swift adds a huge amount of power to them if you want to go beyond the basics.
Let's start with a simple example from earlier:
func getHaterStatus(weather: String) -> String? {
    if weather == "sunny" {
        return nil
    } else {
        return "Hate"
    }
}
That function accepts a string that defines the current weather. The problem is, a string is a poor choice for that kind of data – is it “rain”, “rainy” or “raining”? Or perhaps “showering”, “drizzly” or “stormy”? Worse, what if one person writes “Rain” with an uppercase R and someone else writes “Ran” because they weren't looking at what they typed?
Enums solve this problem by letting you define a new data type, then define the possible values it can hold. For example, we might say there are five kinds of weather: sun, cloud, rain, wind and snow. If we make this an enum, it means Swift will accept only those five values – anything else will trigger an error. And behind the scenes enums are usually just simple numbers, which are a lot faster than strings for computers to work with.
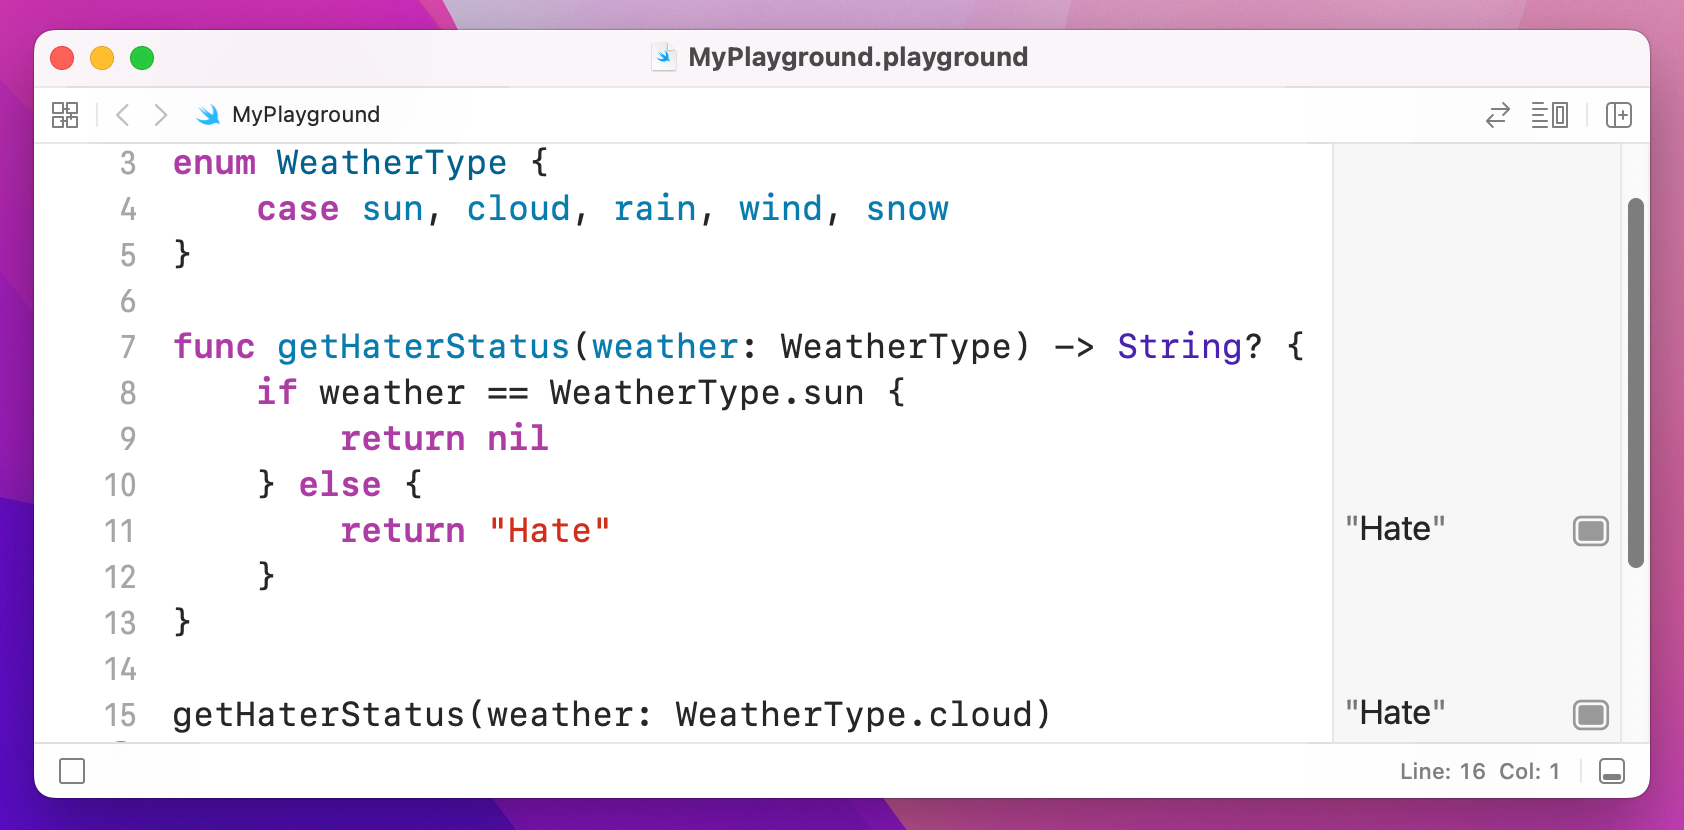
Let's put that into code:
enum WeatherType {
    case sun, cloud, rain, wind, snow
}

func getHaterStatus(weather: WeatherType) -> String? {
    if weather == WeatherType.sun {
        return nil
    } else {
        return "Hate"
    }
}

getHaterStatus(weather: WeatherType.cloud)
Take a look at the first three lines: line 1 gives our type a name, WeatherType. This is what you'll use in place of String or Int in your code. Line 2 defines the five possible cases our enum can be, as I already outlined. Convention has these start with a lowercase letter, so “sun”, “cloud”, etc. And line 3 is just a closing brace, ending the enum.
Now take a look at how it's used: I modified the getHaterStatus() so that it takes a WeatherType value. The conditional statement is also rewritten to compare against WeatherType.sun, which is our value. Remember, this check is just a number behind the scenes, which is lightning fast.
Now, go back and read that code again, because I'm about to rewrite it with two changes that are important. All set?
enum WeatherType {
    case sun
    case cloud
    case rain
    case wind
    case snow
}

func getHaterStatus(weather: WeatherType) -> String? {
    if weather == .sun {
        return nil
    } else {
        return "Hate"
    }
}

getHaterStatus(weather: .cloud)
I made two changes there. First, each of the weather types are now on their own line. This might seem like a small change, and indeed in this example it is, but it becomes important soon. The second change was that I wrote if weather == .sun – I didn't need to spell out that I meant WeatherType.sun because Swift knows I am comparing against a WeatherType variable, so it's using type inference.
Enums are particularly useful inside switch/case blocks, particularly because Swift knows all the values your enum can have so it can ensure you cover them all. For example, we might try to rewrite the getHaterStatus() method to this:
func getHaterStatus(weather: WeatherType) -> String? {
    switch weather {
    case .sun:
        return nil
    case .cloud, .wind:
        return "dislike"
    case .rain:
        return "hate"
    }
}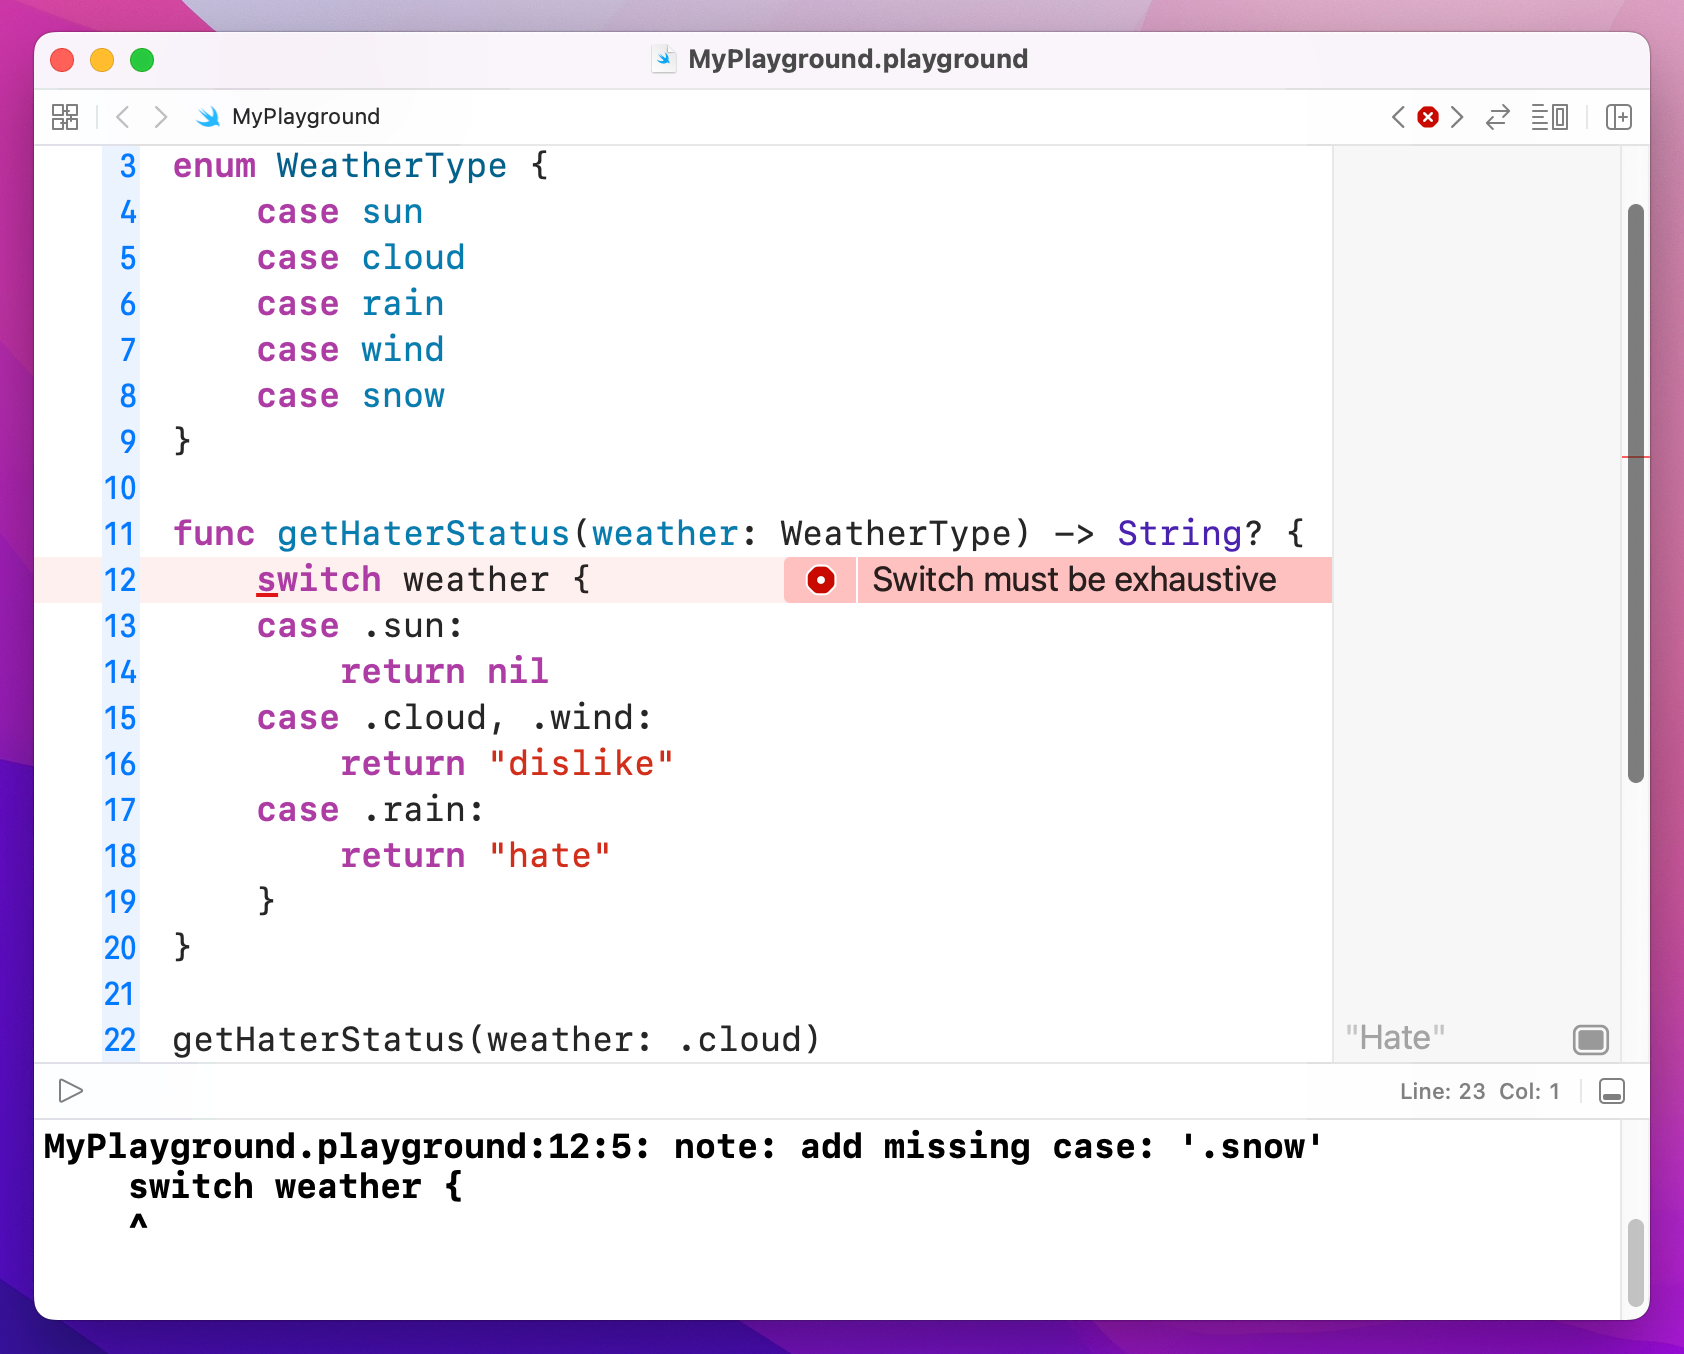
Yes, I realize "haters gonna dislike" is hardly a great lyric, but it's academic anyway because this code won't build: it doesn't handle the .snow case, and Swift wants all cases to be covered. You either have to add a case for it or add a default case.
One of the most powerful features of Swift is that enumerations can have values attached to them that you define. To extend our increasingly dubious example a bit further, I'm going to add a value to the .wind case so that we can say how fast the wind is. Modify your code to this:
enum WeatherType {
    case sun
    case cloud
    case rain
    case wind(speed: Int)
    case snow
}
As you can see, the other cases don't need a speed value – I put that just into wind. Now for the real magic: Swift lets us add extra conditions to the switch/case block so that a case will match only if those conditions are true. This uses the let keyword to access the value inside a case, then the where keyword for pattern matching.
Here's the new function:
func getHaterStatus(weather: WeatherType) -> String? {
    switch weather {
    case .sun:
        return nil
    case .wind(let speed) where speed < 10:
        return "meh"
    case .cloud, .wind:
        return "dislike"
    case .rain, .snow:
        return "hate"
    }
}

getHaterStatus(weather: WeatherType.wind(speed: 5))
You can see .wind appears in there twice, but the first time is true only if the wind is slower than 10 kilometers per hour. If the wind is 10 or above, that won't match. The key is that you use let to get hold of the value inside the enum (i.e. to declare a constant name you can reference) then use a where condition to check.
Swift evaluates switch/case from top to bottom, and stops as soon as it finds a match. This means that if case .cloud, .wind: appears before case .wind(let speed) where speed < 10: then it will be executed instead – and the output changes.
So, think carefully about how you order cases!
Tip: Swift’s optionals are actually implemented using enums with associated values. There are two cases: none, and some, with some having whatever value is inside the optional.
Structs are complex data types, meaning that they are made up of multiple values. You then create an instance of the struct and fill in its values, then you can pass it around as a single value in your code. For example, we could define a Person struct type that contains two properties: clothes and shoes:
struct Person {
    var clothes: String
    var shoes: String
}
When you define a struct, Swift makes them very easy to create because it automatically generates what's called a memberwise initializer. In plain speak, it means you create the struct by passing in initial values for its two properties, like this:
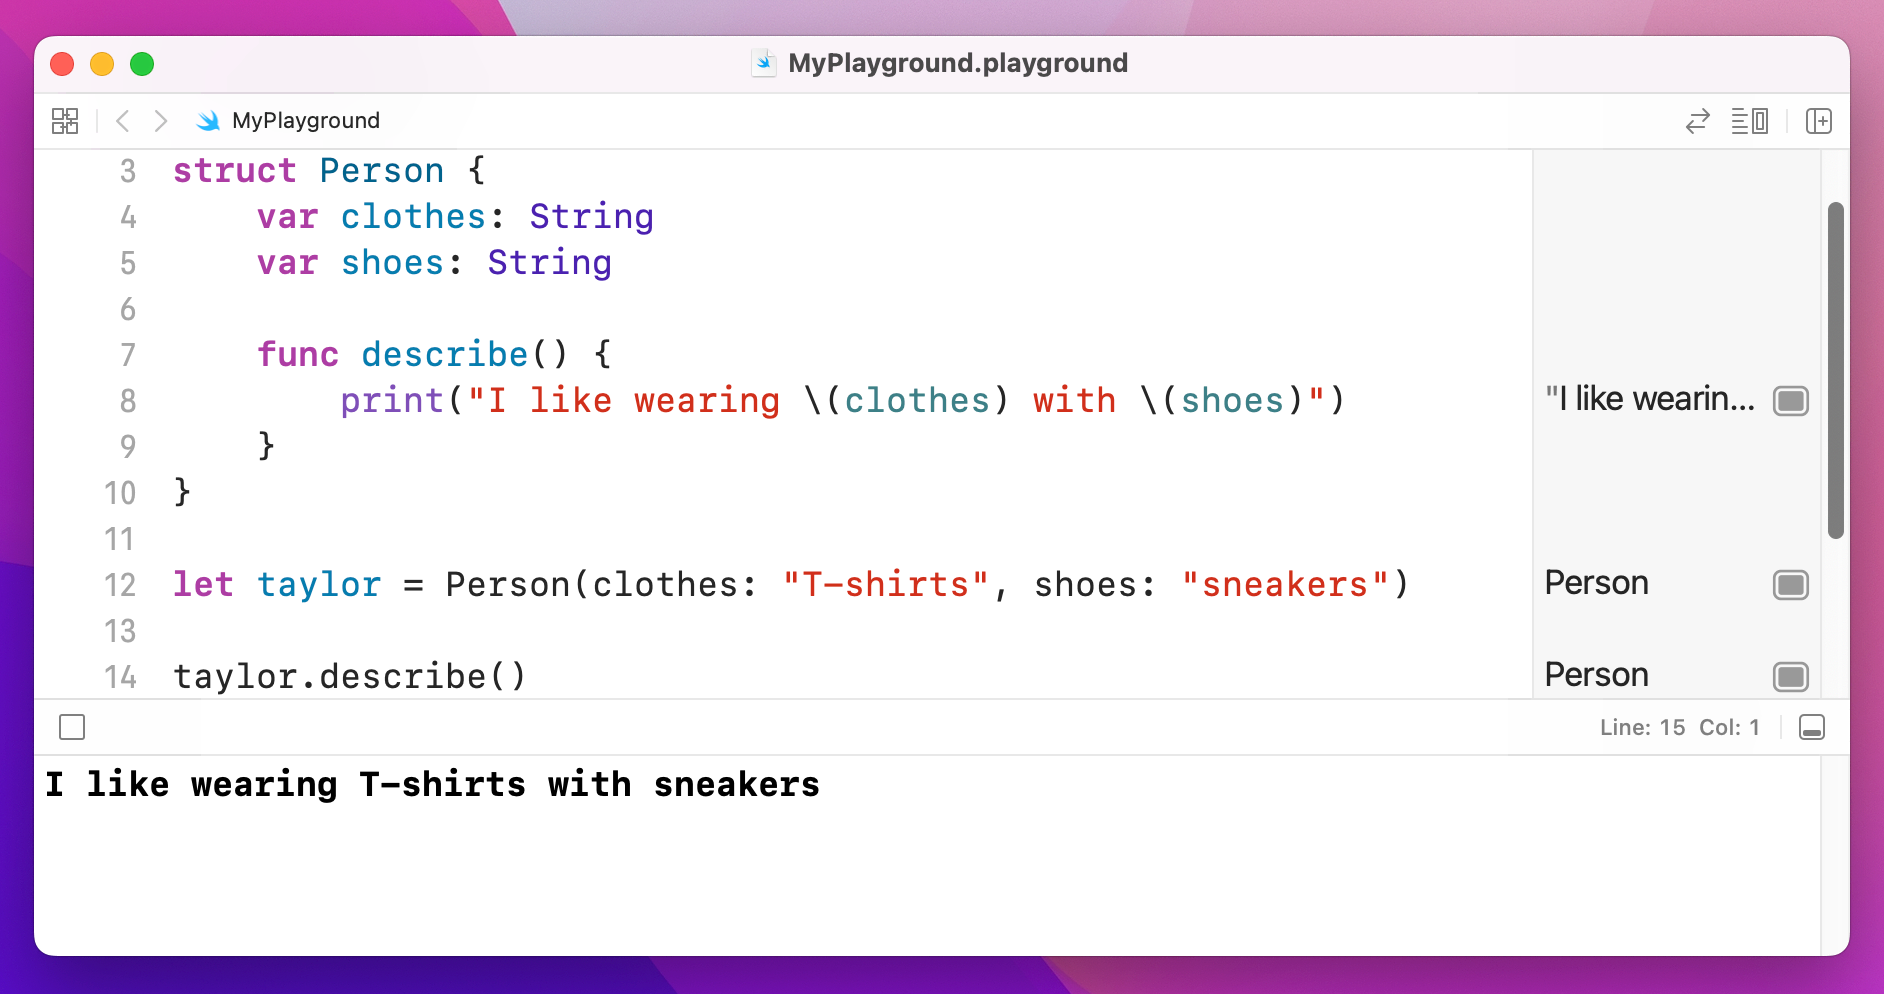
let taylor = Person(clothes: "T-shirts", shoes: "sneakers")
let other = Person(clothes: "short skirts", shoes: "high heels")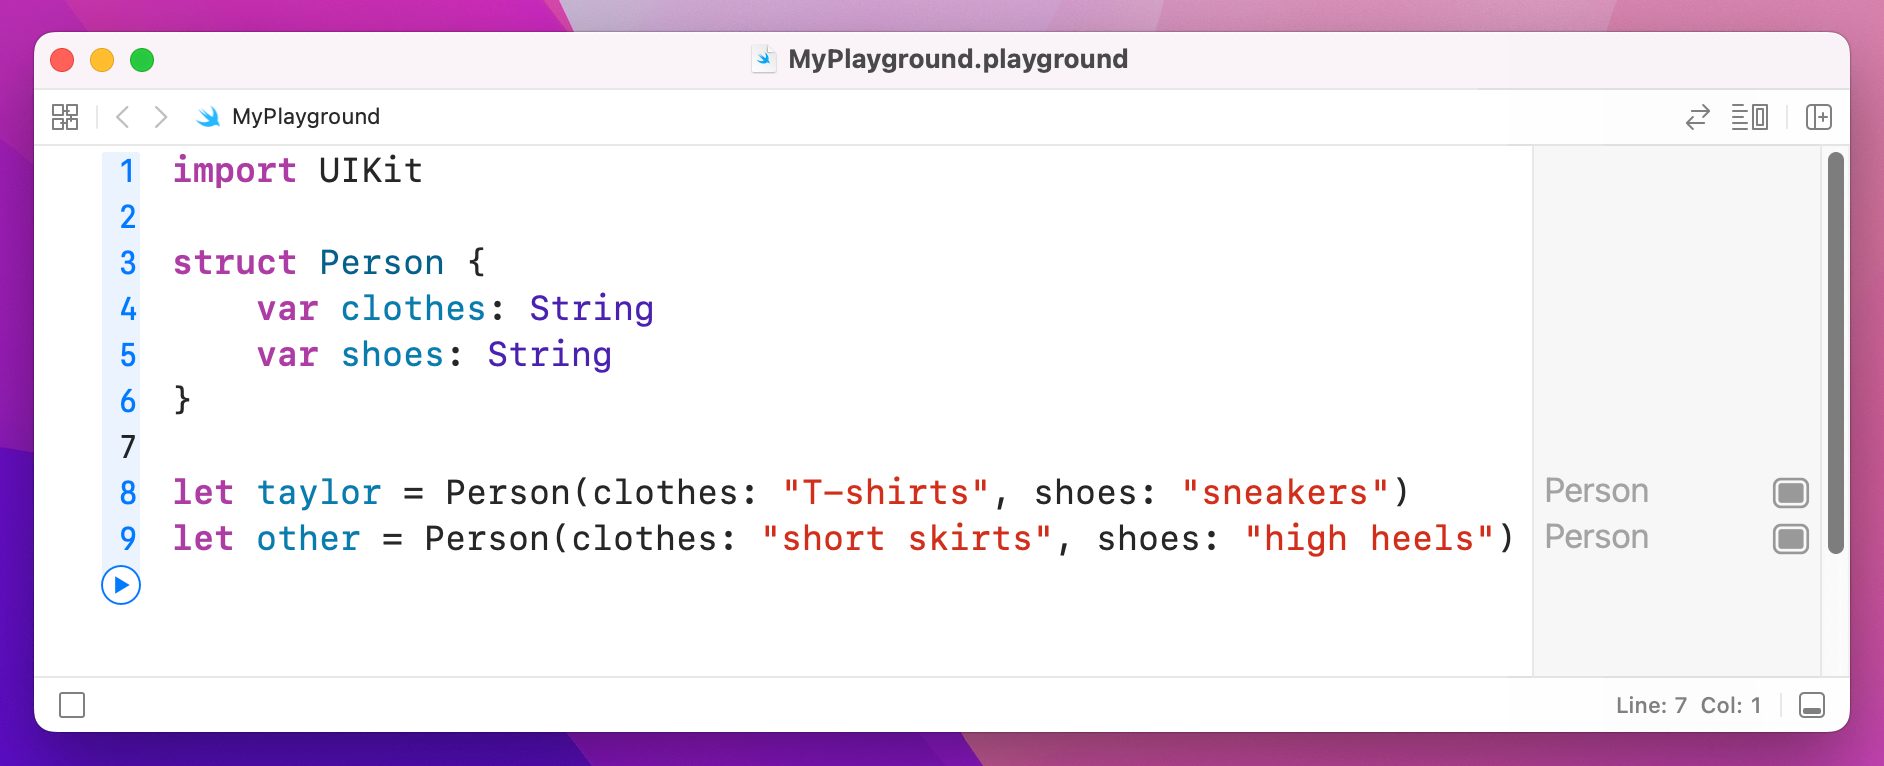
Once you have created an instance of a struct, you can read its properties just by writing the name of the struct, a period, then the property you want to read:
print(taylor.clothes)
print(other.shoes)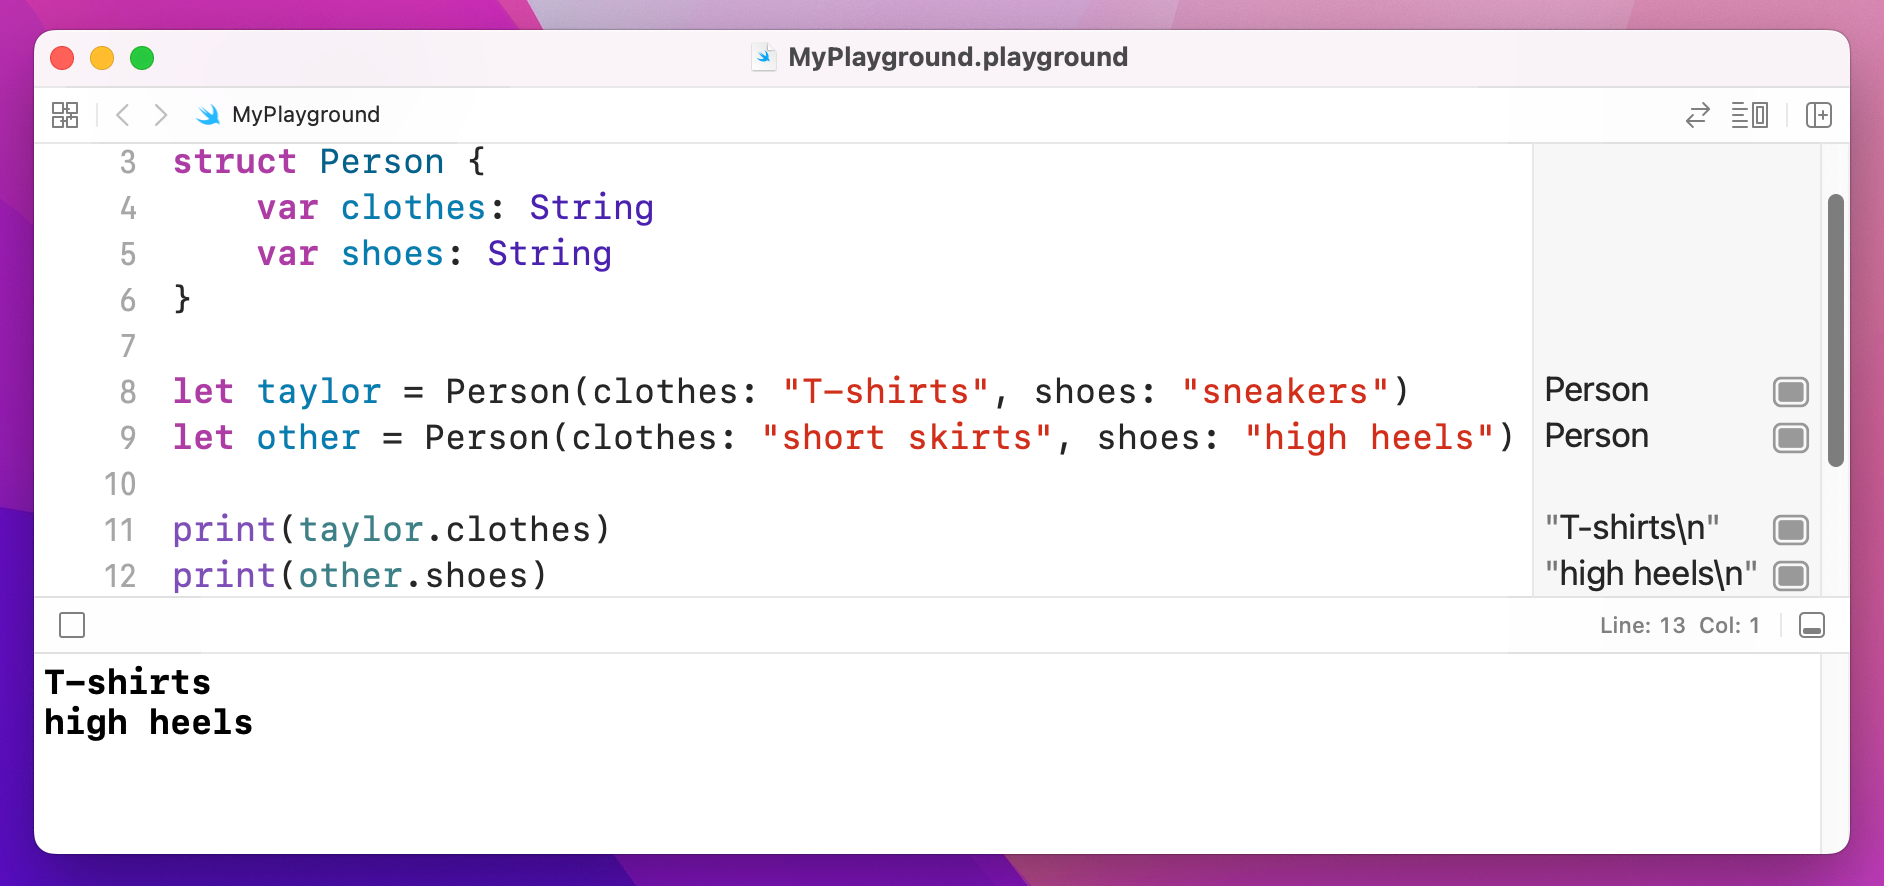
If you assign one struct to another, Swift copies it behind the scenes so that it is a complete, standalone duplicate of the original. Well, that's not strictly true: Swift uses a technique called "copy on write" which means it only actually copies your data if you try to change it.
To help you see how struct copies work, put this into your playground:
struct Person {
    var clothes: String
    var shoes: String
}

let taylor = Person(clothes: "T-shirts", shoes: "sneakers")
let other = Person(clothes: "short skirts", shoes: "high heels")

var taylorCopy = taylor
taylorCopy.shoes = "flip flops"

print(taylor)
print(taylorCopy)
That creates two Person structs, then creates a third one called taylorCopy as a copy of taylor. What happens next is the interesting part: the code changes taylorCopy, and prints both it and taylor. If you look in your results pane (you might need to resize it to fit) you'll see that the copy has a different value to the original: changing one did not change the other.
You can place functions inside structs, and in fact it’s a good idea to do so for all functions that read or change data inside the struct. For example, we could add a function to our Person struct to describe what they are wearing, like this:
struct Person {
    var clothes: String
    var shoes: String

    func describe() {
        print("I like wearing \(clothes) with \(shoes)")
    }
}
There’s one more thing you ought to know but can't see in that code: when you write a function inside a struct, it's called a method instead. In Swift you write func whether it's a function or a method, but the distinction is preserved when you talk about them.
Swift has another way of building complex data types called classes. They look similar to structs, but have a number of important differences, including:
All three of those are massive differences, so I'm going to cover them in more depth before continuing.
If we were to convert our Person struct into a Person class, Swift wouldn't let us write this:
class Person {
    var clothes: String
    var shoes: String
}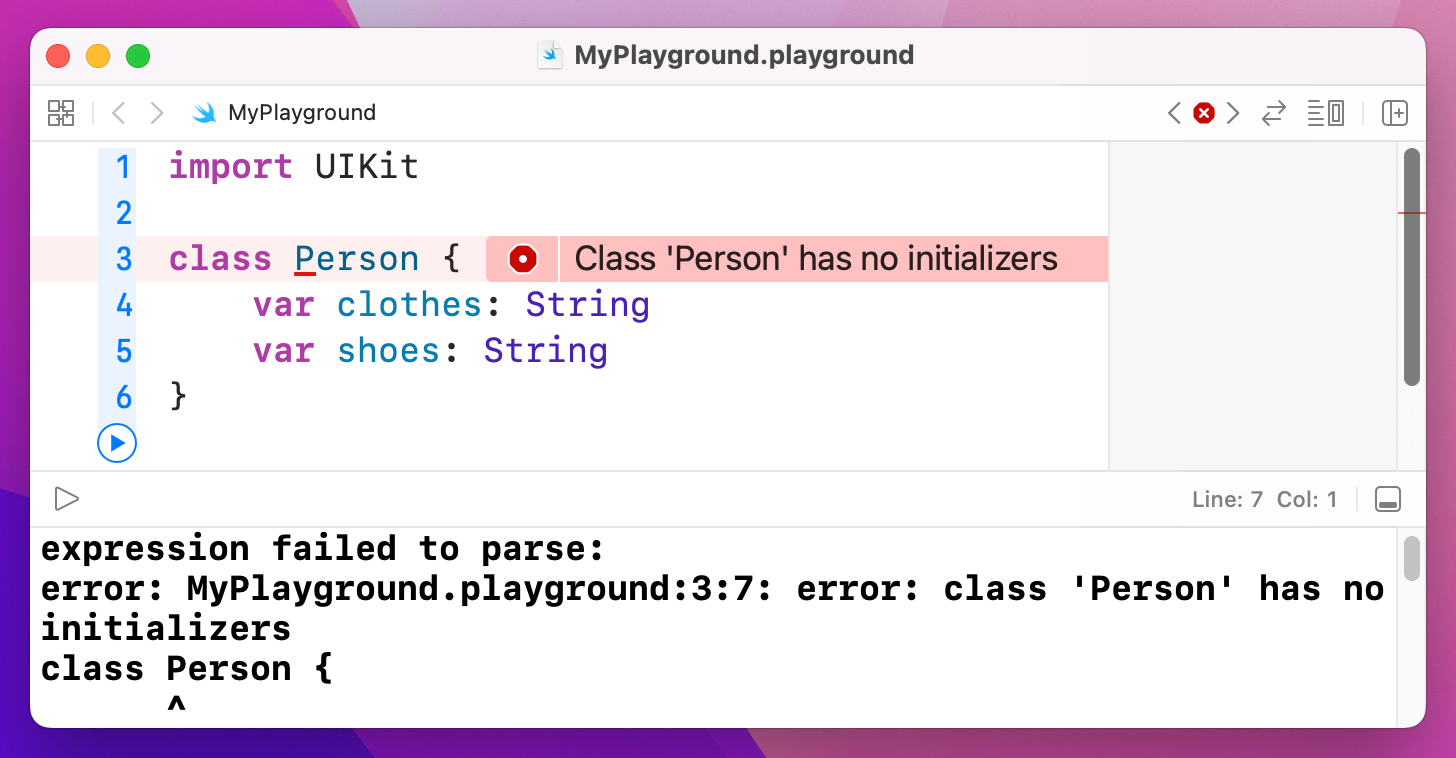
This is because we're declaring the two properties to be String, which if you remember means they absolutely must have a value. This was fine in a struct because Swift automatically produces a memberwise initializer for us that forced us to provide values for the two properties, but this doesn't happen with classes so Swift can't be sure they will be given values.
There are three solutions: make the two values optional strings, give them default values, or write our own initializer. The first option is clumsy because it introduces optionals all over our code where they don't need to be. The second option works, but it's a bit wasteful unless those default values will actually be used. That leaves the third option, and really it's the right one: write our own initializer.
To do this, create a method inside the class called init() that takes the two parameters we care about:
class Person {
    var clothes: String
    var shoes: String

    init(clothes: String, shoes: String) {
        self.clothes = clothes
        self.shoes = shoes
    }
}
There are two things that might jump out at you in that code.
First, you don't write func before your init() method, because it's special. Second, because the parameter names being passed in are the same as the names of the properties we want to assign, you use self. to make your meaning clear – "the clothes property of this object should be set to the clothes parameter that was passed in." You can give them unique names if you want – it's down to you.
Important: Swift requires that all non-optional properties have a value by the end of the initializer, or by the time the initializer calls any other method – whichever comes first.
The second difference between classes and structs are that classes can build on each other to produce greater things, known as class inheritance. This is a technique used extensively in both UIKit and AppKit, even in the most basic programs, so it's something you will need to get to grips with eventually.
Let's start with something simple: a Singer class that has properties, which is their name and age. As for methods, there will be a simple initializer to handle setting the properties, plus a sing() method that outputs some words:
class Singer {
    var name: String
    var age: Int

    init(name: String, age: Int) {
        self.name = name
        self.age = age
    }

    func sing() {
        print("La la la la")
    }
}
We can now create an instance of that object by calling that initializer, then read out its properties and call its method:
var taylor = Singer(name: "Taylor", age: 25)
taylor.name
taylor.age
taylor.sing()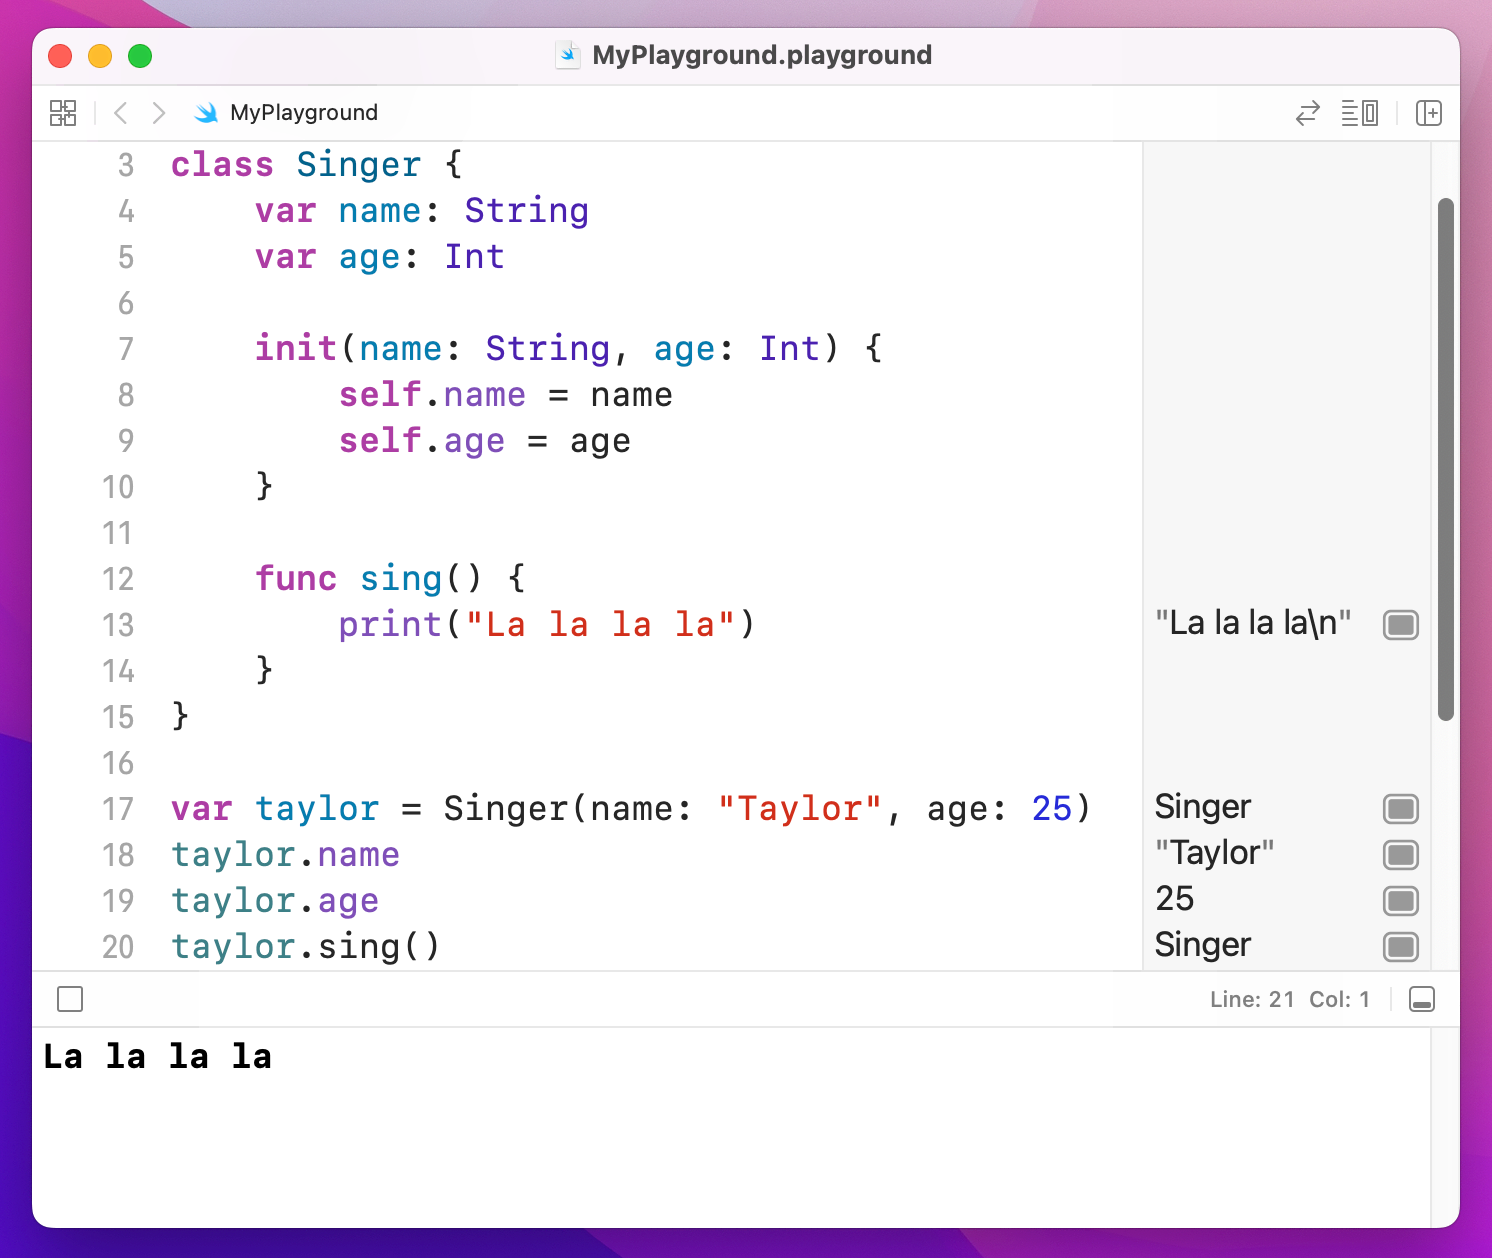
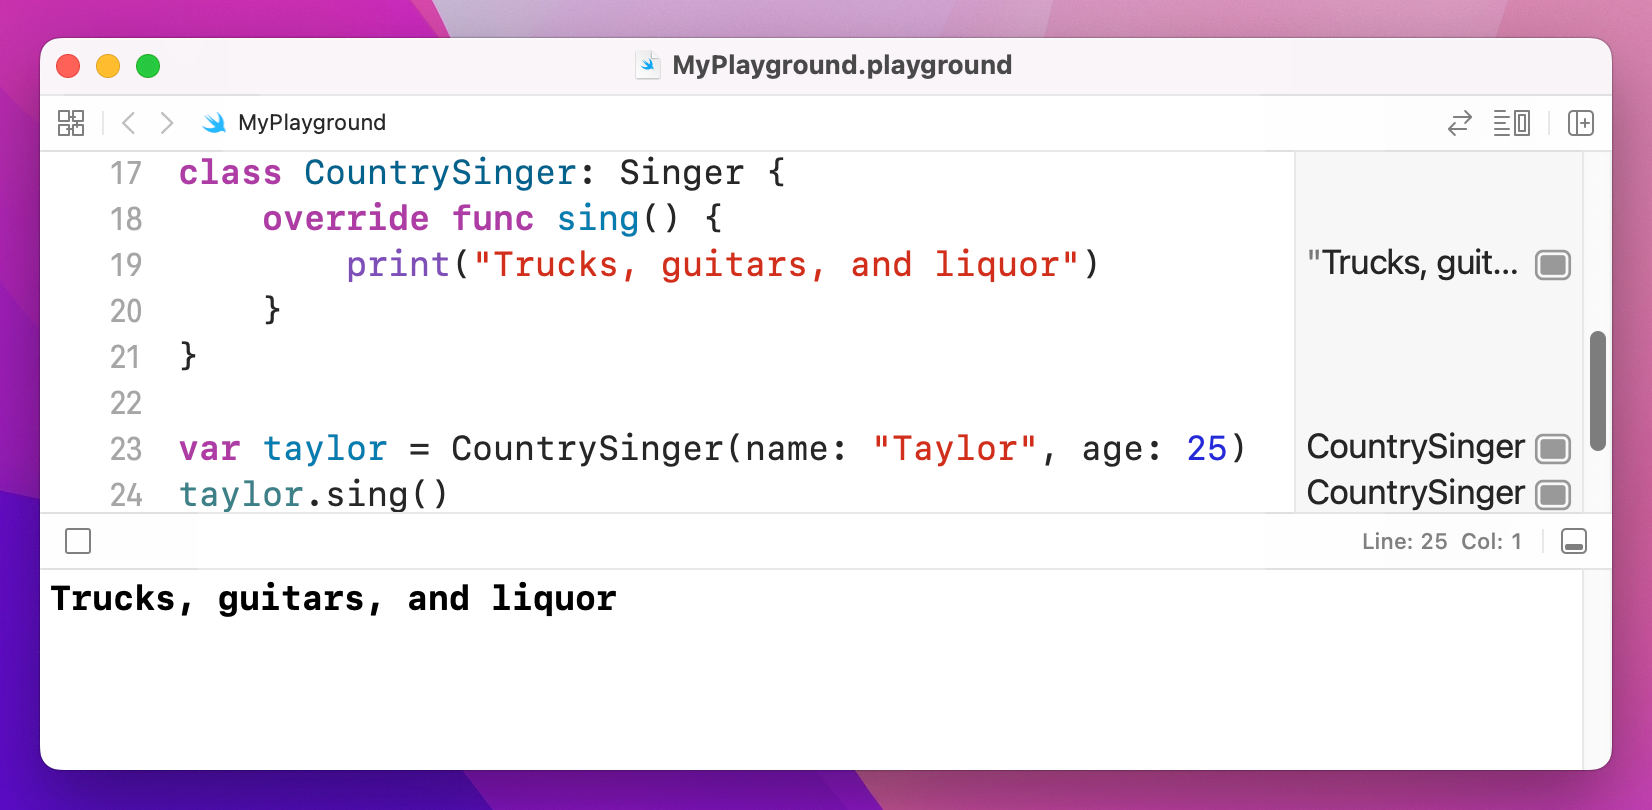
That's our basic class, but we're going to build on it: I want to define a CountrySinger class that has everything the Singer class does, but when I call sing() on it I want to print "Trucks, guitars, and liquor" instead.
You could of course just copy and paste the original Singer into a new class called CountrySinger but that's a lazy way to program and it will come back to haunt you if you make later changes to Singer and forget to copy them across. Instead, Swift has a smarter solution: we can define CountrySinger as being based off Singer and it will get all its properties and methods for us to build on:
class CountrySinger: Singer {

}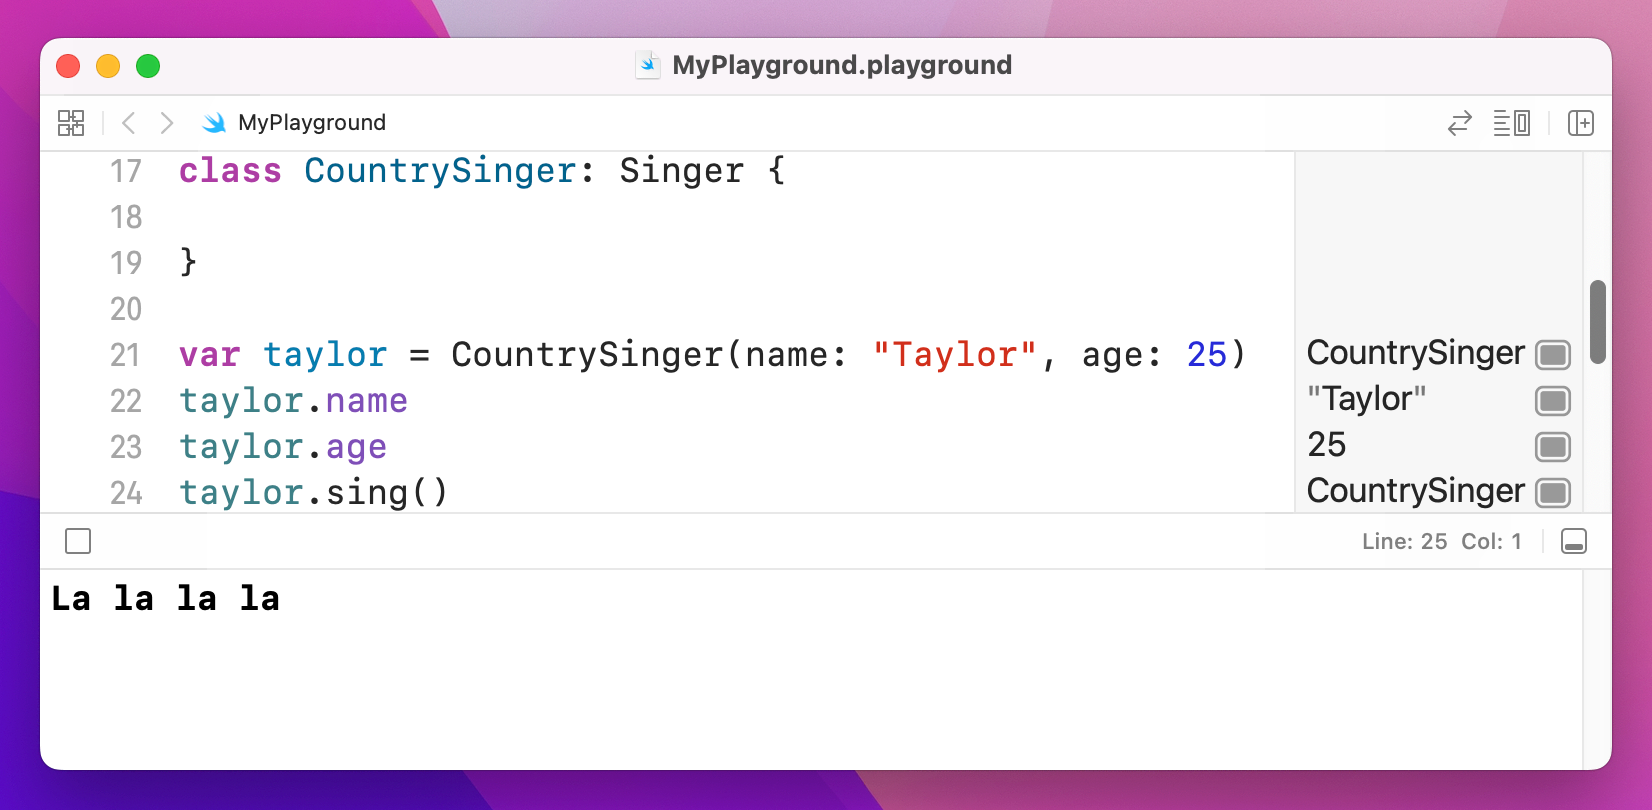
That colon is what does the magic: it means "CountrySinger extends Singer." Now, that new CountrySinger class (called a subclass) doesn't add anything to Singer (called the parent class, or superclass) yet. We want it to have its own sing() method, but in Swift you need to learn a new keyword: override. This means "I know this method was implemented by my parent class, but I want to change it for this subclass."
Having the override keyword is helpful, because it makes your intent clear. It also allows Swift to check your code: if you don't use override Swift won't let you change a method you got from your superclass, or if you use override and there wasn't anything to override, Swift will point out your error.
So, we need to use override func, like this:
class CountrySinger: Singer {
    override func sing() {
        print("Trucks, guitars, and liquor")
    }
}
Now modify the way the taylor object is created:
var taylor = CountrySinger(name: "Taylor", age: 25)
taylor.sing()
If you change CountrySinger to just Singer you should be able to see the different messages appearing in the results pane.
Now, to make things more complicated, we're going to define a new class called HeavyMetalSinger. But this time we're going to store a new property called noiseLevel defining how loud this particular heavy metal singer likes to scream down their microphone.
This causes a problem, and it's one that needs to be solved in a very particular way:
Singer class doesn't have a noiseLevel property.HeavyMetalSinger that accepts a noise level.name and age of the heavy metal singer, so it can pass it onto the superclass Singer.noiseLevel) then pass on the other parameters for the superclass to use.That might sound awfully complicated, but in code it's straightforward. Here's the HeavyMetalSinger class, complete with its own sing() method:
class HeavyMetalSinger: Singer {
    var noiseLevel: Int

    init(name: String, age: Int, noiseLevel: Int) {
        self.noiseLevel = noiseLevel
        super.init(name: name, age: age)
    }

    override func sing() {
        print("Grrrrr rargh rargh rarrrrgh!")
    }
}
Notice how its initializer takes three parameters, then calls super.init() to pass name and age on to the Singer superclass - but only after its own property has been set. You'll see super used a lot when working with objects, and it just means "call a method on the class I inherited from.” It's usually used to mean "let my parent class do everything it needs to do first, then I'll do my extra bits."
Class inheritance is a big topic so don't fret if it's not clear just yet. However, there is one more thing you need to know: class inheritance often spans many levels. For example, A could inherit from B, and B could inherit from C, and C could inherit from D, and so on. This lets you build functionality and re-use up over a number of classes, helping to keep your code modular and easy to understand.
If you want to have some part of Apple’s operating system call your Swift class’s method, you need to mark it with a special attribute: @objc. This is short for “Objective-C”, and the attribute effectively marks the method as being available for older Objective-C code to run – which is almost all of iOS, macOS, watchOS, and tvOS. For example, if you ask the system to call your method after one second has passed, you’ll need to mark it with @objc.
Don’t worry too much about @objc for now – not only will I be explaining it in context later on, but Xcode will always tell you when it’s needed. Alternatively, if you don’t want to use @objc for individual methods you can put @objcMembers before your class to automatically make all its methods available to Objective-C.
When you copy a struct, the whole thing is duplicated, including all its values. This means that changing one copy of a struct doesn't change the other copies – they are all individual. With classes, each copy of an object points at the same original object, so if you change one they all change. Swift calls structs "value types" because they just point at a value, and classes "reference types" because objects are just shared references to the real value.
This is an important difference, and it means the choice between structs and classes is an important one:
If I were to summarize this key difference between structs and classes, I'd say this: classes offer more flexibility, whereas structs offer more safety. In practice, which you choose depends on the Apple framework you’re working with: UIKit, AppKit, SpriteKit and the other older frameworks rely heavily on structs for data and classes for user interface elements, whereas SwiftUI flips things around and uses structs for user interface elements and classes for data.
Structs and classes (collectively: "types") can have their own variables and constants, and these are called properties. These let you attach values to your types to represent them uniquely, but because types can also have methods you can have them behave according to their own data.
Let's take a look at an example now:
struct Person {
    var clothes: String
    var shoes: String

    func describe() {
        print("I like wearing \(clothes) with \(shoes)")
    }
}

let taylor = Person(clothes: "T-shirts", shoes: "sneakers")
let other = Person(clothes: "short skirts", shoes: "high heels")
taylor.describe()
other.describe()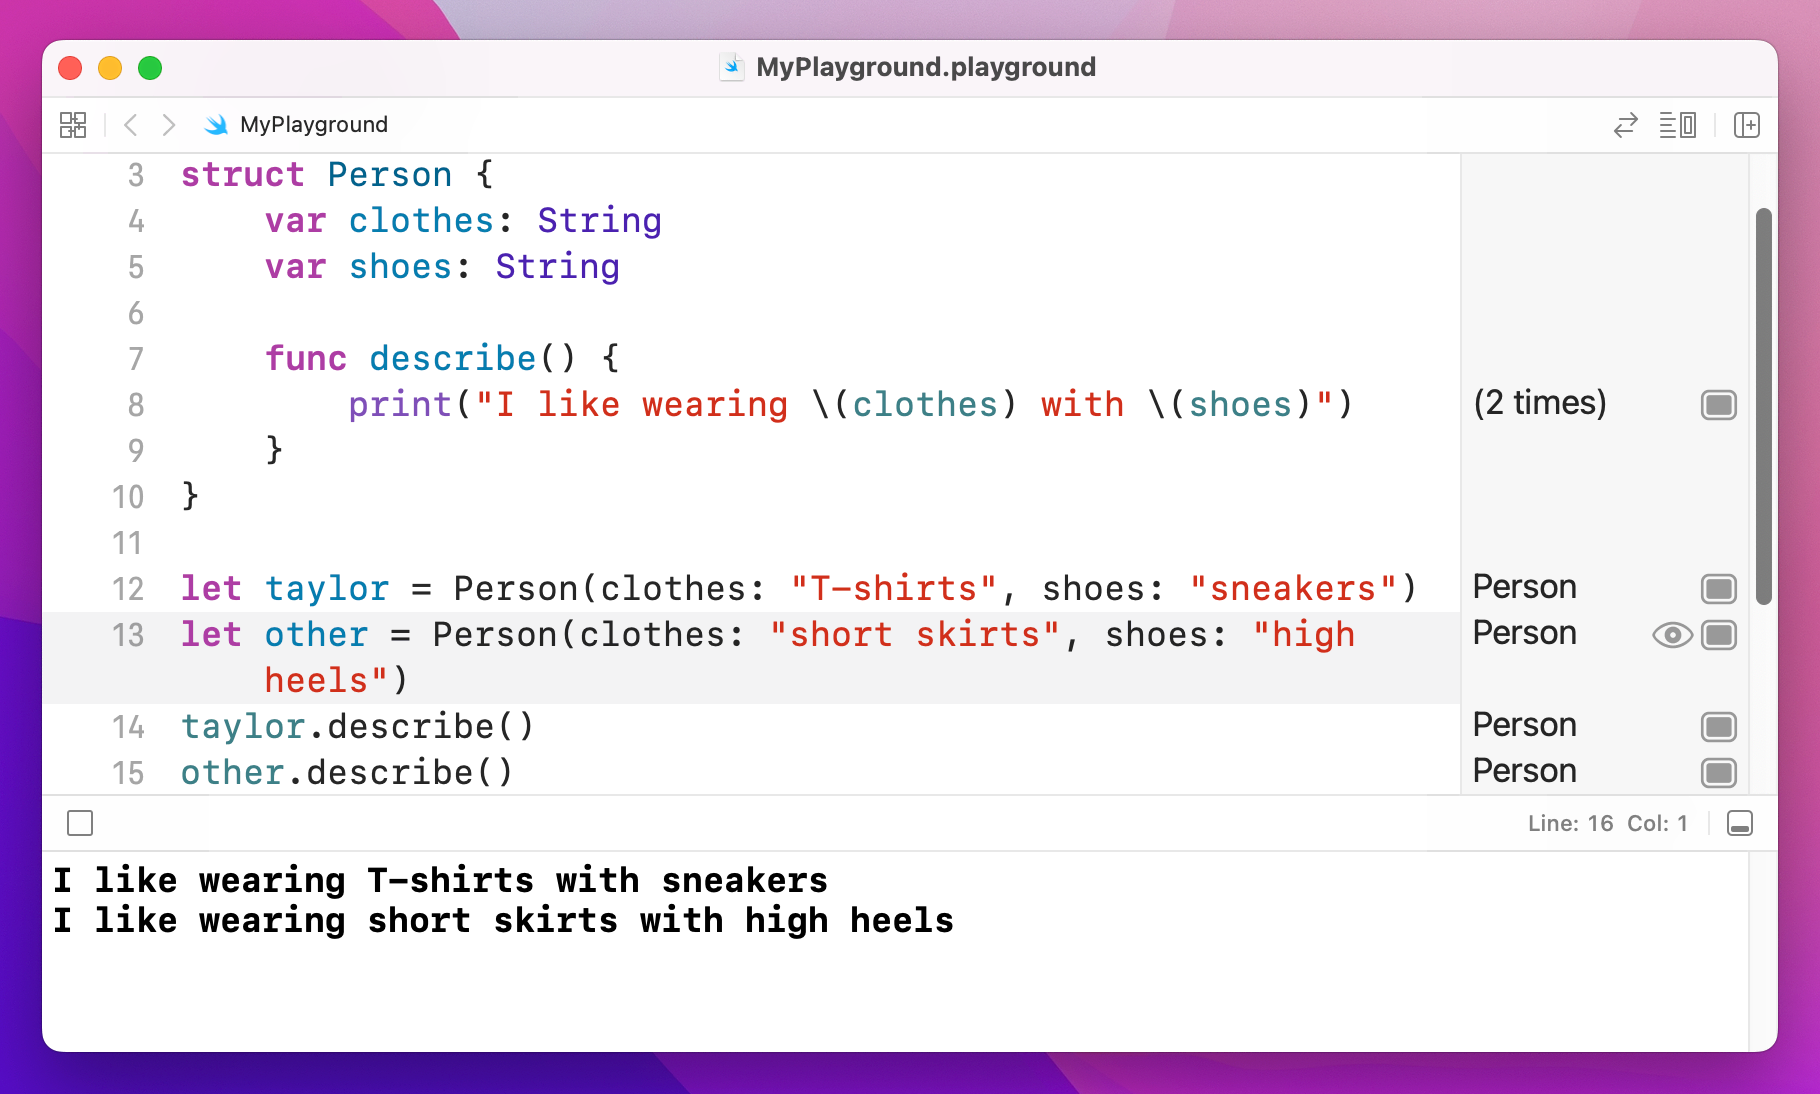
As you can see, when you use a property inside a method it will automatically use the value that belongs to the same object.
Swift lets you add code to be run when a property is about to be changed or has been changed. This is frequently a good way to have a user interface update when a value changes, for example.
There are two kinds of property observer: willSet and didSet, and they are called before or after a property is changed. In willSet Swift provides your code with a special value called newValue that contains what the new property value is going to be, and in didSet you are given oldValue to represent the previous value.
Let's attach two property observers to the clothes property of a Person struct:
struct Person {
    var clothes: String {
        willSet {
            updateUI(msg: "I'm changing from \(clothes) to \(newValue)")
        }

        didSet {
            updateUI(msg: "I just changed from \(oldValue) to \(clothes)")
        }
    }
}

func updateUI(msg: String) {
    print(msg)
}

var taylor = Person(clothes: "T-shirts")
taylor.clothes = "short skirts"
That will print out the messages "I'm changing from T-shirts to short skirts" and "I just changed from T-shirts to short skirts."
It's possible to make properties that are actually code behind the scenes. We already used the uppercased() method of strings, for example, but there’s also a property called capitalized that gets calculated as needed, rather than every string always storing a capitalized version of itself.
To make a computed property, place an open brace after your property then use either get or set to make an action happen at the appropriate time. For example, if we wanted to add a ageInDogYears property that automatically returned a person's age multiplied by seven, we'd do this:
struct Person {
    var age: Int

    var ageInDogYears: Int {
        get {
            return age * 7
        }
    }
}

var fan = Person(age: 25)
print(fan.ageInDogYears)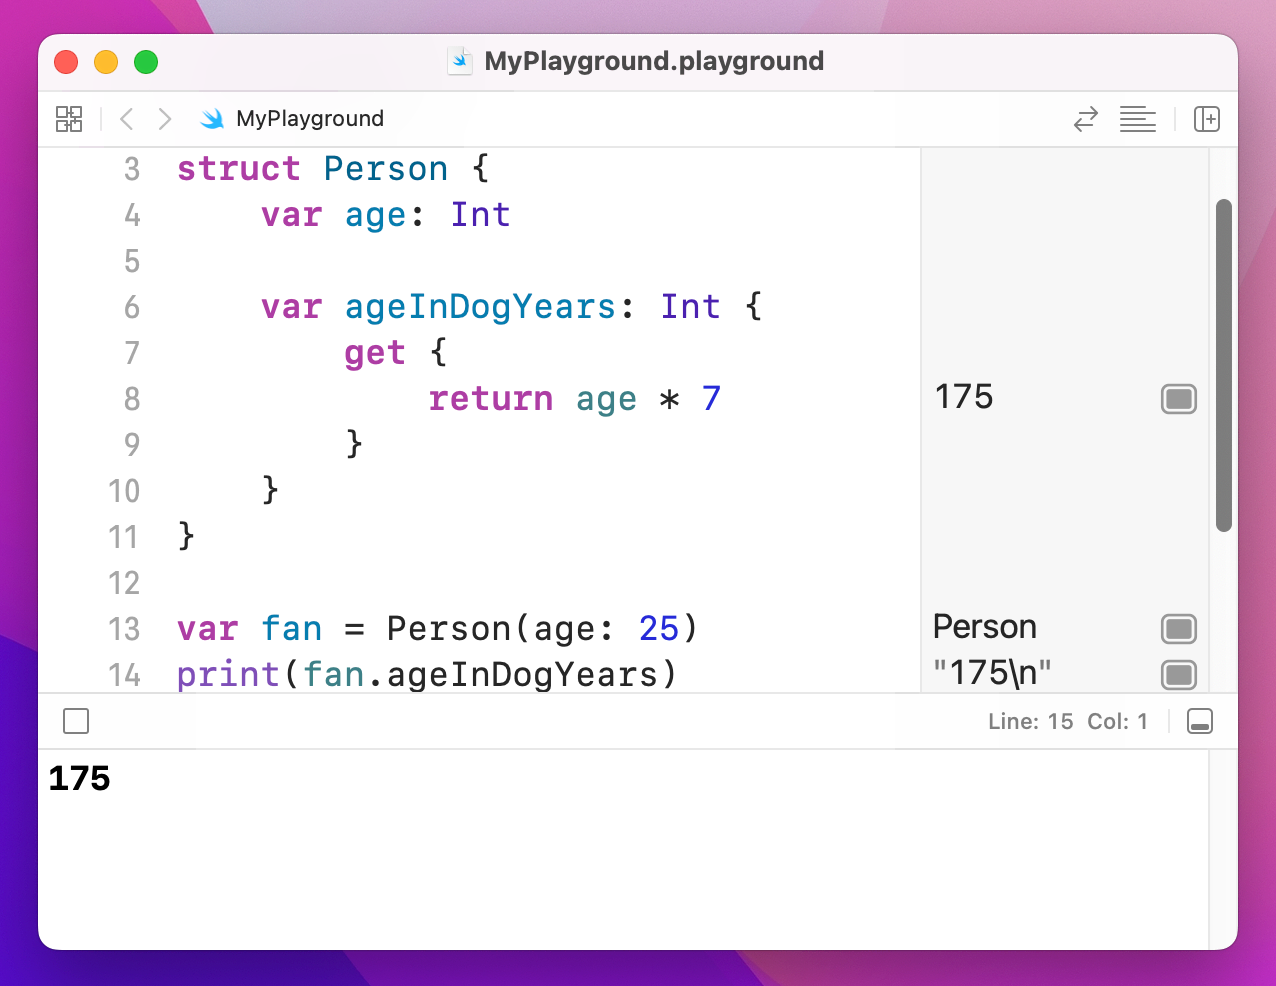
Note: If you intend to use them only for reading data you can just remove the get part entirely, like this:
var ageInDogYears: Int {
    return age * 7
}Swift lets you create properties and methods that belong to a type, rather than to instances of a type. This is helpful for organizing your data meaningfully by storing shared data.
Swift calls these shared properties “static properties”, and you create one just by using the static keyword. Once that's done, you access the property by using the full name of the type. Here's a simple example:
struct TaylorFan {
    static var favoriteSong = "Look What You Made Me Do"

    var name: String
    var age: Int
}

let fan = TaylorFan(name: "James", age: 25)
print(TaylorFan.favoriteSong)
So, a Taylor Swift fan has a name and age that belongs to them, but they all have the same favorite song.
Because static methods belong to the struct itself rather than to instances of that struct, you can't use it to access any non-static properties from the struct.
Access control lets you specify what data inside structs and classes should be exposed to the outside world, and you get to choose four modifiers:
Most of the time you don't need to specify access control, but sometimes you'll want to explicitly set a property to be private because it stops others from accessing it directly. This is useful because your own methods can work with that property, but others can't, thus forcing them to go through your code to perform certain actions.
To declare a property private, just do this:
class TaylorFan {
    private var name: String?
}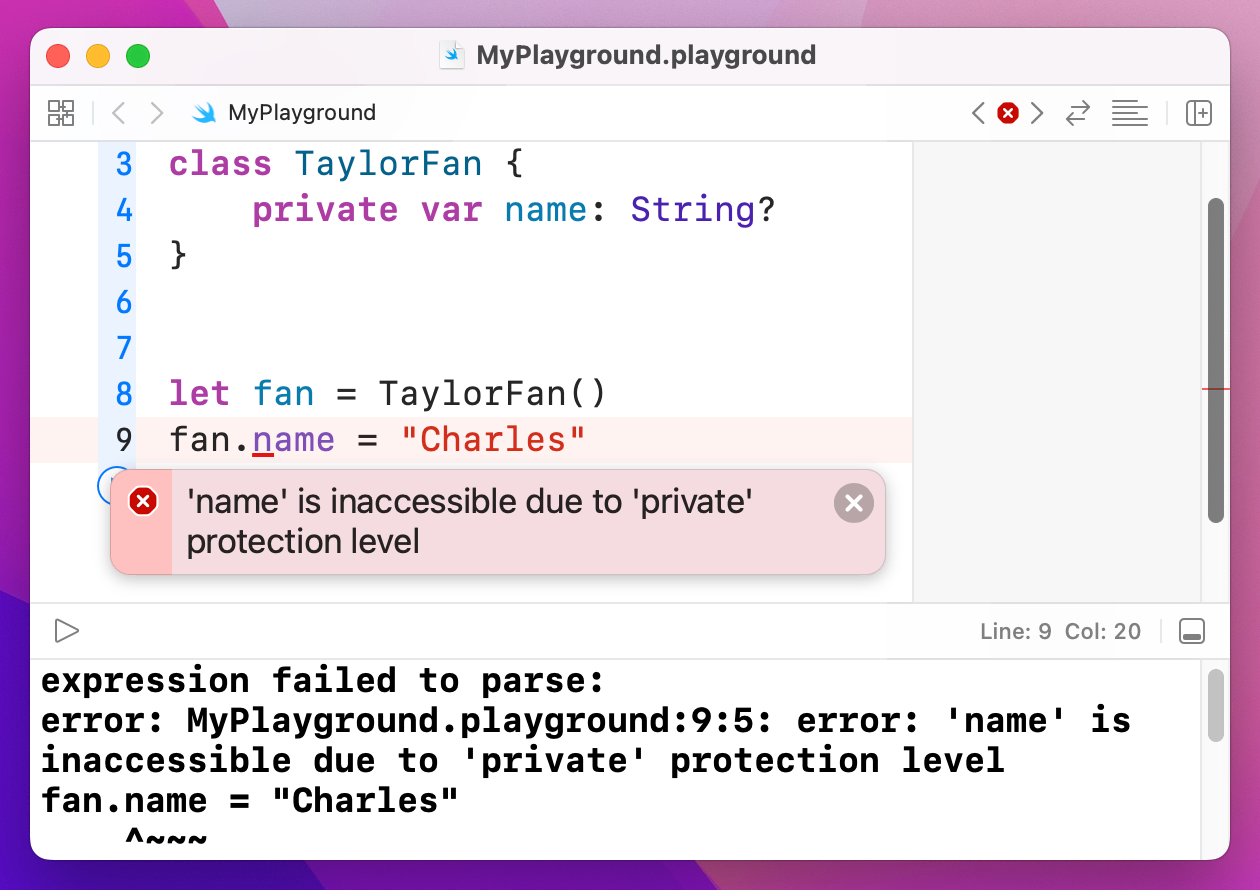
If you want to use “file private” access control, just write it as one word like so: fileprivate.
Because classes can inherit from each other (e.g. CountrySinger can inherit from Singer) it means one class is effectively a superset of another: class B has all the things A has, with a few extras. This in turn means that you can treat B as type B or as type A, depending on your needs.
Confused? Let's try some code:
class Album {
    var name: String

    init(name: String) {
        self.name = name
    }
}

class StudioAlbum: Album {
    var studio: String

    init(name: String, studio: String) {
        self.studio = studio
        super.init(name: name)
    }
}

class LiveAlbum: Album {
    var location: String

    init(name: String, location: String) {
        self.location = location
        super.init(name: name)
    }
}
That defines three classes: albums, studio albums and live albums, with the latter two both inheriting from Album. Because any instance of LiveAlbum is inherited from Album it can be treated just as either Album or LiveAlbum – it's both at the same time. This is called "polymorphism," but it means you can write code like this:
var taylorSwift = StudioAlbum(name: "Taylor Swift", studio: "The Castles Studios")
var fearless = StudioAlbum(name: "Speak Now", studio: "Aimeeland Studio")
var iTunesLive = LiveAlbum(name: "iTunes Live from SoHo", location: "New York")

var allAlbums: [Album] = [taylorSwift, fearless, iTunesLive]
There we create an array that holds only albums, but put inside it two studio albums and a live album. This is perfectly fine in Swift because they are all descended from the Album class, so they share the same basic behavior.
We can push this a step further to really demonstrate how polymorphism works. Let's add a getPerformance() method to all three classes:
class Album {
    var name: String

    init(name: String) {
        self.name = name
    }

    func getPerformance() -> String {
        return "The album \(name) sold lots"
    }
}

class StudioAlbum: Album {
    var studio: String

    init(name: String, studio: String) {
        self.studio = studio
        super.init(name: name)
    }

    override func getPerformance() -> String {
        return "The studio album \(name) sold lots"
    }
}

class LiveAlbum: Album {
    var location: String

    init(name: String, location: String) {
        self.location = location
        super.init(name: name)
    }

    override func getPerformance() -> String {
        return "The live album \(name) sold lots"
    }
}
The getPerformance() method exists in the Album class, but both child classes override it. When we create an array that holds Albums, we're actually filling it with subclasses of albums: LiveAlbum and StudioAlbum. They go into the array just fine because they inherit from the Album class, but they never lose their original class. So, we could write code like this:
var taylorSwift = StudioAlbum(name: "Taylor Swift", studio: "The Castles Studios")
var fearless = StudioAlbum(name: "Speak Now", studio: "Aimeeland Studio")
var iTunesLive = LiveAlbum(name: "iTunes Live from SoHo", location: "New York")

var allAlbums: [Album] = [taylorSwift, fearless, iTunesLive]

for album in allAlbums {
    print(album.getPerformance())
}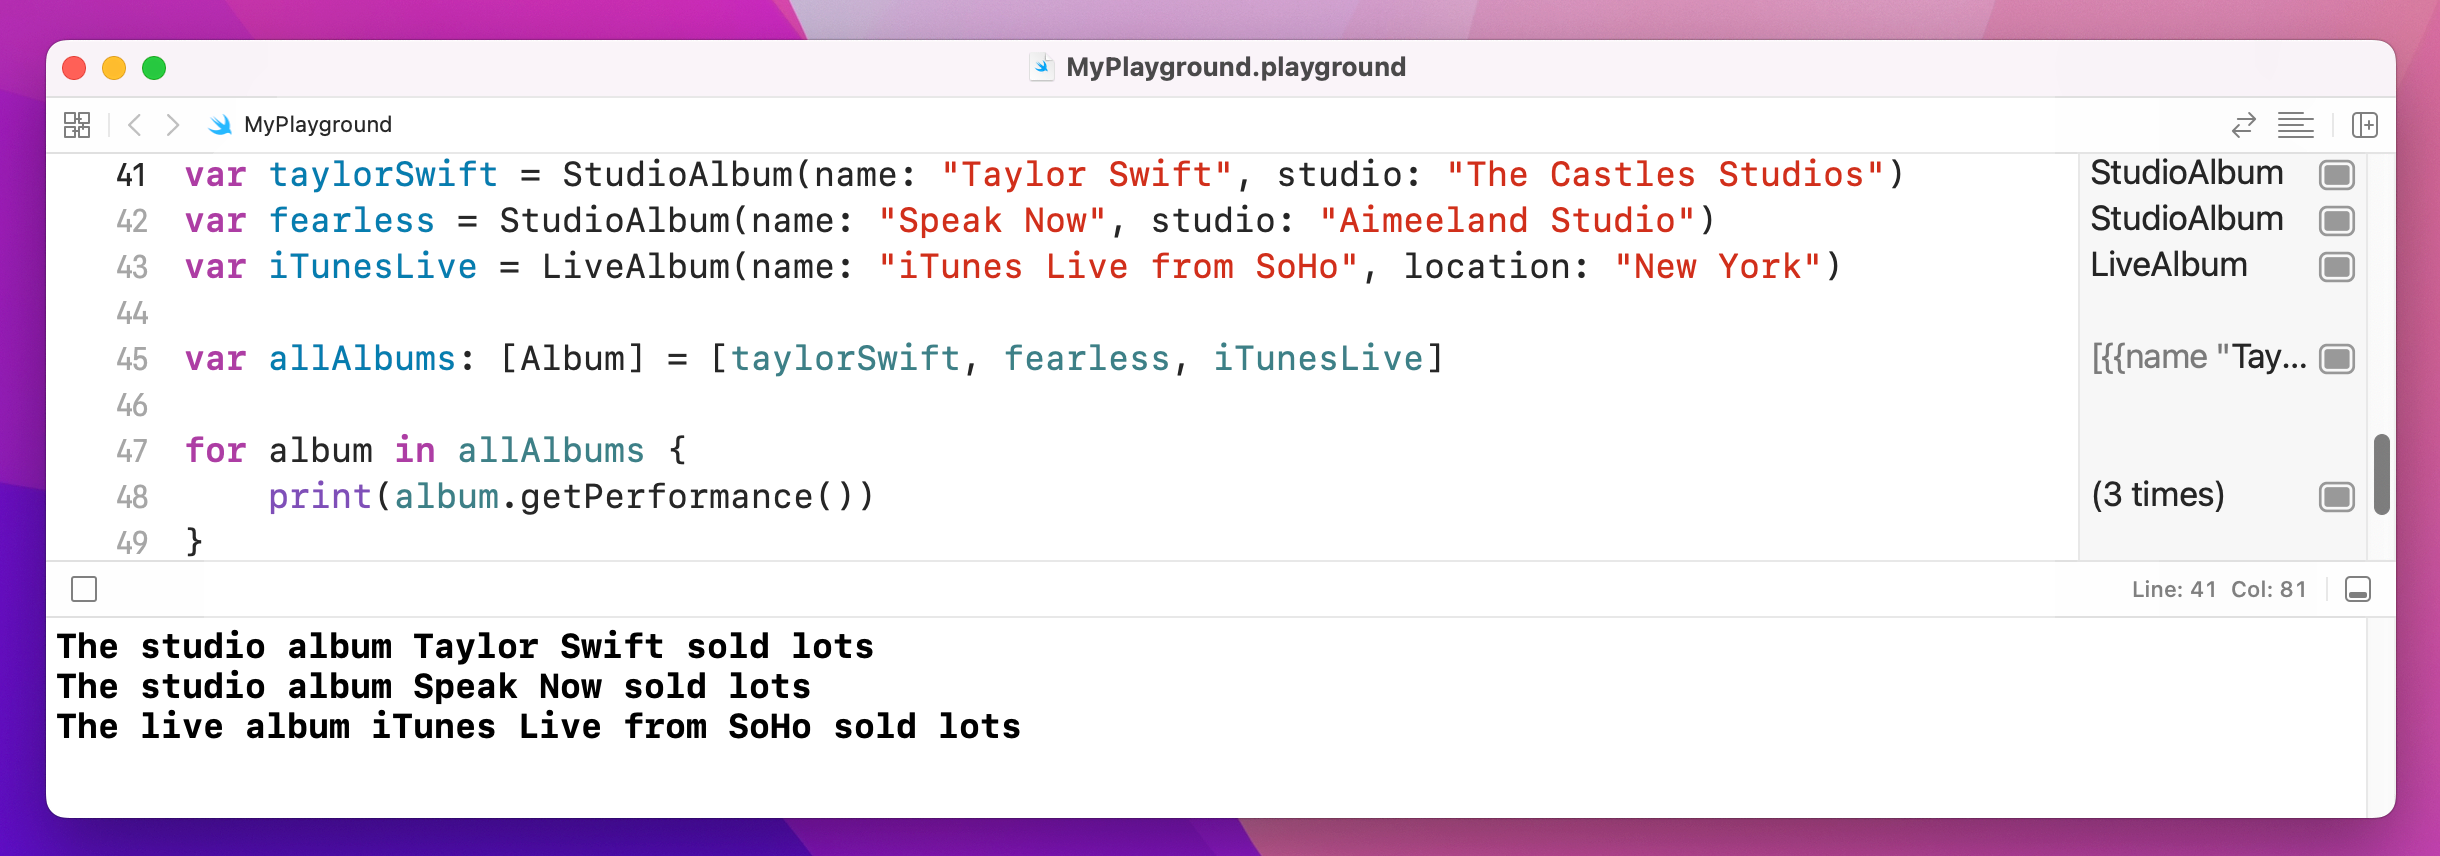
That will automatically use the override version of getPerformance() depending on the subclass in question. That's polymorphism in action: an object can work as its class and its parent classes, all at the same time.
You will often find you have an object of a certain type, but really you know it's a different type. Sadly, if Swift doesn't know what you know, it won't build your code. So, there's a solution, and it's called typecasting: converting an object of one type to another.
Chances are you're struggling to think why this might be necessary, but I can give you a very simple example:
for album in allAlbums {
    print(album.getPerformance())
}
That was our loop from a few minutes ago. The allAlbums array holds the type Album, but we know that really it's holding one of the subclasses: StudioAlbum or LiveAlbum. Swift doesn't know that, so if you try to write something like print(album.studio) it will refuse to build because only StudioAlbum objects have that property.
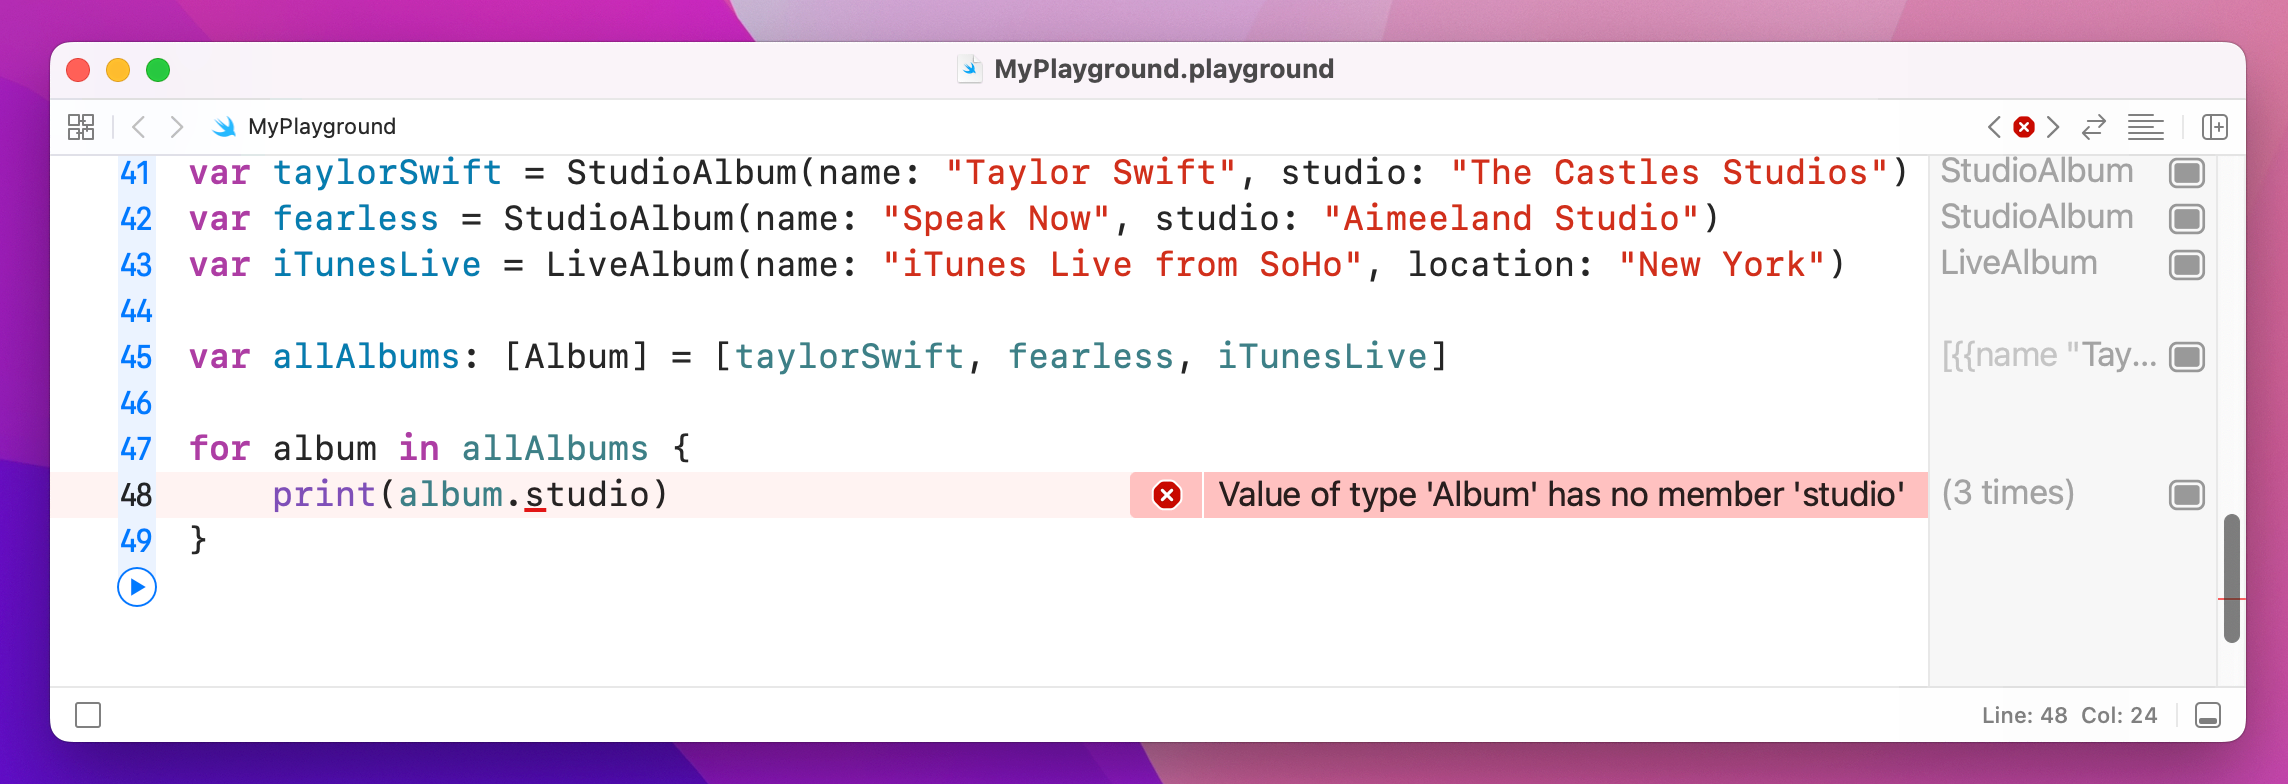
Typecasting in Swift comes in three forms, but most of the time you'll only meet two: as? and as!, known as optional downcasting and forced downcasting. The former means "I think this conversion might be true, but it might fail," and the second means "I know this conversion is true, and I'm happy for my app to crash if I'm wrong."
Note: when I say "conversion" I don't mean that the object literally gets transformed. Instead, it's just converting how Swift treats the object – you're telling Swift that an object it thought was type A is actually type E.
The question and exclamation marks should give you a hint of what's going on, because this is very similar to optional territory. For example, if you write this:
for album in allAlbums {
    let studioAlbum = album as? StudioAlbum
}
Swift will make studioAlbum have the data type StudioAlbum?. That is, an optional studio album: the conversion might have worked, in which case you have a studio album you can work with, or it might have failed, in which case you have nil.
This is most commonly used with if let to automatically unwrap the optional result, like this:
for album in allAlbums {
    print(album.getPerformance())

    if let studioAlbum = album as? StudioAlbum {
        print(studioAlbum.studio)
    } else if let liveAlbum = album as? LiveAlbum {
        print(liveAlbum.location)
    }
}
That will go through every album and print its performance details, because that's common to the Album class and all its subclasses. It then checks whether it can convert the album value into a StudioAlbum, and if it can it prints out the studio name. The same thing is done for the LiveAlbum in the array.
Forced downcasting is when you're really sure an object of one type can be treated like a different type, but if you're wrong your program will just crash. Forced downcasting doesn't need to return an optional value, because you're saying the conversion is definitely going to work – if you're wrong, it means you wrote your code wrong.
To demonstrate this in a non-crashy way, let's strip out the live album so that we just have studio albums in the array:
var taylorSwift = StudioAlbum(name: "Taylor Swift", studio: "The Castles Studios")
var fearless = StudioAlbum(name: "Speak Now", studio: "Aimeeland Studio")

var allAlbums: [Album] = [taylorSwift, fearless]

for album in allAlbums {
    let studioAlbum = album as! StudioAlbum
    print(studioAlbum.studio)
}
That's obviously a contrived example, because if that really were your code you would just change allAlbums so that it had the data type [StudioAlbum]. Still, it shows how forced downcasting works, and the example won't crash because it makes the correct assumptions.
Swift lets you downcast as part of the array loop, which in this case would be more efficient. If you wanted to write that forced downcast at the array level, you would write this:
for album in allAlbums as! [StudioAlbum] {
    print(album.studio)
}
That no longer needs to downcast every item inside the loop, because it happens when the loop begins. Again, you had better be correct that all items in the array are StudioAlbums, otherwise your code will crash.
Swift also allows optional downcasting at the array level, although it's a bit more tricksy because you need to use the nil coalescing operator to ensure there's always a value for the loop. Here's an example:
for album in allAlbums as? [LiveAlbum] ?? [LiveAlbum]() {
    print(album.location)
}
What that means is, “try to convert allAlbums to be an array of LiveAlbum objects, but if that fails just create an empty array of live albums and use that instead” – i.e., do nothing.
Typecasting is useful when you know something that Swift doesn’t, for example when you have an object of type A that Swift thinks is actually type B. However, typecasting is useful only when those types really are what you say – you can’t force a type A into a type Z if they aren’t actually related.
For example, if you have an integer called number, you couldn’t write code like this to make it a string:
let number = 5
let text = number as! String
That is, you can’t force an integer into a string, because they are two completely different types. Instead, you need to create a new string by feeding it the integer, and Swift knows how to convert the two. The difference is subtle: this is a new value, rather than just a re-interpretation of the same value.
So, that code should be rewritten like this:
let number = 5
let text = String(number)
print(text)
This only works for some of Swift’s built-in data types: you can convert integers and floats to strings and back again, for example, but if you created two custom structs Swift can’t magically convert one to the other – you need to write that code yourself.
You've met integers, strings, doubles, floats, Booleans, arrays, dictionaries, structs and classes so far, but there's another type of data that is used extensively in Swift, and it's called a closure. These are complicated, but they are so powerful and expressive that they are used pervasively in Swift, so you won't get very far without understanding them.
A closure can be thought of as a variable that holds code. So, where an integer holds "0" or "500", a closure holds lines of Swift code. Closures also capture the environment where they are created, which means they take a copy of the values that are used inside them.
You never need to design your own closures so don't be afraid if you find the following quite complicated. However, Apple’s frameworks will often ask you to write closures to match their needs, so you at least need to know how they work.
Here’s an example from SwiftUI:
let message = "Button pressed"

Button("Press Me", action: {
    print(message)
})
Button is one of the many user interface controls we have in SwiftUI, and provides something that user can press on to execute some sort of action.
In this code, creating a button takes two parameters: some text to show as the button’s title, and a closure containing the code to be executed when the button is pressed. I've specified “Press Me” for the first parameter, and for the second I've made the system print a message string.
This method needs to use a closure because SwiftUI won’t run the code until the button is pressed – it will stash the action code away for later on, then call it only when needed. This wouldn't be possible if we just ran our code directly.
The above code also shows how closures capture their environment: I intentionally declared the message constant outside of the closure, then used it inside. Swift detects this, and makes that data available inside the closure too.
Swift's system of automatically capturing a closure's environment is very helpful, but can occasionally trip you up: if object A stores a closure as a property, and that property also references object A, you have something called a retain cycle and you'll have unhappy users. This is a substantially more advanced topic than you need to know right now, so don't worry too much about it just yet.
As closures are used so frequently, Swift can apply a little syntactic sugar to make your code easier to read. The rule is this: if the last parameters to a method are closures, you can eliminate those parameters and instead provide them as a block of code inside braces. For example, we could convert the previous code to this:
let message = "Button pressed"

Button("Press Me") {
    print(message)
}
It does make your code shorter and easier to read, so this syntax form – known as trailing closure syntax – is preferred.
A function can have multiple trailing closures if needed, and this is particularly common in SwiftUI. For example, one way to create a button is to provide code to run when it’s pressed as the first closure, then something custom to show inside the button on the screen, like this:
Button {
    print("The button was pressed")
} label: {
    Image("press-me")
}
That uses an image rather than a simple piece of text, but it could be any kind of SwiftUI user interface control.
Protocols are effectively contracts in Swift: they define a set of methods and properties that a type must implement if it says it conforms to the protocol. This contract gives us the flexibility to use different types to solve the same problem – we don’t get whether a ThingA or a ThingB is being used, as long as they both conform to the Thing protocol.
As an example, an Employee protocol might look like this:
protocol Employee {
    var name: String { get set }
    var jobTitle: String { get set }
    func doWork()
}
There are three important things in there.
First, both the properties have { get set } after them. This means that conforming types must make them both gettable (readable) and settable (writeable), which in turn means if a type says it is compatible with the Employee protocol it must make those two properties variables rather than constants.
Second, doWork() has no code inside it. Protocols are contracts defining how something ought to be able to behave, and don’t provide implementations of those behaviors.
Third, that protocol isn’t a concrete type, which means we can’t create instances of it. But we can create classes and structs that conform to it, like this:
struct Executive: Employee {
    var name = "Steve Jobs"
    var jobTitle = "CEO"

    func doWork() {
        print("I'm strategizing!")
    }
}

struct Manager: Employee {
    var name = "Maurice Moss"
    var jobTitle = "Head of IT"

    func doWork() {
        print("I'm turning it off and on again.")
    }
}
Now that we have a protocol and two types that conform to it, we can try using it:
let staff: [any Employee] = [Executive(), Manager()]

for person in staff {
    person.doWork()
}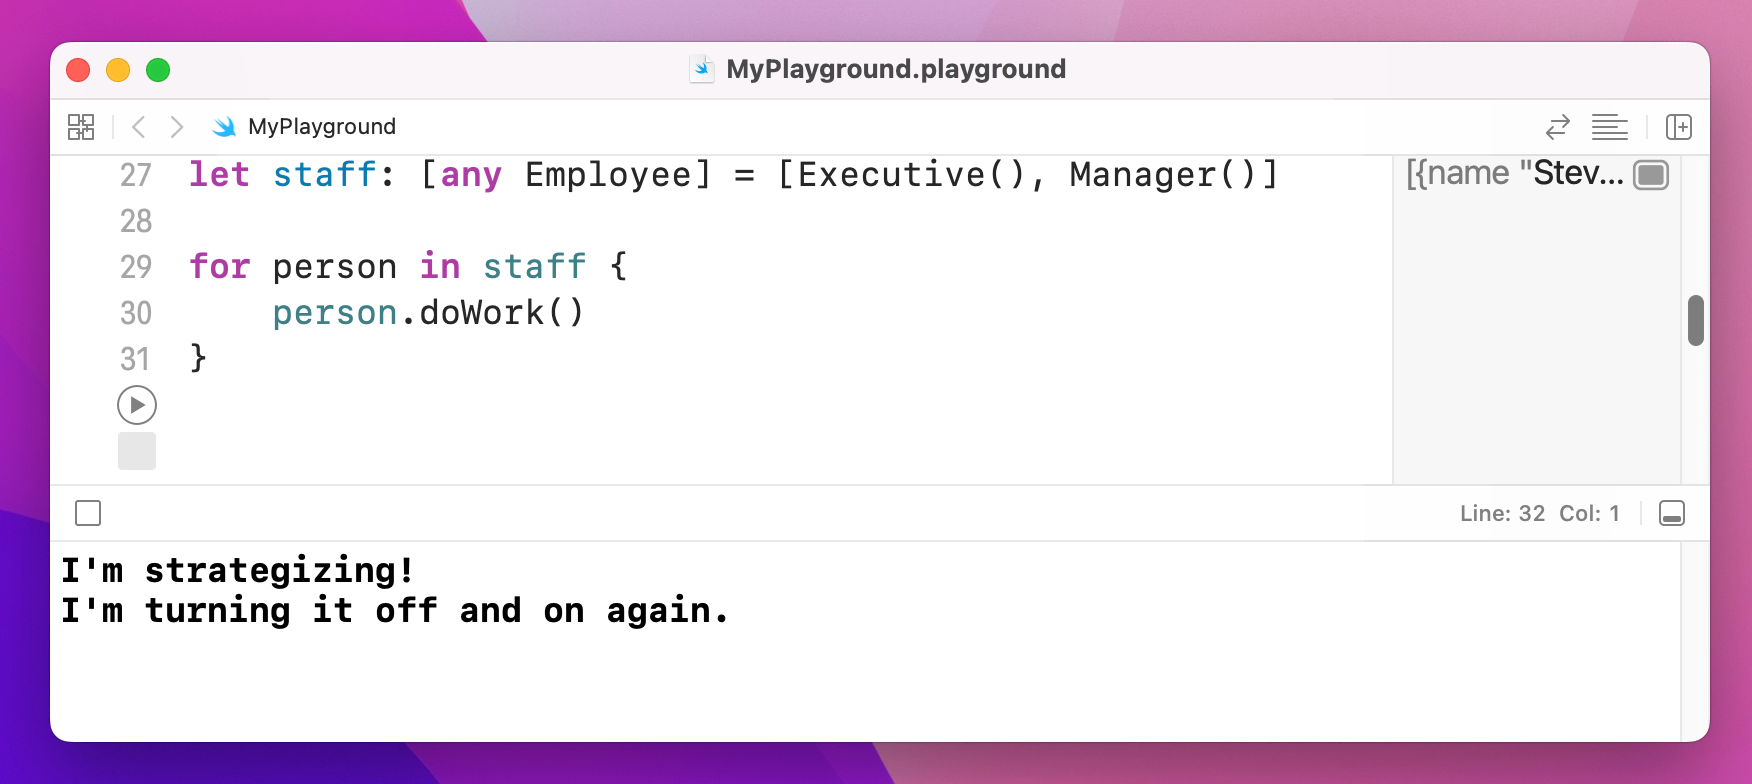
Because both types conform to Employee – they implement the properties and methods of that protocol – we can create an employee array and use the objects inside that array without knowing what their actual type is.
Notice how we use [any Employee] rather than just [Employee] – this is Swift’s way of making it clear in our code that the actual data types inside the array could be anything at all, as long as it conforms to the Employee protocol.
Extensions let us modify Swift’s data types to add new functionality, and so on in a really clean way – our new code is indistinguishable from existing code.
Let's start with an extension that adds one to an integer. Yes, I realize this is essentially just += 1, but we're starting simple. First, add this integer:
var myInt = 0Now add this to the playground, just beneath the import UIKit statement:
extension Int {
    func plusOne() -> Int {
        return self + 1
    }
}
Tip: As that method contains only a single line of code that must return a value, you can remove the return keyword entirely.
extension Int tells Swift that we want to add functionality to its Int struct. We could have used String, Array, or whatever instead, but Int is a nice easy one to start.
How the extension works will become clear once you use it. Put this line just below the end of the extension:
myInt.plusOne()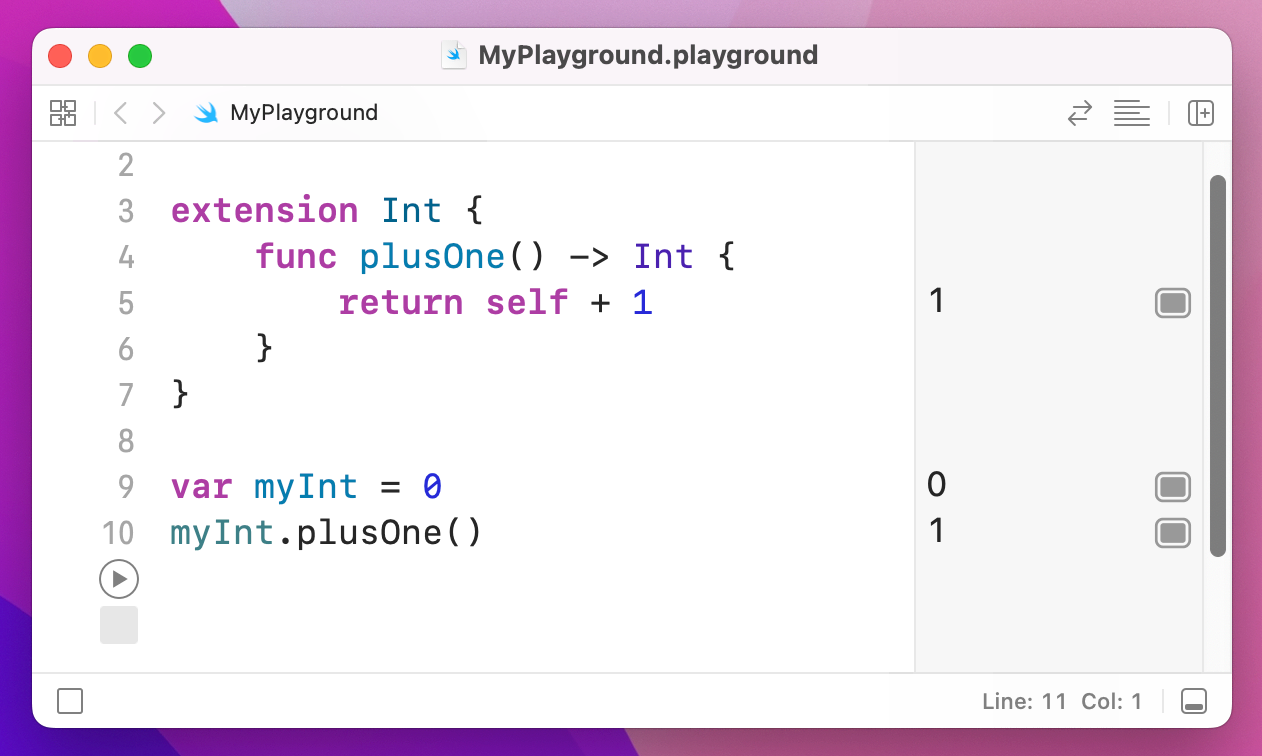
In the playground output you'll now see 0 for the first line and 1 for the second, so calling plusOne() has returned a number one higher than the number we called it on.
The extension has been added to all integers, so you can even call it like this:
5.plusOne()When you do that, you'll see 6 in the output column.
Our extension adds 1 to its input number and returns it to the caller, but doesn't modify the original value. Try typing this:
var myInt = 10
myInt.plusOne()
myInt
Using a variable by itself tells the playground just to output its value, so in the output column you'll see 10, then 11, then 10 again. This is the original value, the return from the plusOne() method, and the original, unchanged value.
To push things a little further, let's modify the plusOne() method so that it doesn't return anything, instead modifying the instance itself – i.e., the input integer.
To make that happen, you might think we need to do something like this:
extension Int {
    func plusOne() {
        self += 1
    }
}
That removes the return value because we aren't returning anything now, and it uses the += operator to add one to self. But this won't work, and in fact Xcode will give you a wonderfully indecipherable error message: "Left side of mutating operator isn't mutable: 'self' is immutable"
What Xcode really means is that it Swift doesn't let you modify self inside an extension by default. The reason is that we could call plusOne() using 5.plusOne(), and clearly you can't modify the number 5 to mean something else.
So, Swift forces you to declare the method mutating, meaning that it will change its input. Change your extension to this:
extension Int {
    mutating func plusOne() {
        self += 1
    }
}
…and now the error message will go away. Once you have declared a method as being mutating, Swift knows it will change values so it won't let you use it with constants. For example:
var myInt = 10
myInt.plusOne()

let otherInt = 10
otherInt.plusOne()
The first integer will be modified correctly, but the second will fail because Swift won't let you modify constants.
It's extremely common for developers to use extensions to add functionality to things. In some ways, extensions are similar to subclasses, so why use extensions at all?
The main reason is extensibility: extensions work across all data types, and they don't conflict when you have more than one. That is, we could make a Dog subclass that adds bark(), but what if we find some open source code that contains a doTricks() method? We would have to copy and paste it in to our subclass, or perhaps even subclass again.
With extensions you can have ten different pieces of functionality in ten different files – they can all modify the same type directly, and you don't need to subclass anything. A common naming scheme for naming your extension files is Type+Modifier.swift, for example String+RandomLetter.swift.
If you find yourself trimming whitespace off strings frequently, you'll probably get tired of using this monstrosity:
str = str.trimmingCharacters(in: .whitespacesAndNewlines)…so why not just make an extension like this:
extension String {
    mutating func trim() {
        self = trimmingCharacters(in: .whitespacesAndNewlines)
    }
}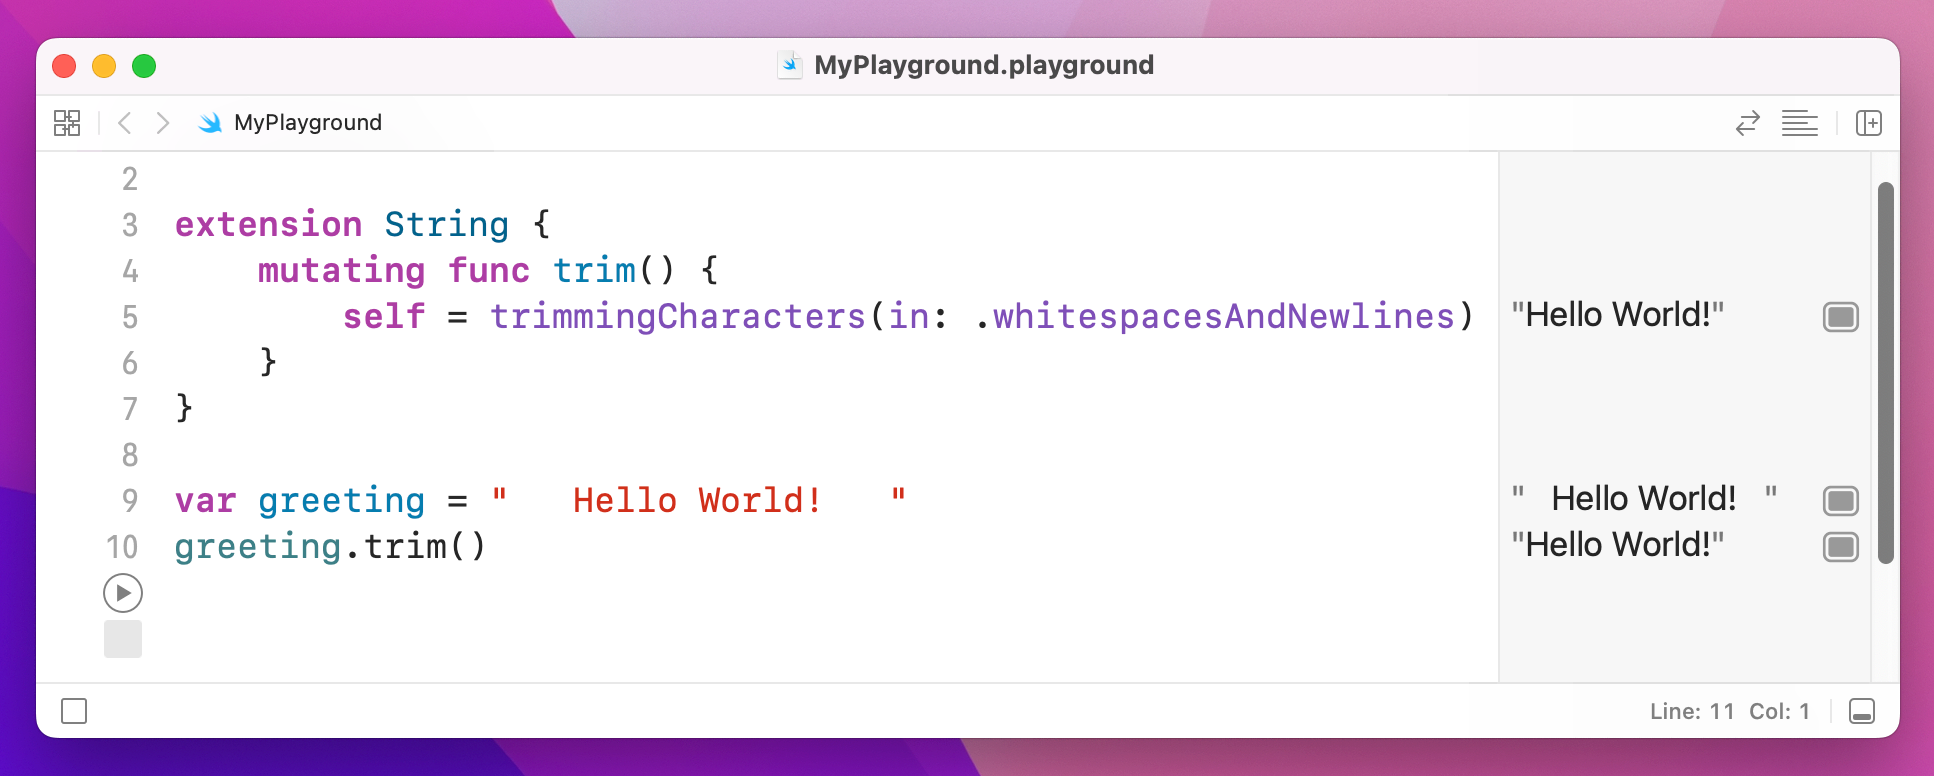
You can extend as much as you want, although it's good practice to keep differing functionality separated into individual files.
One of Swift’s most powerful features is its ability to extend whole swathes of data types at the same time. These are known as protocol extensions, and they are commonly used to build flexibility into large apps.
You’ve already seen how protocols let us define contracts that conforming types must adopt. Well, protocol extensions let us define implementations of things inside the protocol, adding the functionality to all types that conform to the protocol in a single place.
To demonstrate how this works, let’s look at another simple extension for the Int data type: we’re going to add a clamp() method that makes sure one number falls within the lower and upper bounds that are specified:
extension Int {
    func clamp(low: Int, high: Int) -> Int {
        if self > high {
            // if we are higher than the upper bound, return the upper bound
            return high
        } else if self < low {
            // if we are lower than the lower bound, return the lower bound
            return low
        }

        // we are inside the range, so return our value
        return self
    }
}

let i: Int = 8
print(i.clamp(low: 0, high: 5))
Because 8 is higher than the upper bound of 5, that will print 5.
I explicitly made i an Int for a reason: there are other kinds of integers available in Swift. For example, UInt is an unsigned integer, which means it sacrifices the ability to hold negative numbers in exchange for the ability to hold much larger positive numbers.
There are also integers of different sizes, e.g. Int8 holds an integer made up of 8 binary digits, which holds a maximum value of 127, and UInt64 is the largest type of integer and holds up to 18,446,744,073,709,551,615 – that’s 18 quintillion four hundred and forty-six quadrillion in case you were wondering.
Our extension modifies the Int data type specifically, rather than all variations of integers, which means code like this won’t work because UInt64 doesn’t have the extension:
let j: UInt64 = 8
print(j.clamp(low: 0, high: 5))
Swift’s solution is to let us create protocol extensions: extensions that modify several data types at once.
You’ve already seen how the self keyword lets us refer to our current value, so self * self means “multiply my current number by itself.” Well, there’s also Self with a capital S, which has a subtly different meaning: it means “my current data type.” So, self means “my current value” and Self means “my current data type.”
This matters when it comes to extending protocols because of the way our clamp() method is declared. Take a look again:
func clamp(low: Int, high: Int) -> Int {
    if self > high {
        return high
    } else if self < low {
        return low
    }

    return self
}
If we want clamp() to apply to all types of integer, we can’t very well make it return Int - that’s not big enough to hold the full range of a UInt64, so Swift will refuse to build. Instead, we need to make the method return Self, which means “I’ll return whatever data type I was used with.”
Here’s the rewritten extension:
extension BinaryInteger {
    func clamp(low: Self, high: Self) -> Self {
        if self > high {
            return high
        } else if self < low {
            return low
        }

        return self
    }
}
This time I’ve made it apply to BinaryInteger, which is a protocol that all of Swift’s integer types conform to. This means all integer types get access to the clamp() method, and work as expected – we don’t need to extend them all individually.
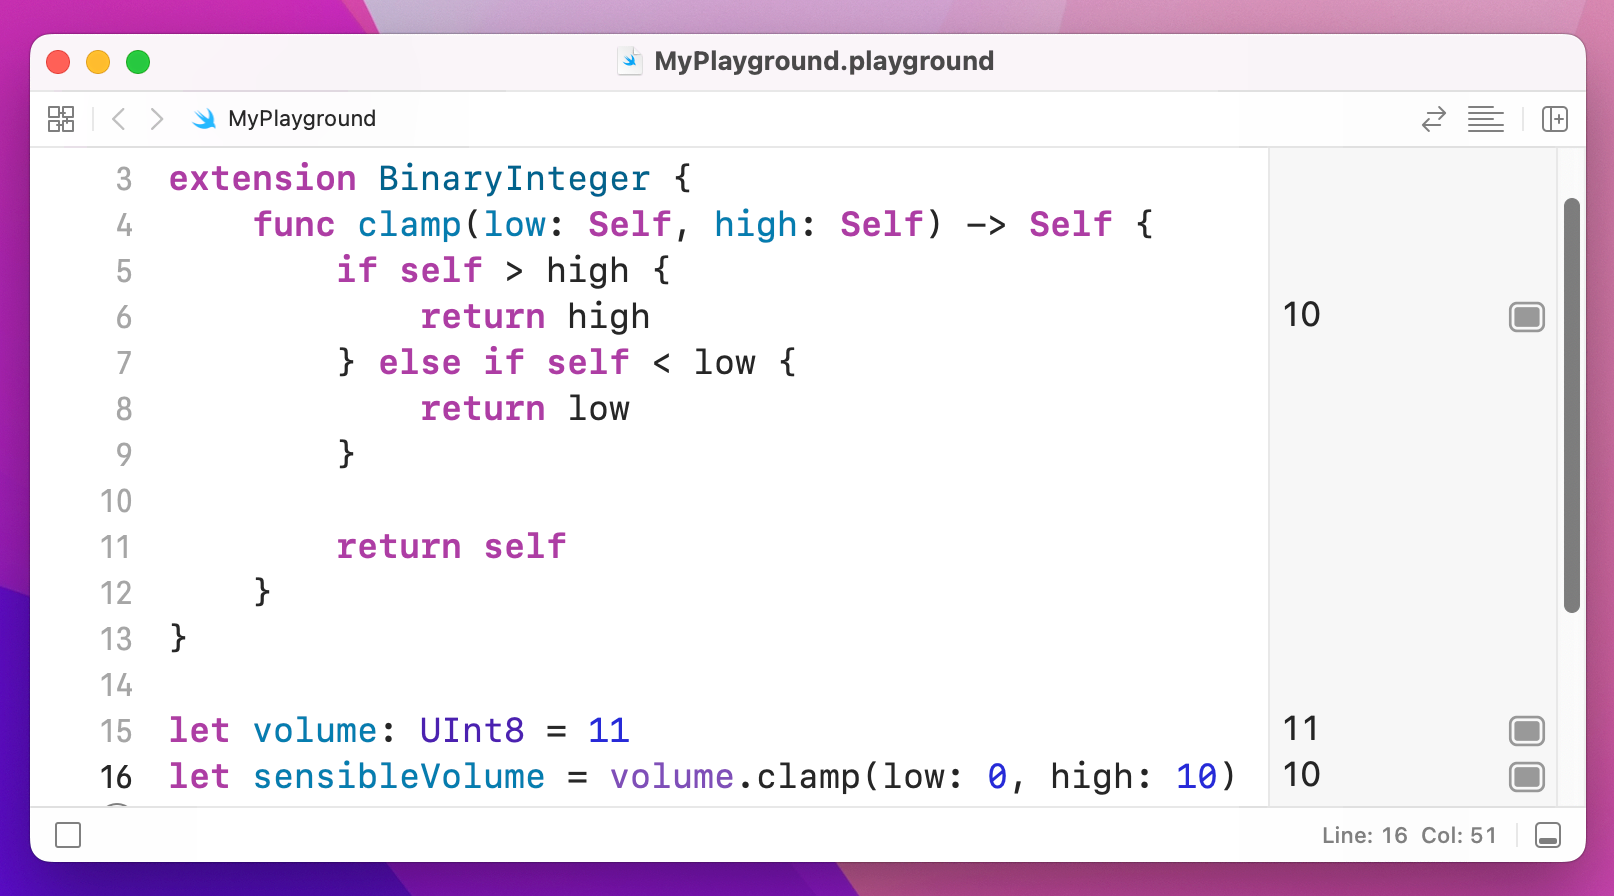
Protocol extensions are helpful for providing default method implementations so that conforming types don’t need to implement those methods themselves unless they specifically want to.
As an example, we might define an extension for our Employee protocol so that all conforming types automatically get a doWork() method:
protocol Employee {
    var name: String { get set }
    var jobTitle: String { get set }
    func doWork()
}

extension Employee {
    func doWork() {
        print("I'm busy!")
    }
}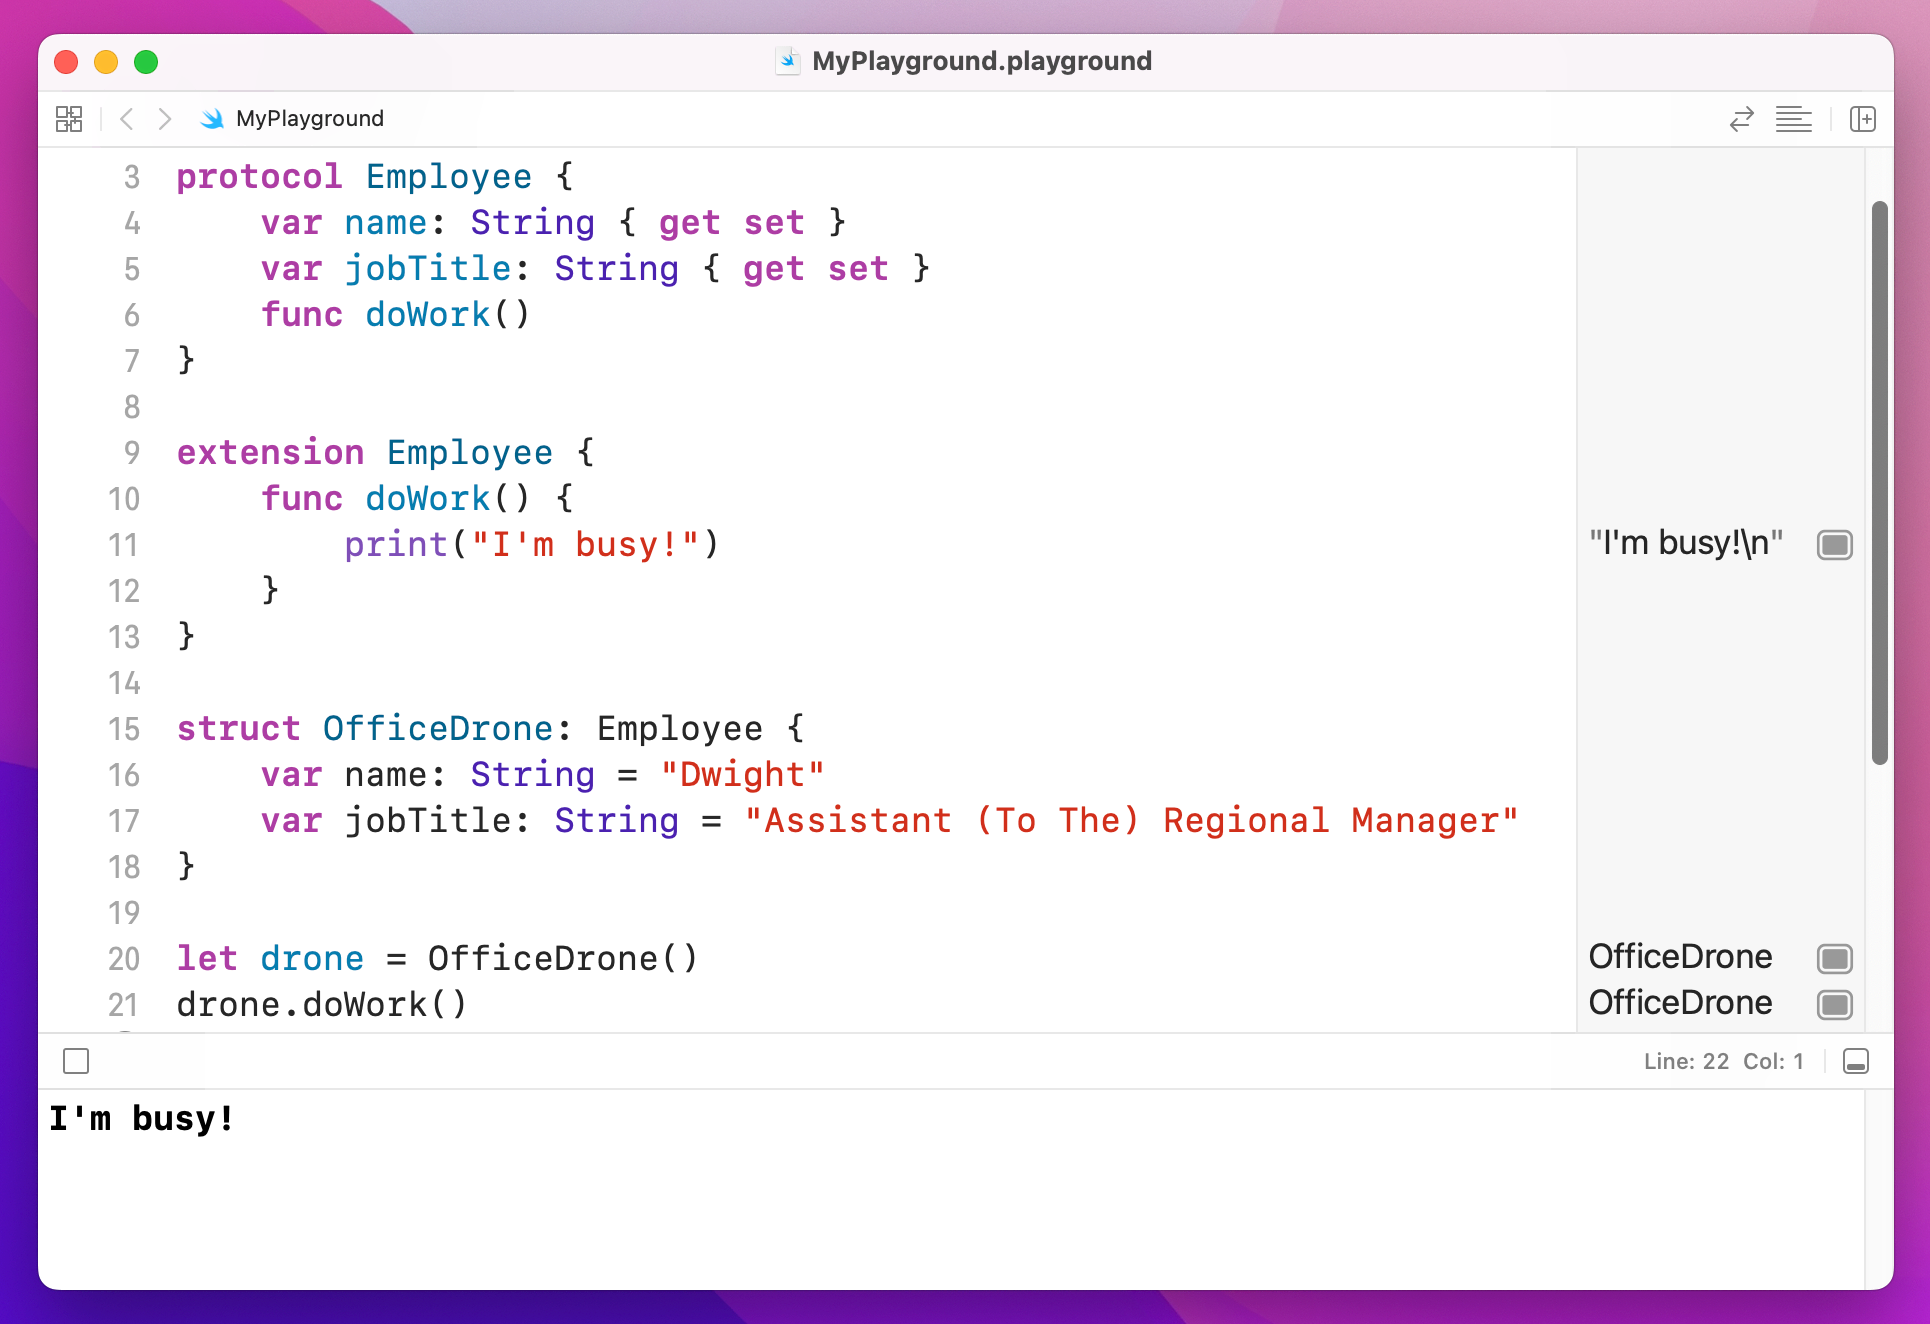
That's the end of our tour around the Swift programming language. I haven't tried to cover everything in the language, but that's okay because you have all the important stuff, all the sometimes-important stuff, and all the nice-to-know stuff – the many other features you'll either come across in a later project or through extended experience with the language.
From here on, we’re going to focus primarily on building apps. If you want to learn more about the Swift language itself, you might want to consider my Pro Swift book.
Copyright © 2023 Paul Hudson, hackingwithswift.com.
You should follow me on Twitter.